> ## Documentation Index
> Fetch the complete documentation index at: https://docs.cassidyai.com/llms.txt
> Use this file to discover all available pages before exploring further.
# MCP servers
> Connect custom MCP servers to Cassidy so your Agents can access external systems through standardized tool interfaces.
MCP (Model Context Protocol) Servers let your organization connect custom external systems to Cassidy. Once an admin configures an MCP server, it can be added to any [Agent](/agents/overview) as a [Connector](/agents/connectors/overview), giving it the ability to perform actions defined by the server's tools directly through chat conversations.
A Connector gives your Agent the ability to take a specific action in an external system through an MCP server. Each tool exposed by the MCP server is a separate permission that you control individually. When someone asks your Agent a question that requires data from a connected MCP server, the Agent uses these tools to query the server in real time. Data is not copied or stored in Cassidy.
**Enterprise MCP.** Cassidy's MCP implementation is admin-controlled so your security team stays in the loop. Only admins can register servers, access is scoped per user or group, every tool has its own permission level (always allowed, requires approval, or disabled), and all tool calls are logged in the Agent's activity history.
For best results with complex MCP server tools, use a powerful,
reasoning-capable model. Cassidy supports models from OpenAI, Anthropic, and
Google — see [Choose the right AI model](/guides/choose-ai-model) for current
recommendations.
## Set up an MCP server (admin only)
MCP servers can only be configured by organization admins. Once configured,
they can be added to any Agent, assuming the user has permission to access
that MCP server.
Click on your name in the bottom left of the sidebar, then click the settings icon for your organization.
In the Organization Settings window, click the **MCP Servers** tab on the left side of the screen.
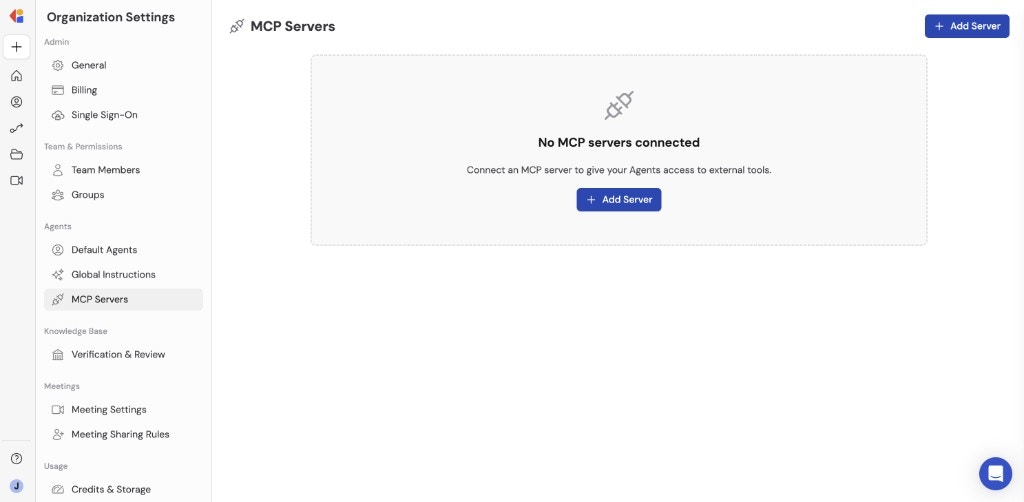 Click **+ Add Server** to begin configuring a new MCP server.
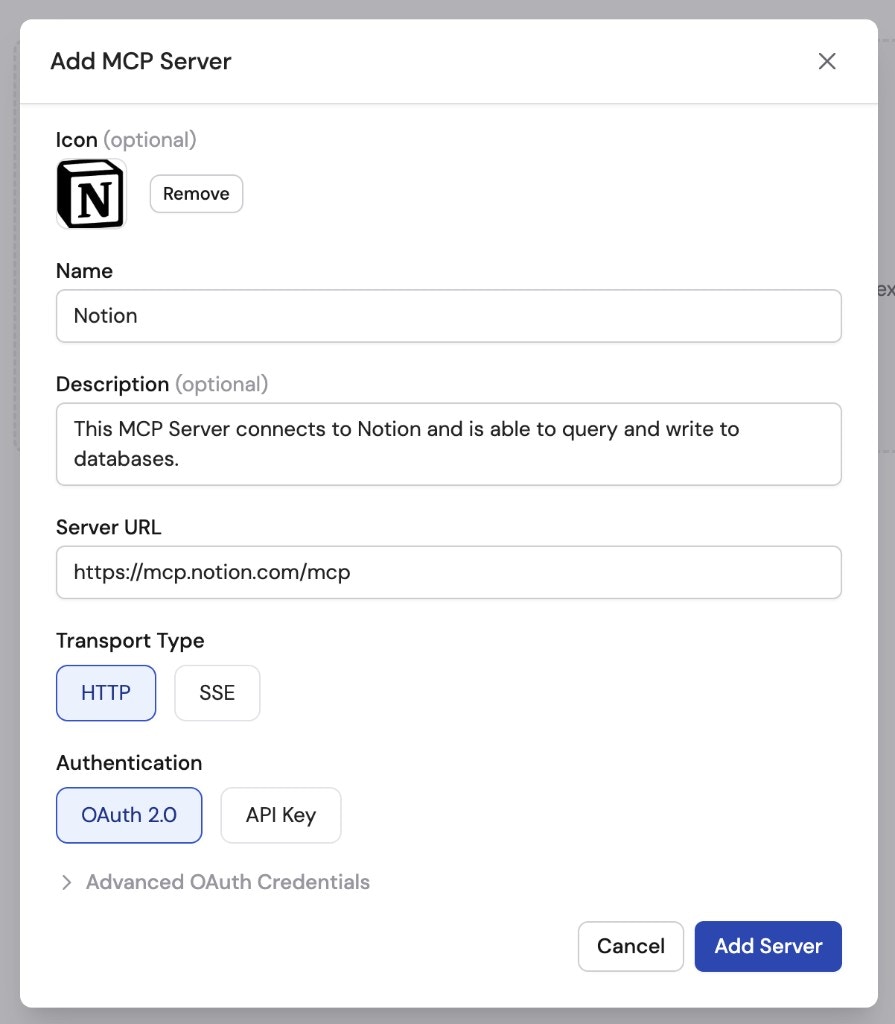
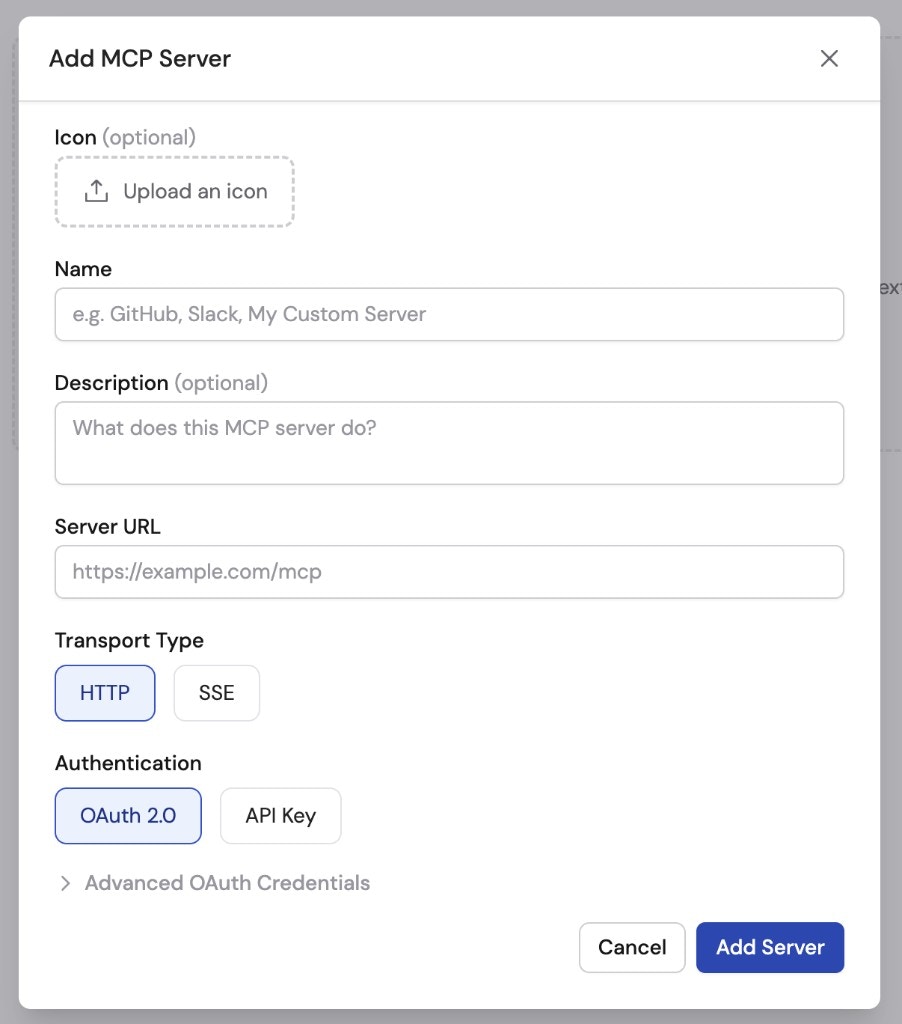 Complete the following fields to configure your MCP server:
* **Icon** (optional) — Upload an image to visually identify the server.
* **Name** — Enter a display name for the MCP server.
* **Description** — Provide a brief description of what the server does.
* **Server URL** — Enter the URL of your MCP server endpoint.
* **Transport Type** — Select **HTTP** or **SSE**. HTTP is recommended for most use cases, but SSE (Server-Sent Events) is also supported.
* **Authentication** — Choose **OAuth 2.0** or **API Key**. OAuth 2.0 is recommended for most use cases. Some MCP servers do not use OAuth and instead require an API key.
Expand the **Advanced OAuth Credentials** dropdown to configure custom OAuth settings. These fields are all optional and typically only needed if you are building your own MCP servers.
* **Client ID**
* **Client Secret**
* **Scope** (e.g., `mcp.read mcp.write`)
* **Redirect URL** — If you are building a custom OAuth app and need to register a redirect URL, use: `https://app.cassidyai.com/api/connections/mcp`
Complete the following fields to configure your MCP server:
* **Icon** (optional) — Upload an image to visually identify the server.
* **Name** — Enter a display name for the MCP server.
* **Description** — Provide a brief description of what the server does.
* **Server URL** — Enter the URL of your MCP server endpoint.
* **Transport Type** — Select **HTTP** or **SSE**. HTTP is recommended for most use cases, but SSE (Server-Sent Events) is also supported.
* **Authentication** — Choose **OAuth 2.0** or **API Key**. OAuth 2.0 is recommended for most use cases. Some MCP servers do not use OAuth and instead require an API key.
Expand the **Advanced OAuth Credentials** dropdown to configure custom OAuth settings. These fields are all optional and typically only needed if you are building your own MCP servers.
* **Client ID**
* **Client Secret**
* **Scope** (e.g., `mcp.read mcp.write`)
* **Redirect URL** — If you are building a custom OAuth app and need to register a redirect URL, use: `https://app.cassidyai.com/api/connections/mcp`
 Click **Add Server** to finish configuring the MCP server.
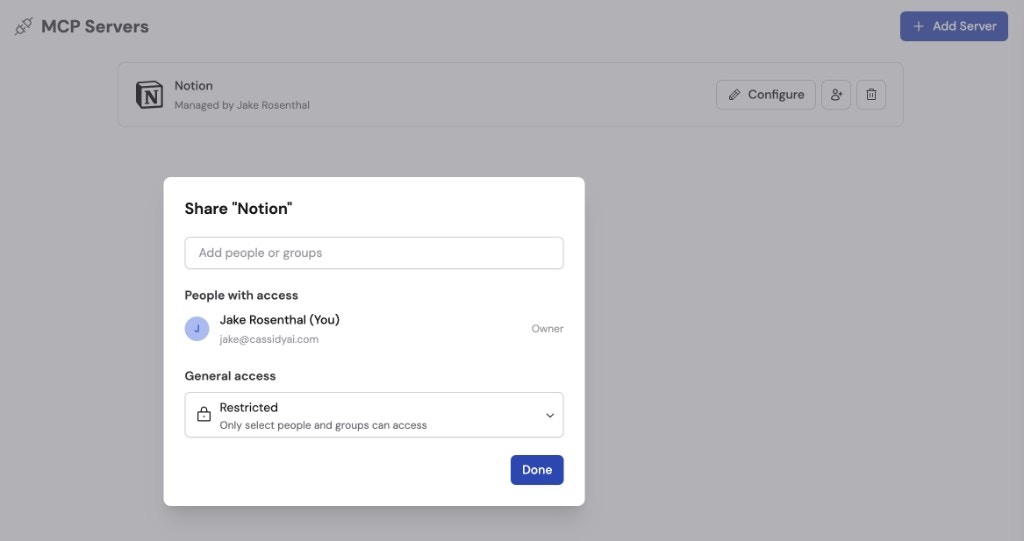
After adding the server, configure permissions to control who in your organization can access and use this MCP server. You can share with specific people or groups.
Click **Add Server** to finish configuring the MCP server.
After adding the server, configure permissions to control who in your organization can access and use this MCP server. You can share with specific people or groups.
 Your MCP server is now available to be added to new and existing Agents.
## Add an MCP server to an Agent
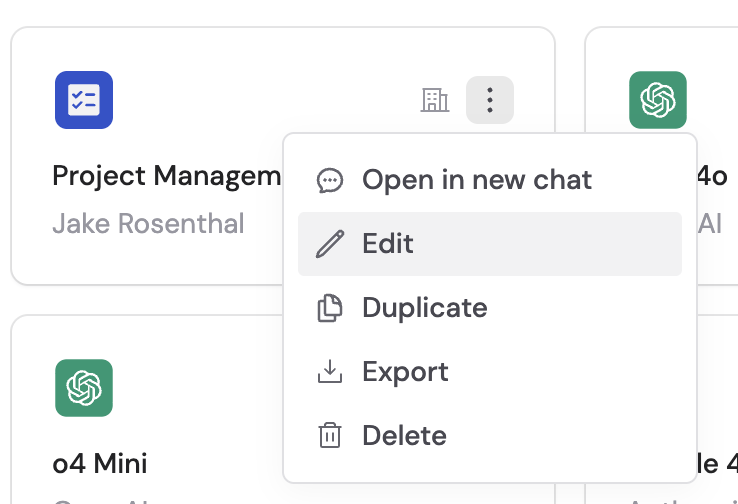
Navigate to **Agents**, find the Agent you want to configure, click **...** and select **Edit**.
Your MCP server is now available to be added to new and existing Agents.
## Add an MCP server to an Agent
Navigate to **Agents**, find the Agent you want to configure, click **...** and select **Edit**.
 In the **Setup** tab, scroll to the **Connectors** section.
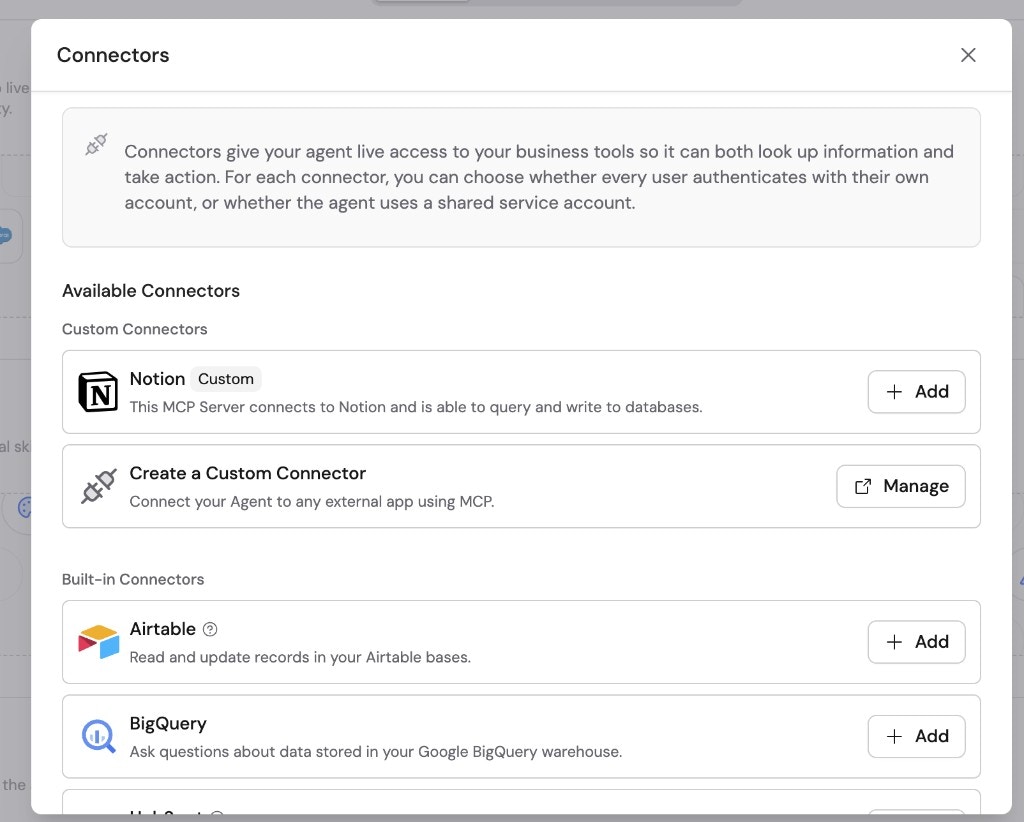
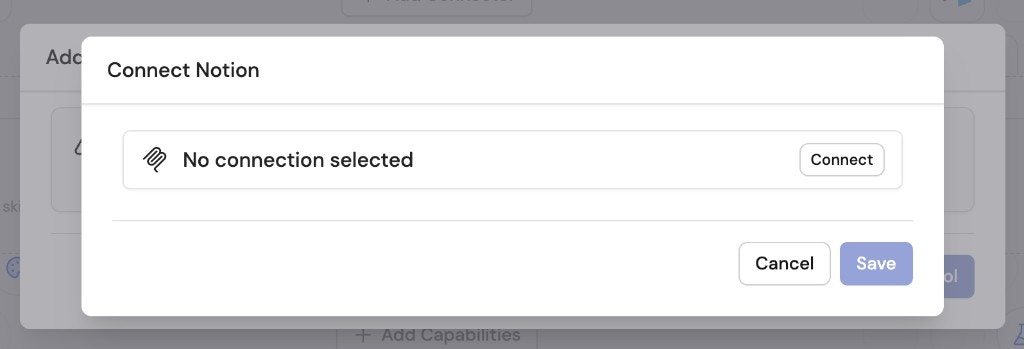
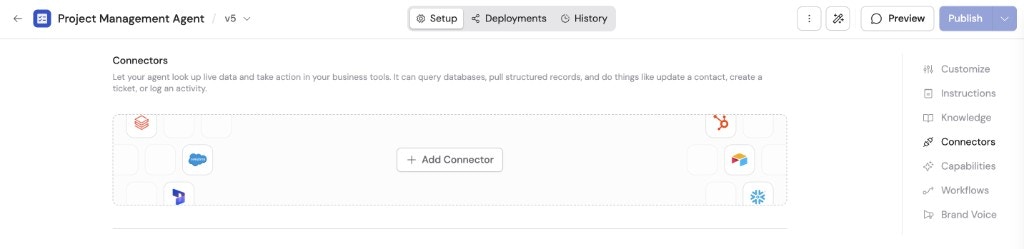 Click **+ Add Connector** and click **+ Add** next to the custom MCP server Connector you want to enable for your Agent.
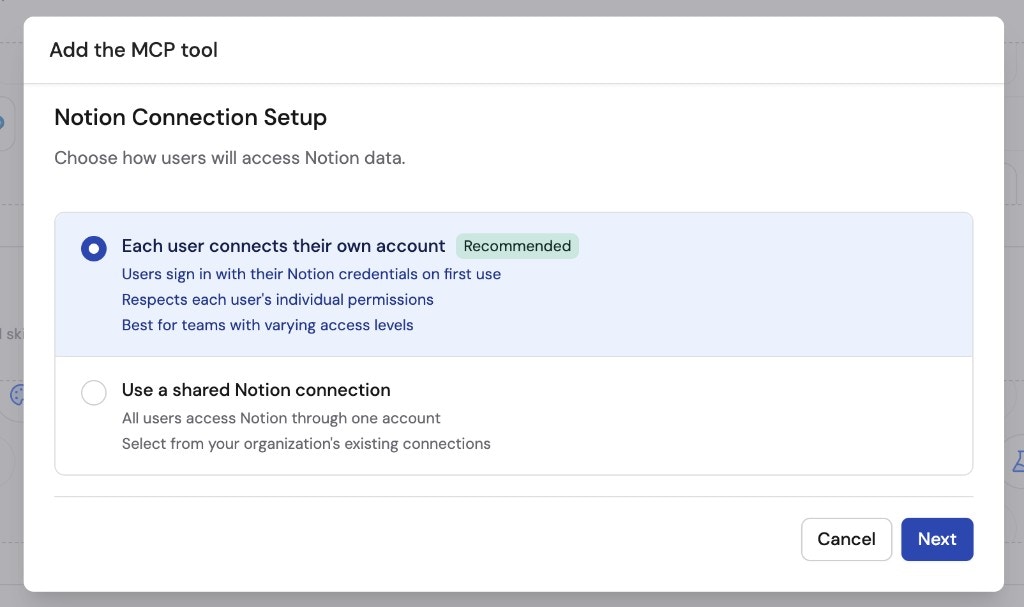
 Select how users will authenticate with the MCP server:
* **Each user connects their own account** (recommended) — Each team member connects their personal account through the MCP server's authentication flow. The Agent can only access what each individual user has permission to see. Best for teams where users have different roles and permissions.
* **Use a shared connection** — Connect a shared service account for your entire workspace. This gives centralized control over what data the Agent can access, regardless of individual user permissions. Best for teams that want everyone accessing the same data with centralized security.
Select how users will authenticate with the MCP server:
* **Each user connects their own account** (recommended) — Each team member connects their personal account through the MCP server's authentication flow. The Agent can only access what each individual user has permission to see. Best for teams where users have different roles and permissions.
* **Use a shared connection** — Connect a shared service account for your entire workspace. This gives centralized control over what data the Agent can access, regardless of individual user permissions. Best for teams that want everyone accessing the same data with centralized security.
 If you chose **Use a shared connection**, click **Connect** to authenticate and set up the shared service account, then click **Save**.
Only workspace admins can set up shared connections.
If you chose **Use a shared connection**, click **Connect** to authenticate and set up the shared service account, then click **Save**.
Only workspace admins can set up shared connections.
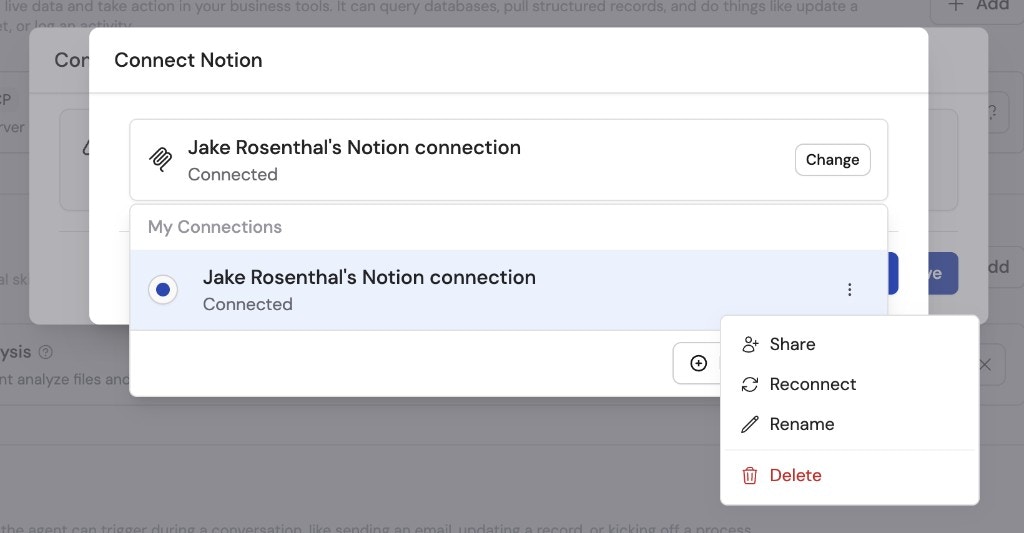
 To share the connection with other team members, click **Change** next to the newly added connection, then click the ellipses menu (**...**) and select **Share**.
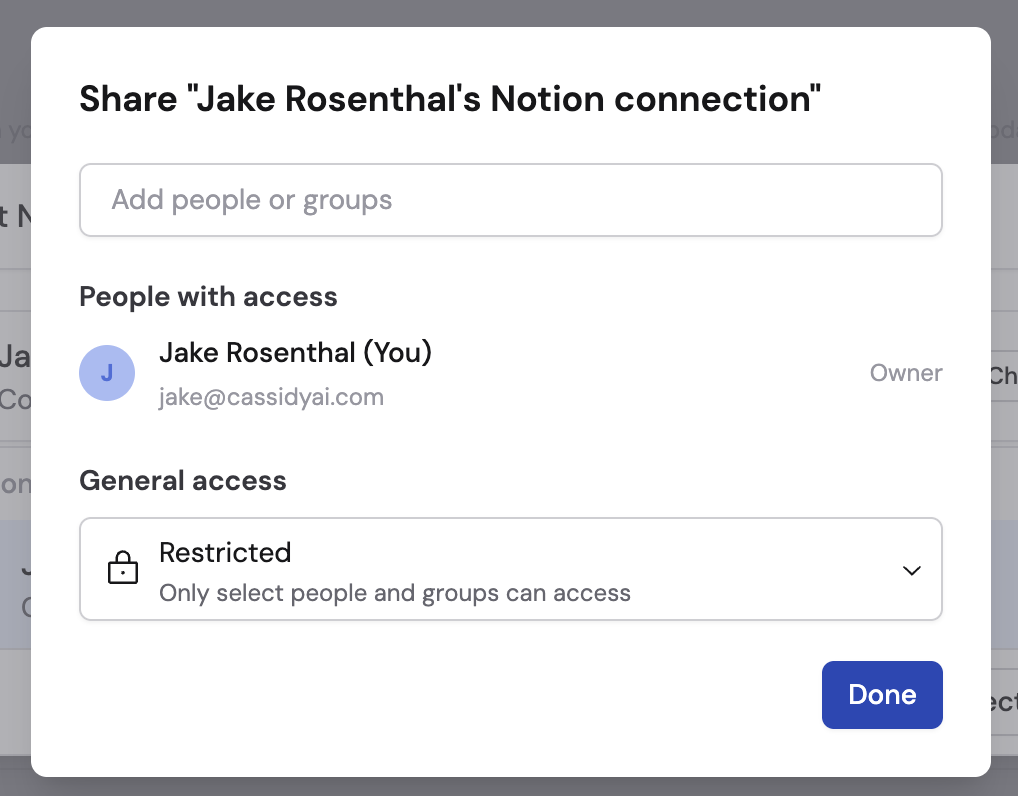
 Add people or groups and/or change the general access to **Team**. You can set specific permissions for each person or group.
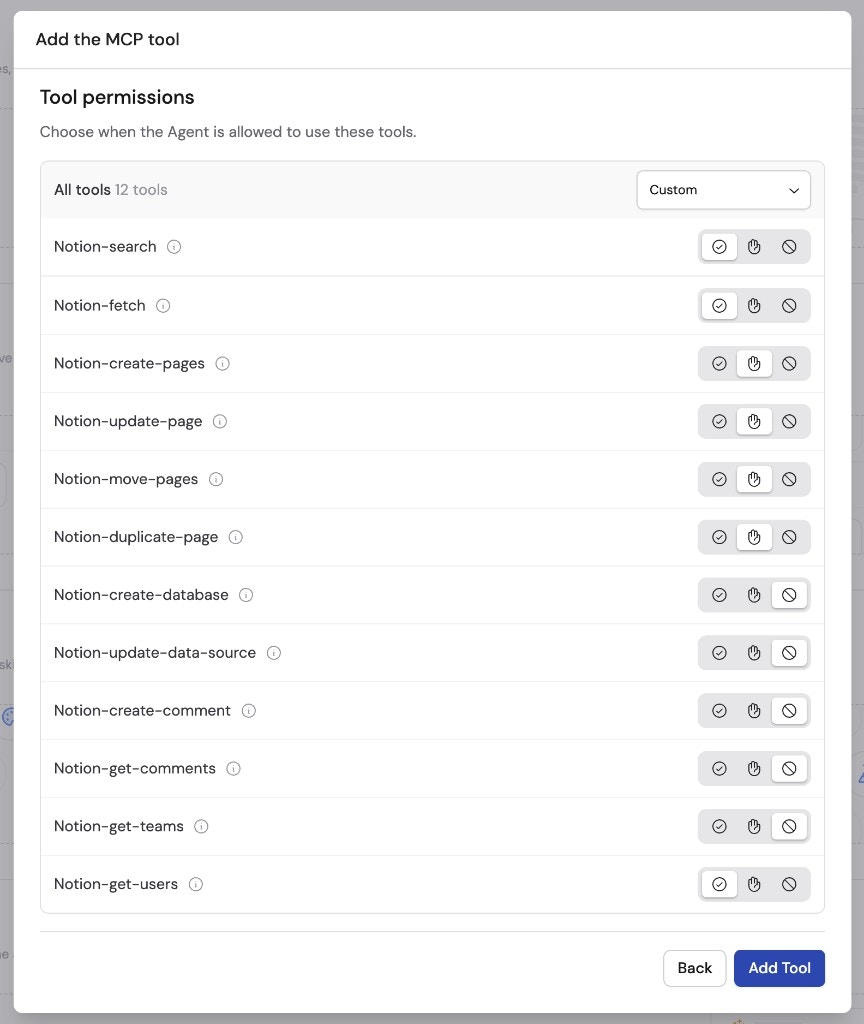
 Click **Next** and select tool permissions for each type of action. Every MCP server action is a separate tool with its own permission setting:
* **Always Allow** — The Agent performs this action automatically when needed.
* **Needs Approval** — The Agent asks the user for permission before taking this action.
* **Disabled** — The Agent cannot perform this action.
When you're done configuring permissions, click **Add Tool**.
Click **Next** and select tool permissions for each type of action. Every MCP server action is a separate tool with its own permission setting:
* **Always Allow** — The Agent performs this action automatically when needed.
* **Needs Approval** — The Agent asks the user for permission before taking this action.
* **Disabled** — The Agent cannot perform this action.
When you're done configuring permissions, click **Add Tool**.
 Navigate to **Chat** and select the Agent with the MCP server Connector enabled.
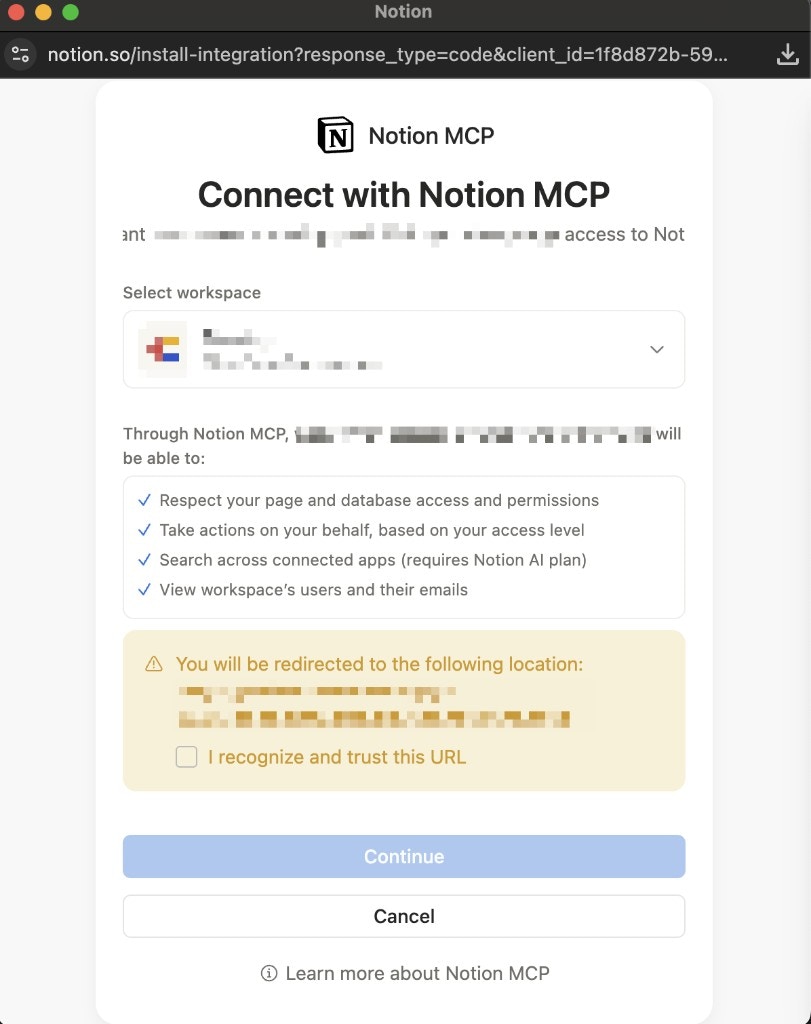
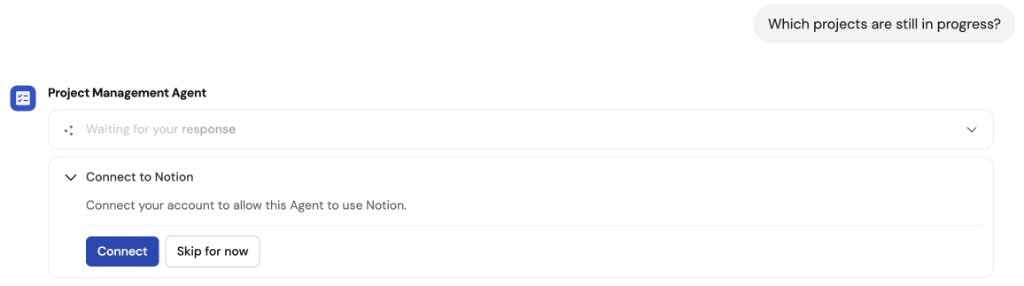
 If you chose **Each user connects their own account**, users are prompted to connect their account from within the chat the first time they use the MCP server Connector. Click **Connect** when prompted, then follow the sign-in flow to authorize access.
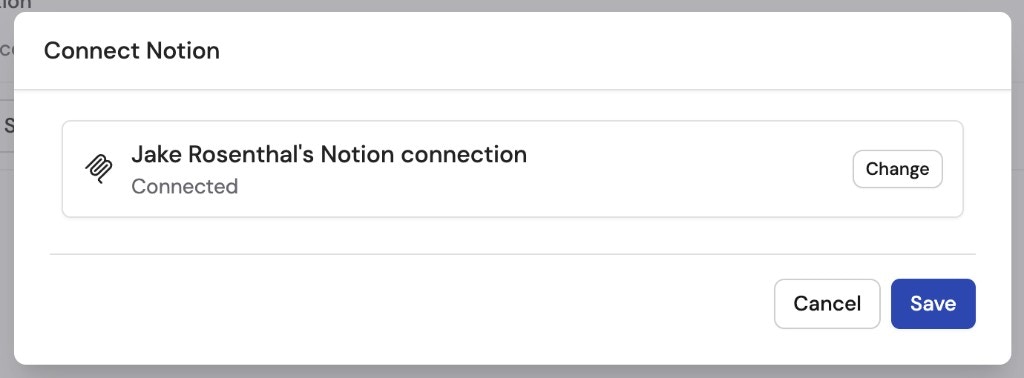
 Once connected, click **Save** to finalize the setup.
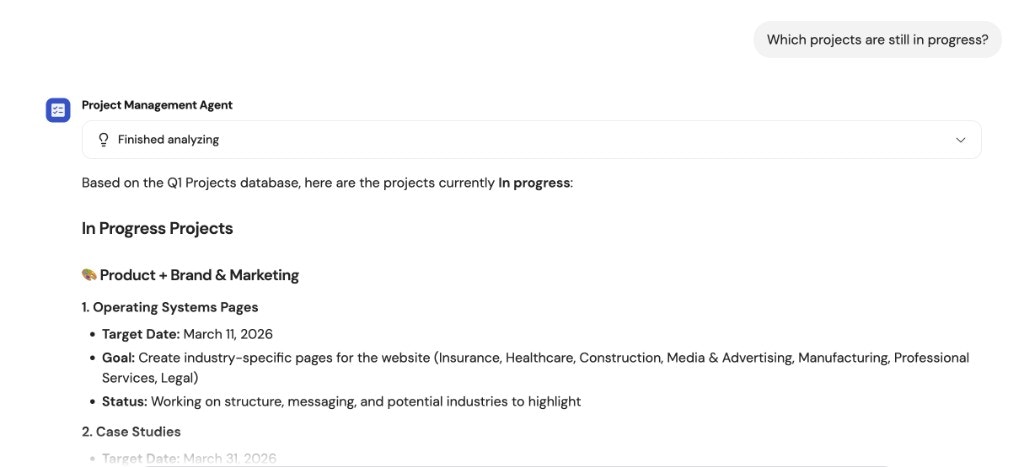
 Your Agent can now access the MCP server's tools to answer questions and perform actions directly through chat conversations.
 ## Monitor MCP server actions
When an Agent uses an MCP server tool during a conversation, you can review what happened by expanding the **Analyzed Sources** dropdown in the chat response. Click on any of the MCP server steps to see the details of each action taken.
* If an action requires a permission the Connector doesn't have, the Agent won't be able to perform it.
* If an action is set to **Needs Approval**, you can click **Approve** or **Reject** directly in the chat before the action executes.
## Monitor MCP server actions
When an Agent uses an MCP server tool during a conversation, you can review what happened by expanding the **Analyzed Sources** dropdown in the chat response. Click on any of the MCP server steps to see the details of each action taken.
* If an action requires a permission the Connector doesn't have, the Agent won't be able to perform it.
* If an action is set to **Needs Approval**, you can click **Approve** or **Reject** directly in the chat before the action executes.
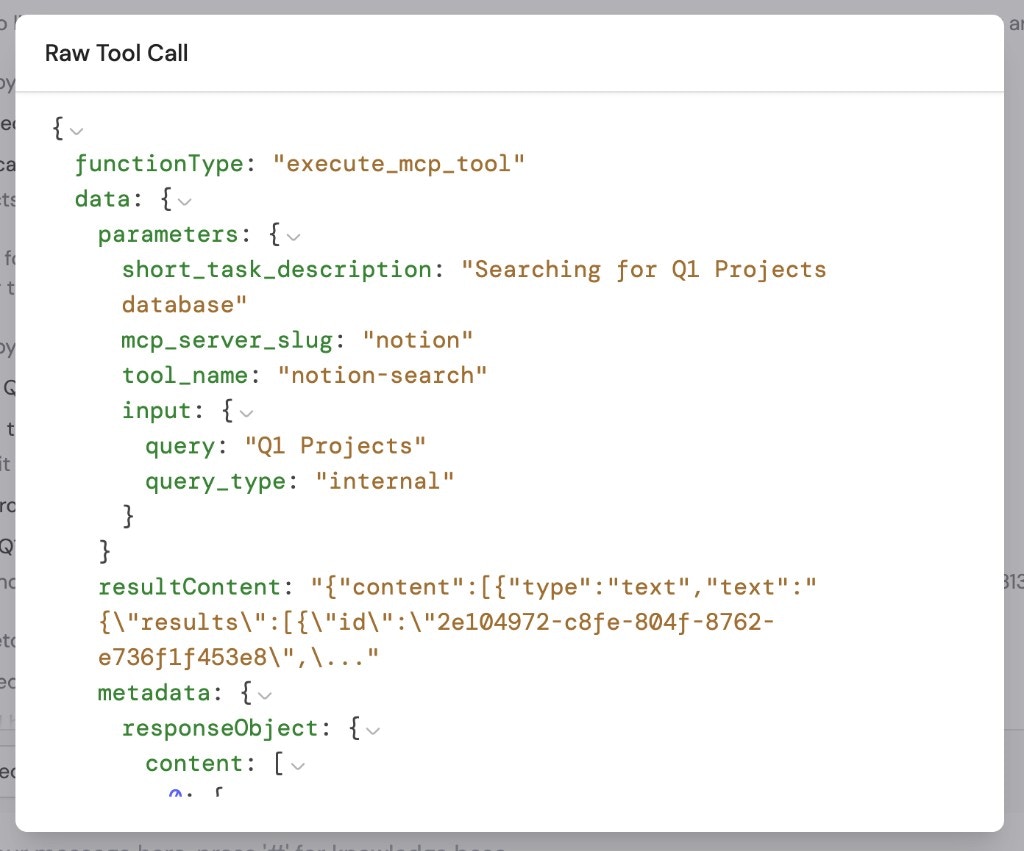
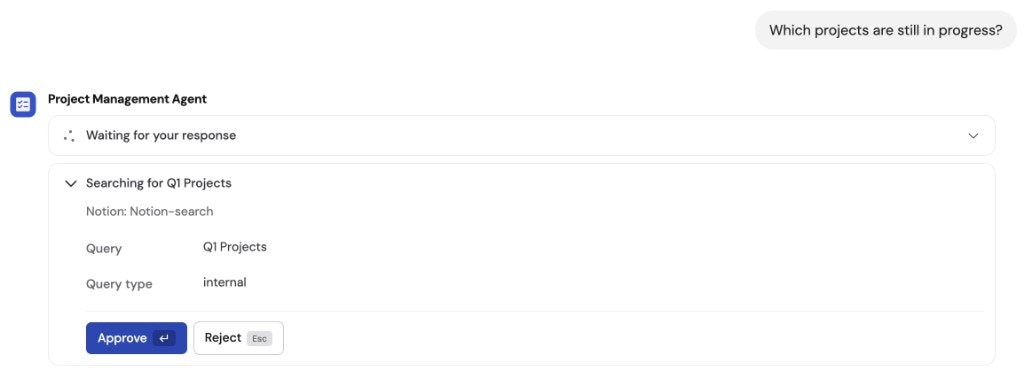 To inspect the raw details of an MCP server action, click on the step in the **Analyzed Sources** dropdown to expand it.
 ## Data security
MCP server Connectors follow the same security model as other [Connectors](/agents/connectors/overview):
* **Permission-based access** — The Agent can only access what the connected account has permission to see in the external system.
* **Auditability** — All queries and actions are logged in your Agent's activity history.
* **Service account control** — Using a shared connection lets you define exactly what data and actions are accessible through a centralized account.
## Next steps
Learn about other Connectors available for your Agents.
Understand how Agents use Connectors, Knowledge Base, and Capabilities
together.
Add built-in skills like web search, image generation, artifacts, and browser use.
Create multi-step automations for repeatable processes.
## Data security
MCP server Connectors follow the same security model as other [Connectors](/agents/connectors/overview):
* **Permission-based access** — The Agent can only access what the connected account has permission to see in the external system.
* **Auditability** — All queries and actions are logged in your Agent's activity history.
* **Service account control** — Using a shared connection lets you define exactly what data and actions are accessible through a centralized account.
## Next steps
Learn about other Connectors available for your Agents.
Understand how Agents use Connectors, Knowledge Base, and Capabilities
together.
Add built-in skills like web search, image generation, artifacts, and browser use.
Create multi-step automations for repeatable processes.