> ## Documentation Index
> Fetch the complete documentation index at: https://docs.cassidyai.com/llms.txt
> Use this file to discover all available pages before exploring further.
# Chat with an Agent
> Everything you need to know about chatting: selecting Agents, uploading files, using tools, voice mode, and more.
Cassidy's Chat interface is where you interact with AI [Agents](/agents/overview), access your [Knowledge Base](/knowledge-base/overview), and run [Workflows](/workflows/overview) — all in one place.
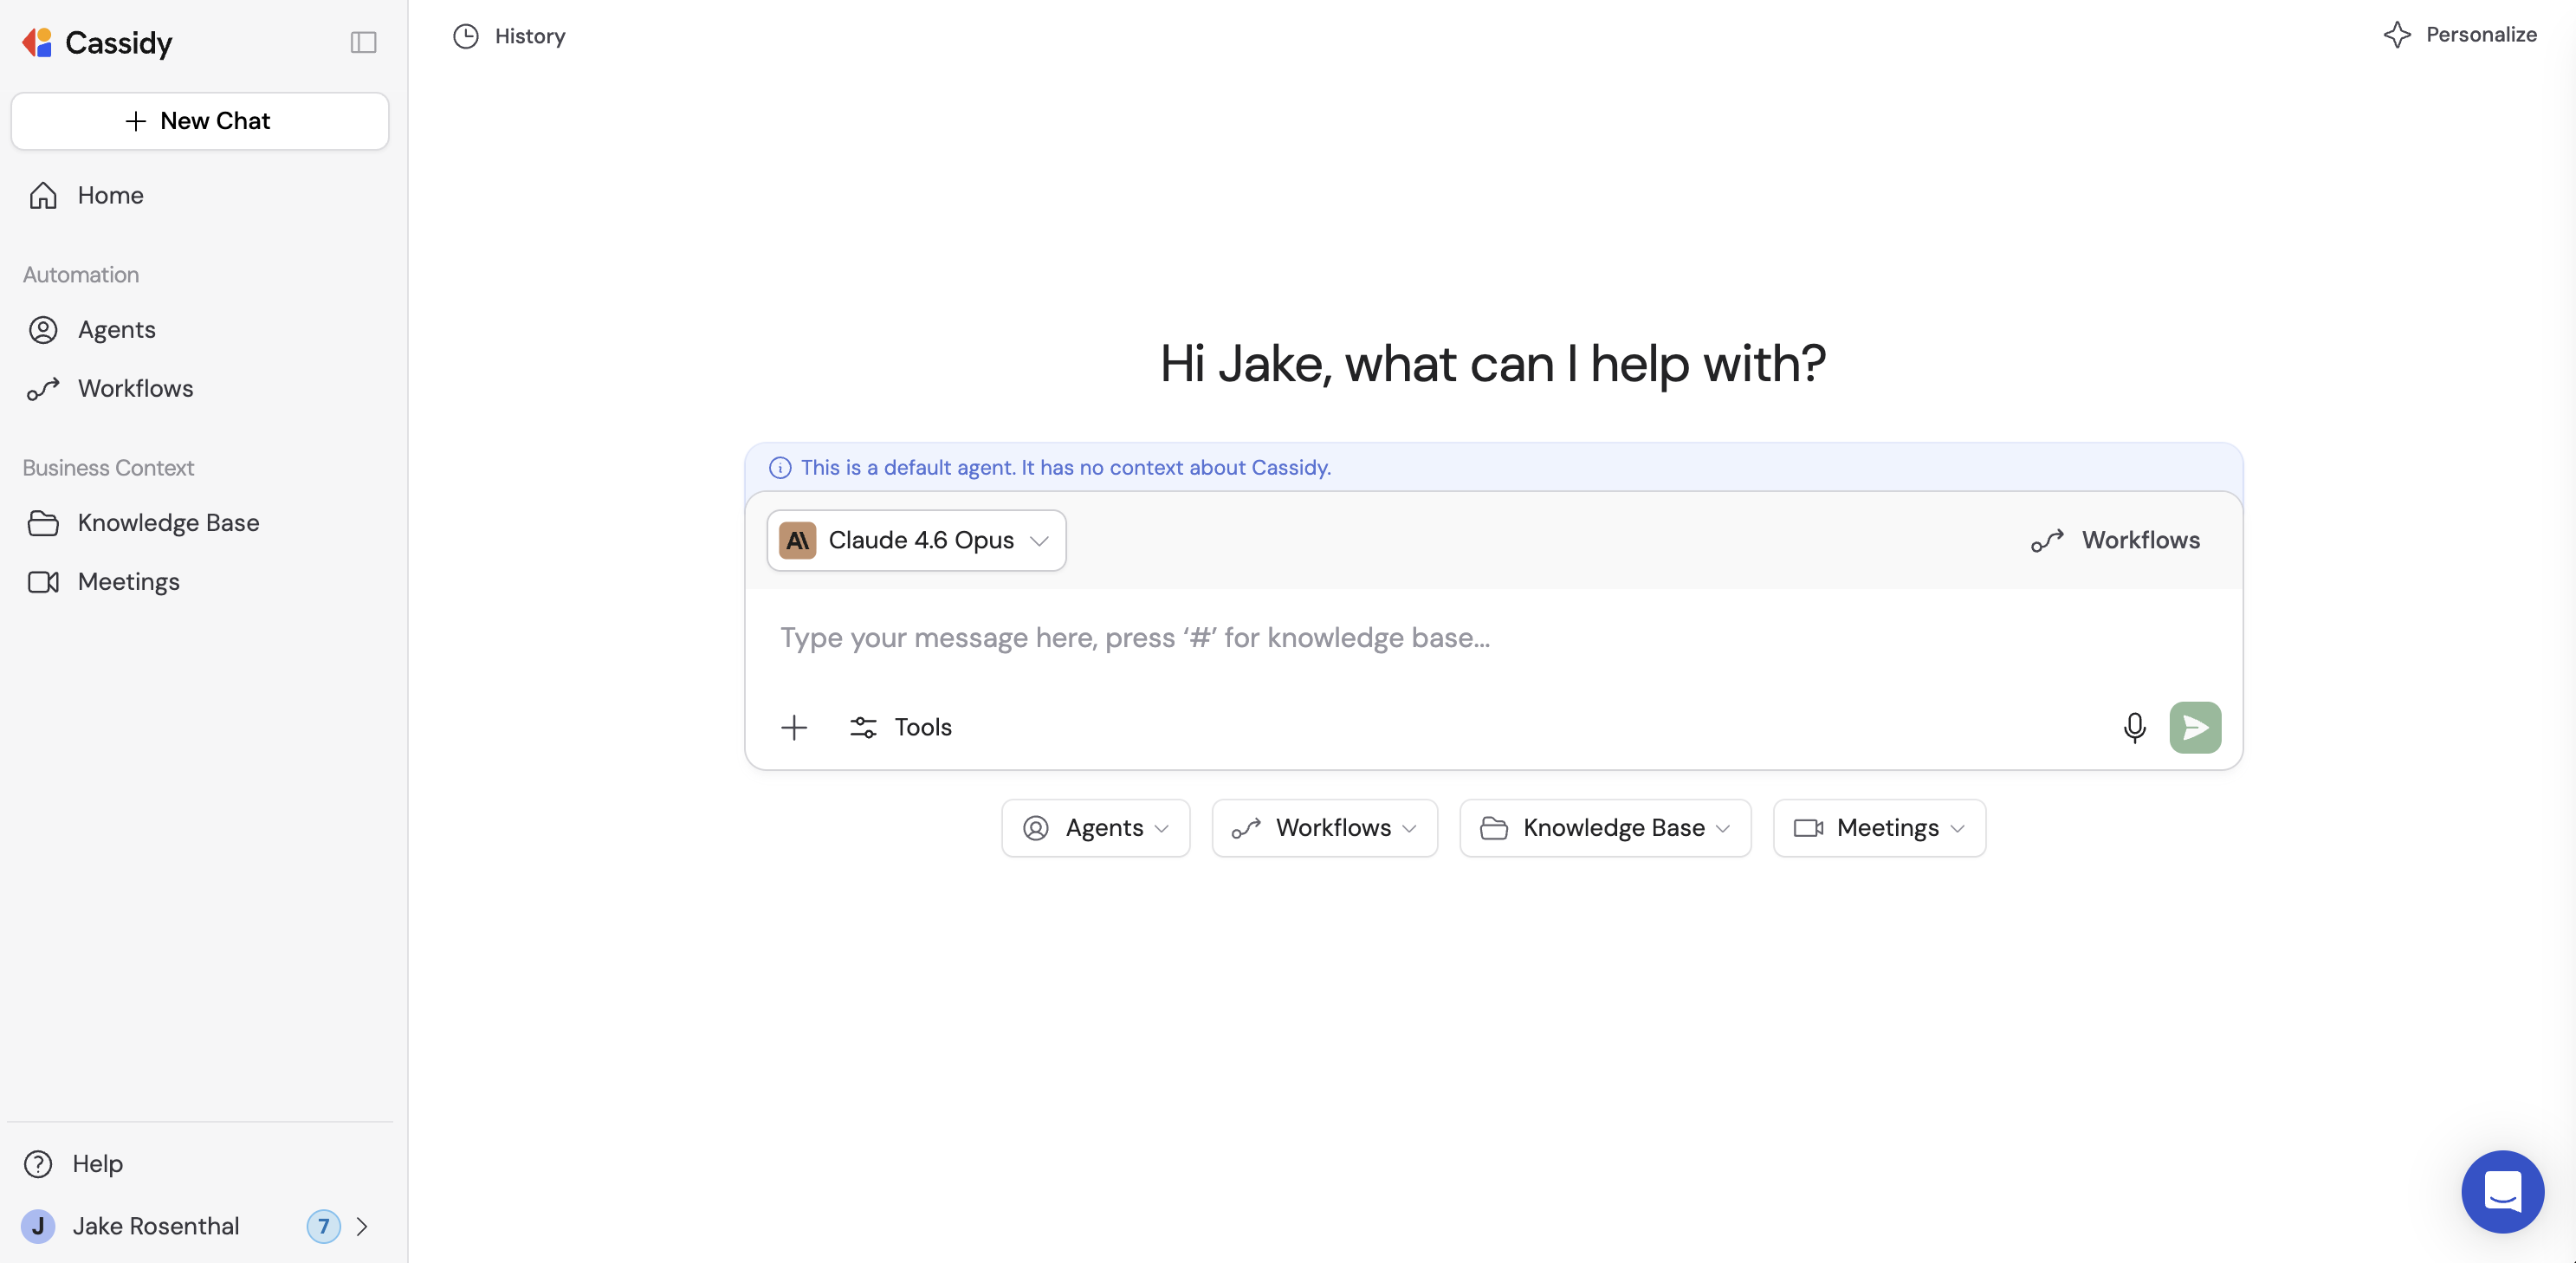 To start a new chat, click **+ New Chat** in the left sidebar or on the **All Chats** page.
 You can also chat through the [Chrome extension](/extensions/chrome), [Outlook extension](/extensions/outlook), [Microsoft Office extension](/extensions/microsoft-office) (Word, Excel, and PowerPoint), and external deployments like [Slack](/integrations/slack/deploy-agent), [Microsoft Teams](/agents/deploy/microsoft-teams), [Google Chat](/agents/deploy/google-chat), [email](/agents/deploy/email), [embed](/agents/deploy/embed), and [API](/agents/deploy/api).
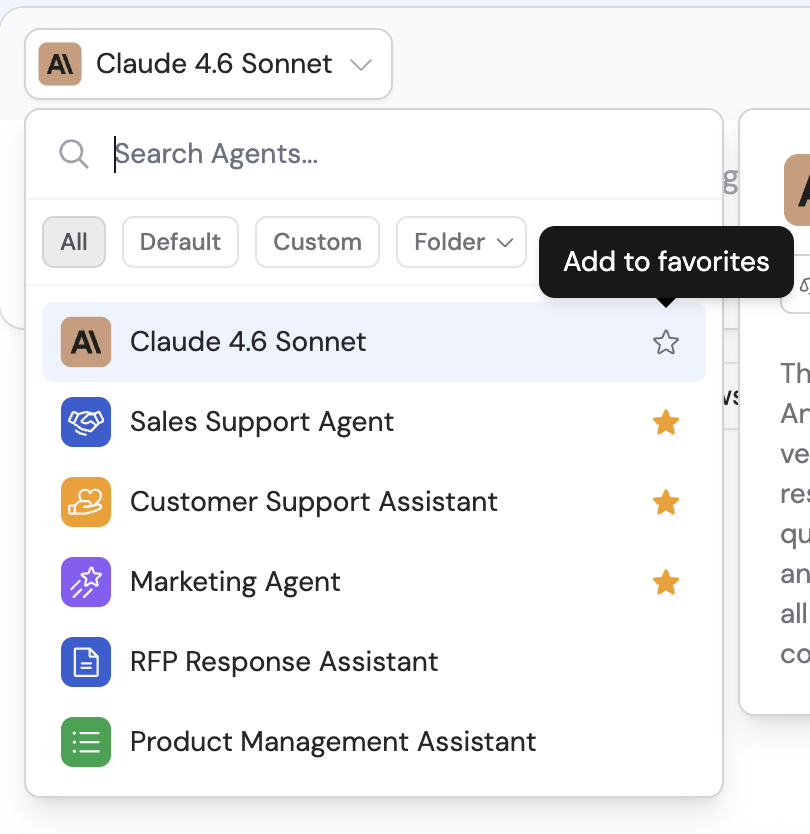
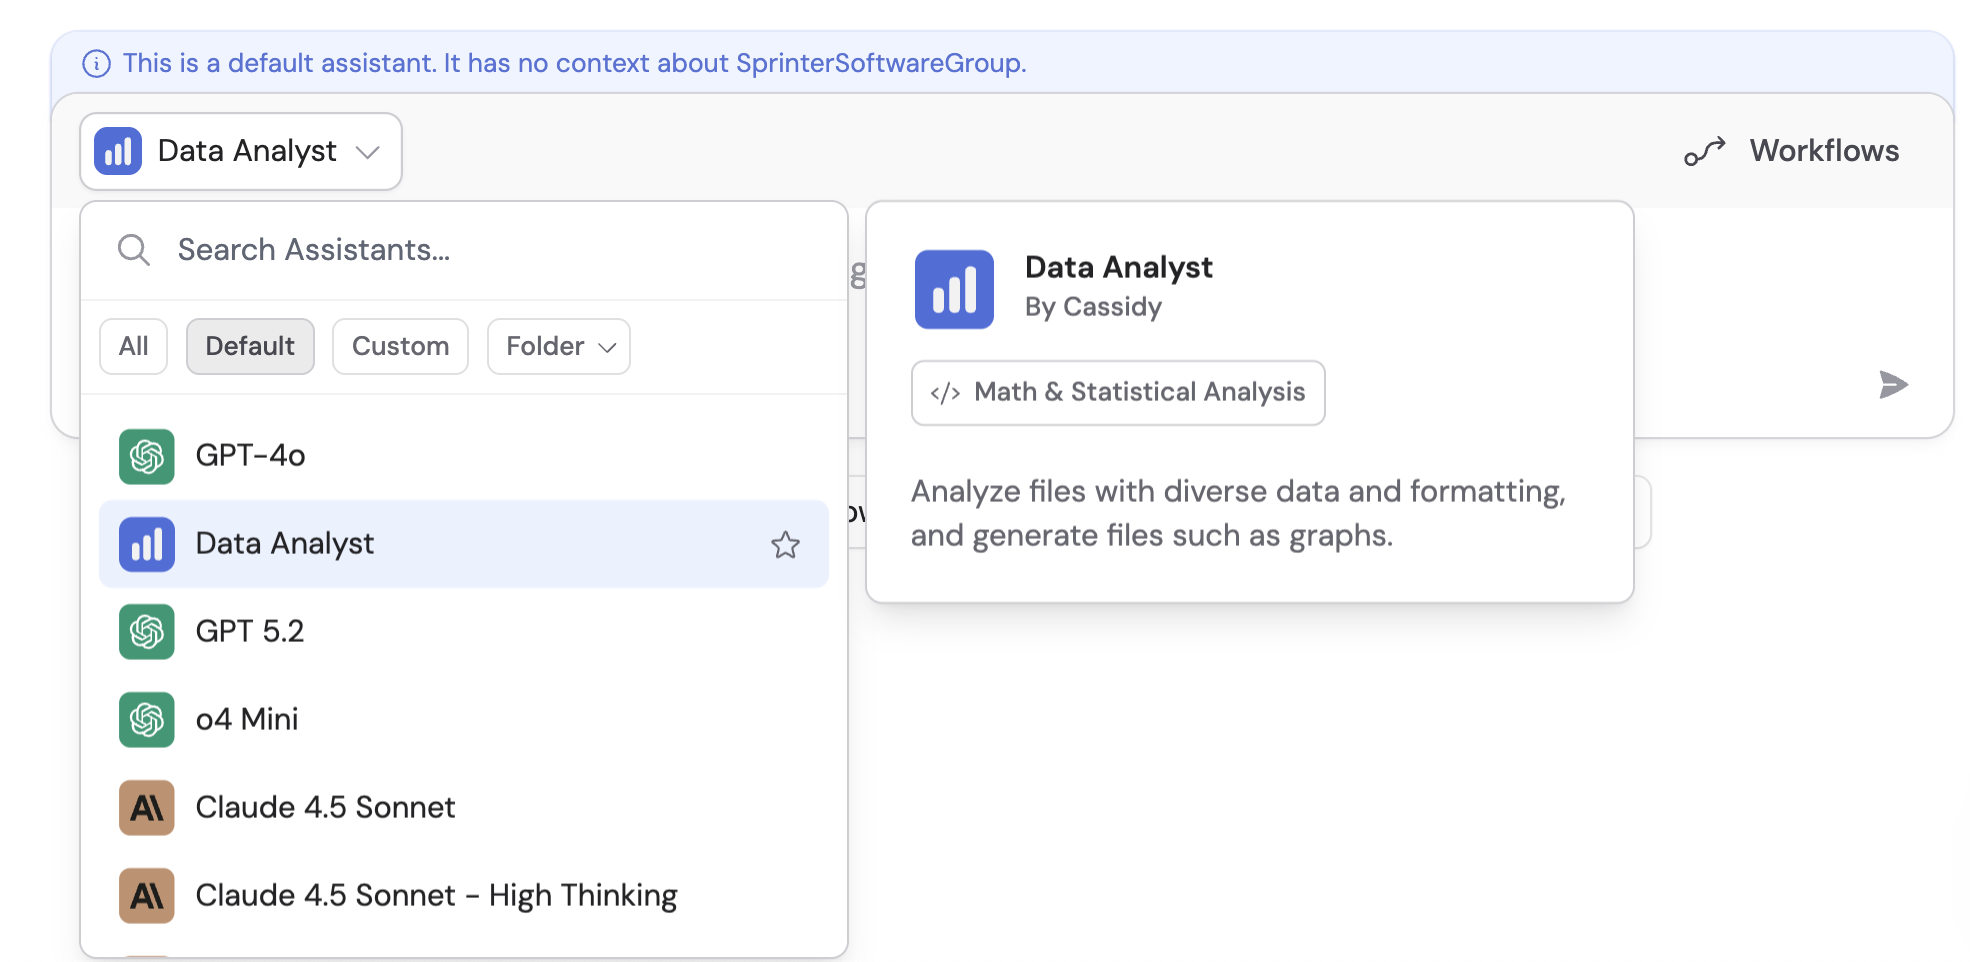
## Select an Agent
Every chat uses an Agent. You can switch between custom Agents, foundational models, and Cassidy's pre-built Agents at any time.
Click the Agent dropdown at the top of the chat or in the text box to see your options.
You can also chat through the [Chrome extension](/extensions/chrome), [Outlook extension](/extensions/outlook), [Microsoft Office extension](/extensions/microsoft-office) (Word, Excel, and PowerPoint), and external deployments like [Slack](/integrations/slack/deploy-agent), [Microsoft Teams](/agents/deploy/microsoft-teams), [Google Chat](/agents/deploy/google-chat), [email](/agents/deploy/email), [embed](/agents/deploy/embed), and [API](/agents/deploy/api).
## Select an Agent
Every chat uses an Agent. You can switch between custom Agents, foundational models, and Cassidy's pre-built Agents at any time.
Click the Agent dropdown at the top of the chat or in the text box to see your options.
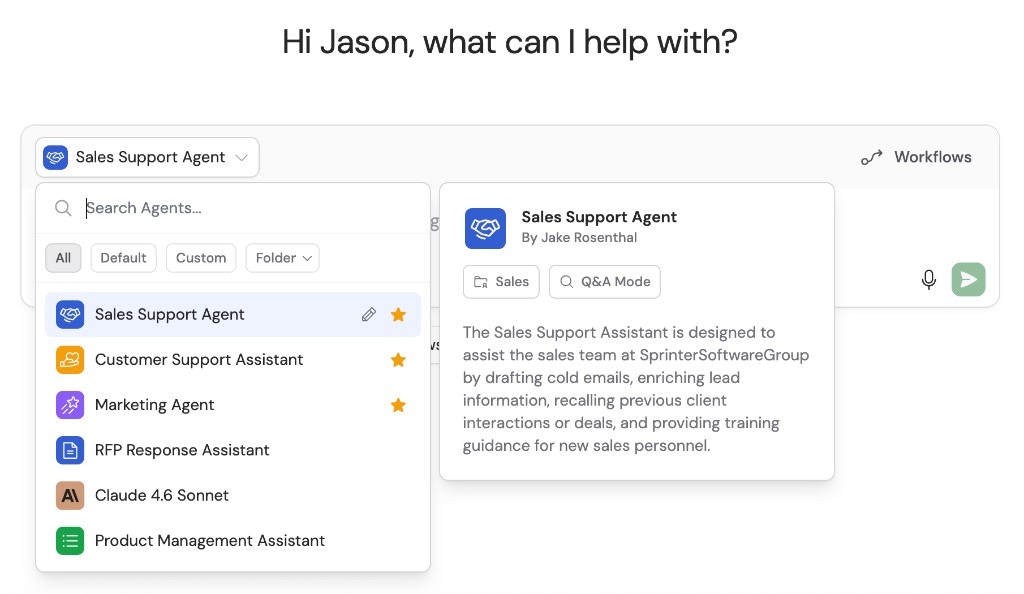 You'll see three categories:
* **Custom Agents** — built by your team, trained on your [Knowledge Base](/knowledge-base/overview) with tailored instructions
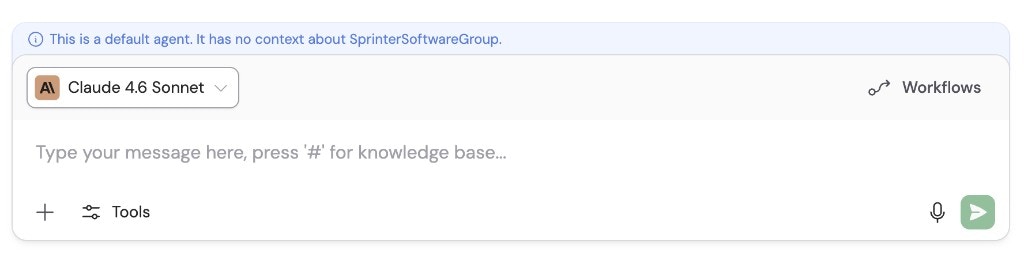
* **Default Agents** — foundational models like GPT, Claude, and Gemini without your business context
* **Pre-built Agents** — Cassidy's ready-made options like the Data Analyst and Cassidy Help Agent
Default Agents don't have access to your company's Knowledge Base or custom instructions.
You'll see three categories:
* **Custom Agents** — built by your team, trained on your [Knowledge Base](/knowledge-base/overview) with tailored instructions
* **Default Agents** — foundational models like GPT, Claude, and Gemini without your business context
* **Pre-built Agents** — Cassidy's ready-made options like the Data Analyst and Cassidy Help Agent
Default Agents don't have access to your company's Knowledge Base or custom instructions.
 Hover over an Agent in the dropdown and click the **star** icon to add it to your favorites for quick access.
 Need a different Agent? Click the dropdown again and select a new one. The chat continues with the new Agent — no need to start over.
When chatting with a Q\&A Agent, responses include source citations that link
back to your Knowledge Base so you can verify the information.
Need a different Agent? Click the dropdown again and select a new one. The chat continues with the new Agent — no need to start over.
When chatting with a Q\&A Agent, responses include source citations that link
back to your Knowledge Base so you can verify the information.
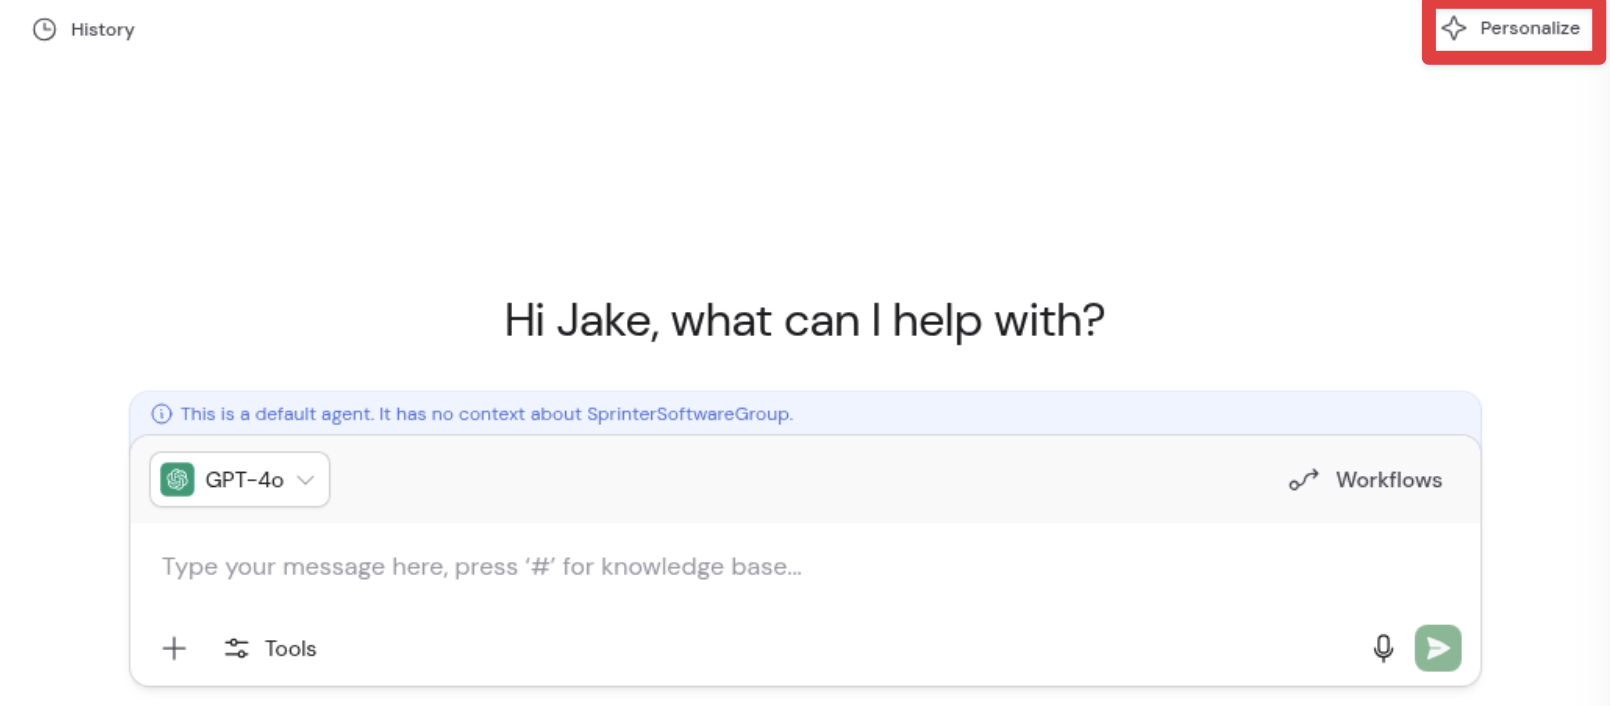
 ## Personalize your chat
Personalization lets you tell the AI about yourself so it provides more relevant, tailored responses in your chat conversations. These settings apply across all your chats regardless of which Agent you use.
Click **+ New Chat** in the left sidebar or on the **Home** page.
Click the **Personalize** button in the top-right corner of the new chat screen.
## Personalize your chat
Personalization lets you tell the AI about yourself so it provides more relevant, tailored responses in your chat conversations. These settings apply across all your chats regardless of which Agent you use.
Click **+ New Chat** in the left sidebar or on the **Home** page.
Click the **Personalize** button in the top-right corner of the new chat screen.
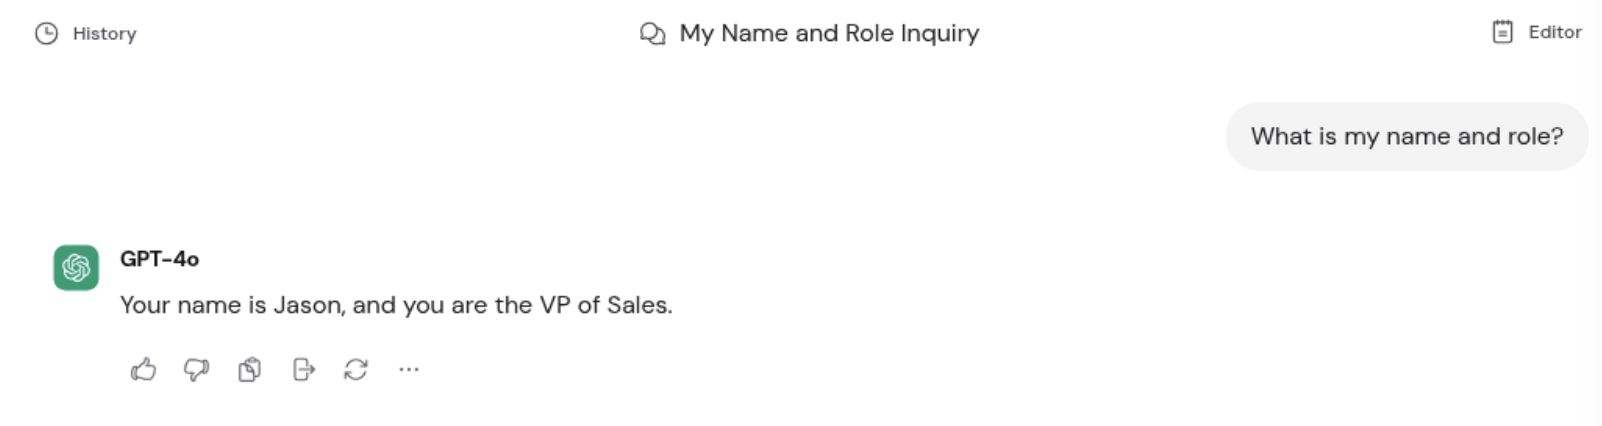
 Fill in the following fields:
* **Name / Nickname** — Pre-filled from your profile name. Change it to whatever you'd like the AI to call you.
* **Role** — Enter your job title or function (e.g., "VP of Sales" or "Software Engineer"). This helps the AI understand your context.
* **Custom Instructions** — Tell the AI about your preferences, work focus, or formatting expectations. For example: "I manage the enterprise sales team focused on AmLaw 200 firms. Keep responses concise and action-oriented. Use bullet points when listing key takeaways." Supports up to 2,000 characters.
Fill in the following fields:
* **Name / Nickname** — Pre-filled from your profile name. Change it to whatever you'd like the AI to call you.
* **Role** — Enter your job title or function (e.g., "VP of Sales" or "Software Engineer"). This helps the AI understand your context.
* **Custom Instructions** — Tell the AI about your preferences, work focus, or formatting expectations. For example: "I manage the enterprise sales team focused on AmLaw 200 firms. Keep responses concise and action-oriented. Use bullet points when listing key takeaways." Supports up to 2,000 characters.
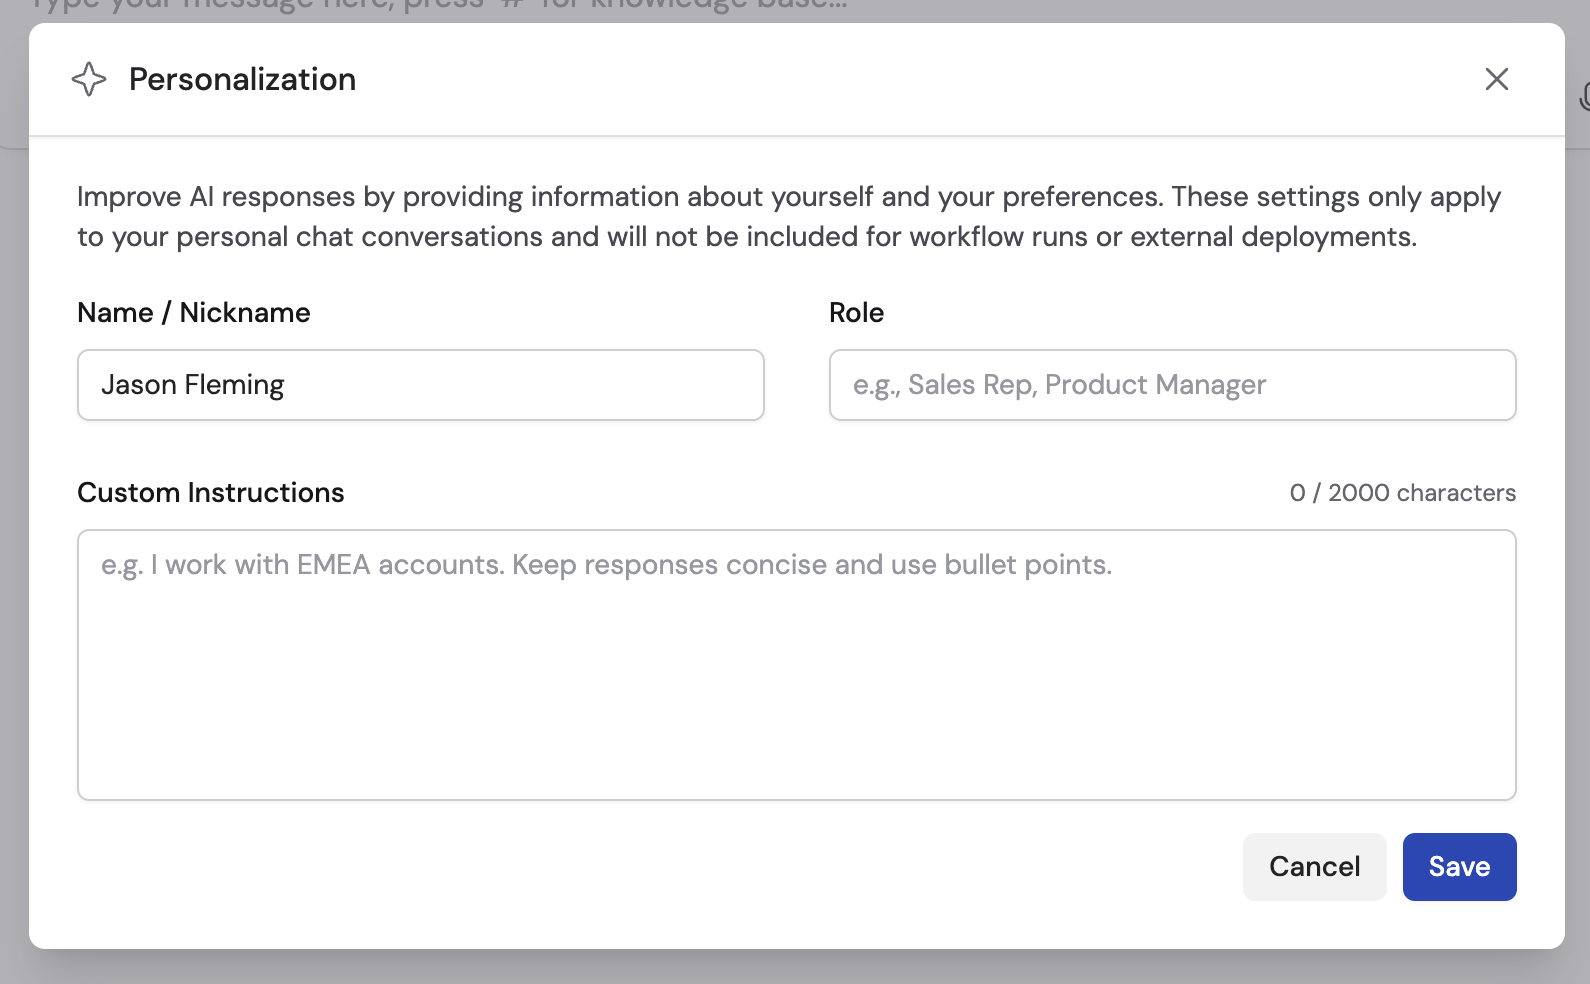 Click **Save** to apply your changes, or **Cancel** to discard them.
 Personalization settings only apply to your personal chat conversations within
the Cassidy app. They do not apply to [Workflow](/workflows/overview) runs or
external deployments like [Slack](/integrations/slack/deploy-agent),
[Microsoft Teams](/agents/deploy/microsoft-teams), [Google
Chat](/agents/deploy/google-chat), [embed](/agents/deploy/embed), or
[API](/agents/deploy/api). Changing your name in personalization does not
change your profile name elsewhere on the platform.
For organization-wide AI behavior rules that apply to every Agent and Workflow, see [Global instructions](/settings/global-instructions).
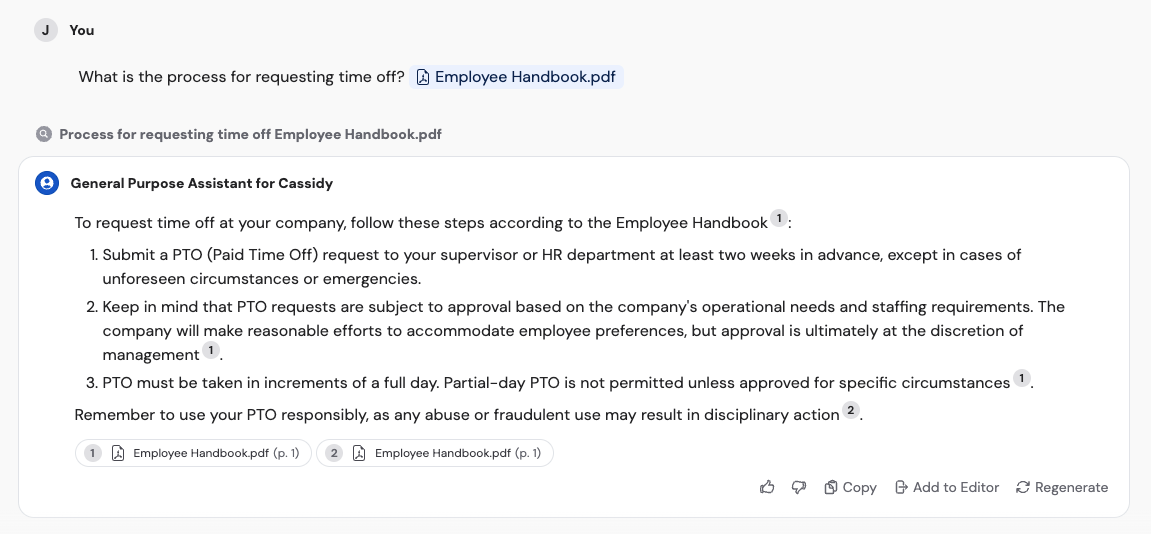
## Reference your Knowledge Base
You can pull specific items from your [Knowledge Base](/knowledge-base/overview) directly into a chat to ask targeted questions.
In the chat text box, type **#** to open a search dropdown for your Knowledge Base.
Personalization settings only apply to your personal chat conversations within
the Cassidy app. They do not apply to [Workflow](/workflows/overview) runs or
external deployments like [Slack](/integrations/slack/deploy-agent),
[Microsoft Teams](/agents/deploy/microsoft-teams), [Google
Chat](/agents/deploy/google-chat), [embed](/agents/deploy/embed), or
[API](/agents/deploy/api). Changing your name in personalization does not
change your profile name elsewhere on the platform.
For organization-wide AI behavior rules that apply to every Agent and Workflow, see [Global instructions](/settings/global-instructions).
## Reference your Knowledge Base
You can pull specific items from your [Knowledge Base](/knowledge-base/overview) directly into a chat to ask targeted questions.
In the chat text box, type **#** to open a search dropdown for your Knowledge Base.
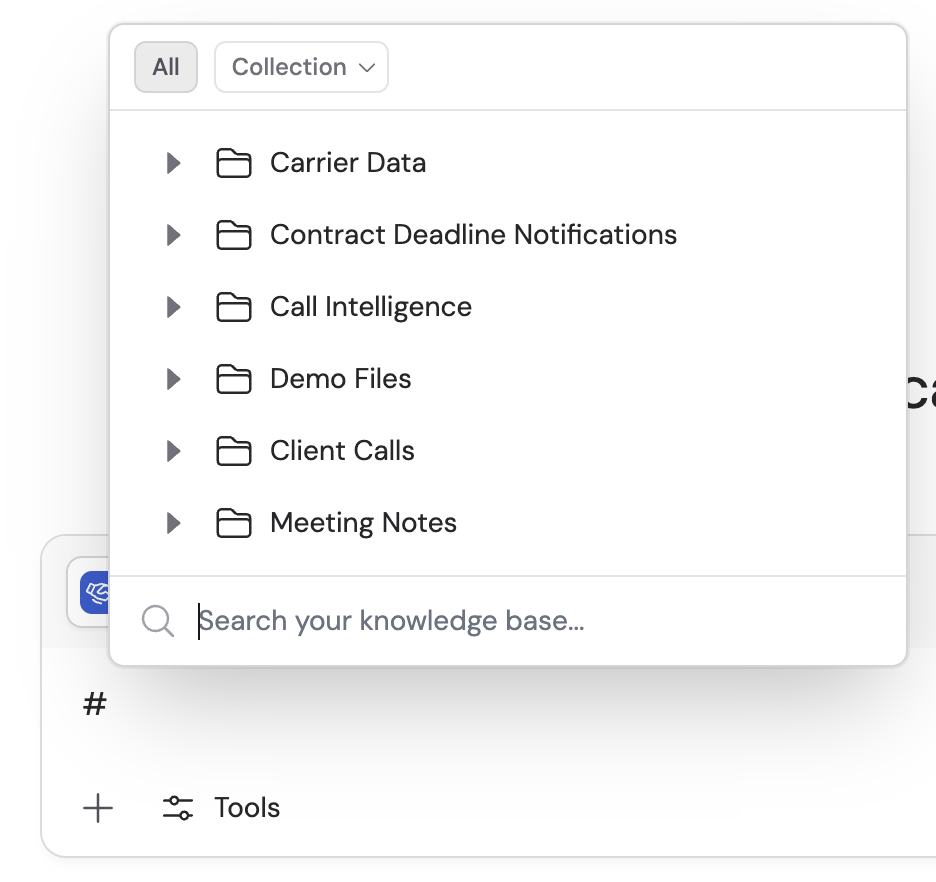 Start typing keywords to filter results. Click the item you want to reference — it appears as a tag in your message.
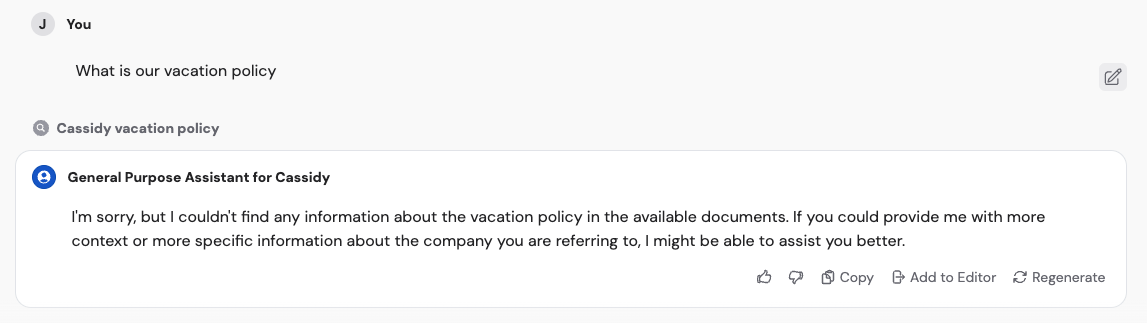
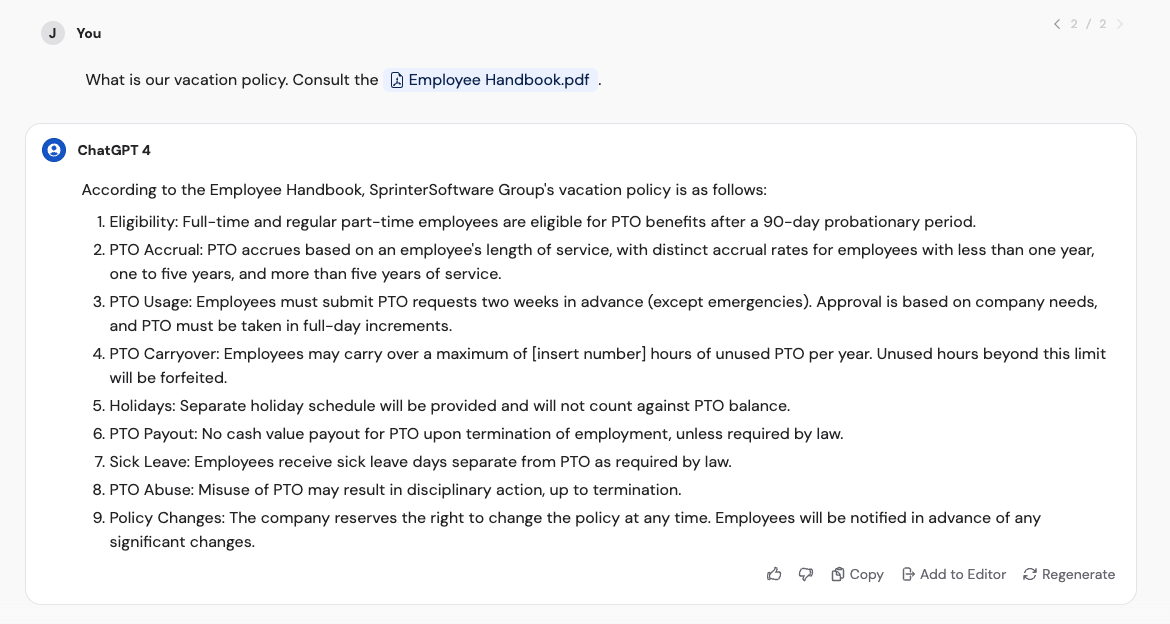
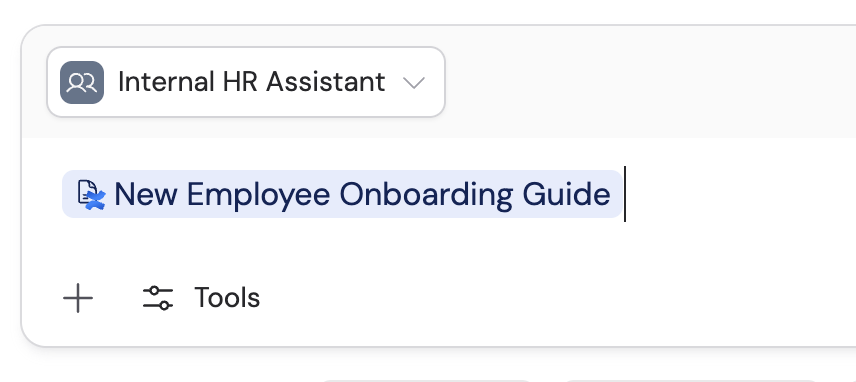 Send your message with the referenced item. The Agent uses that specific document as context for its response. For example:
* "Can you summarize the main points of this employee handbook?"
* "How many vacation days am I entitled to according to this policy?"
* "What is the process for requesting time off?"
The **#** reference is useful when you want to point the Agent at a specific
document for a single question. To have an Agent always search certain
Knowledge Base items, add them to the Agent's configuration — see [Build and
configure an Agent](/agents/build-and-configure) for details.
The **#** picker can include recorded [meetings](/meetings/getting-started),
not only Knowledge Base items. To search **across** your meeting library in
chat (with citations back to recordings), add the [Meetings
Connector](/agents/connectors/meetings) to the Agent — see [Chat with your
meetings](/meetings/knowledge-base).
## Upload files and media
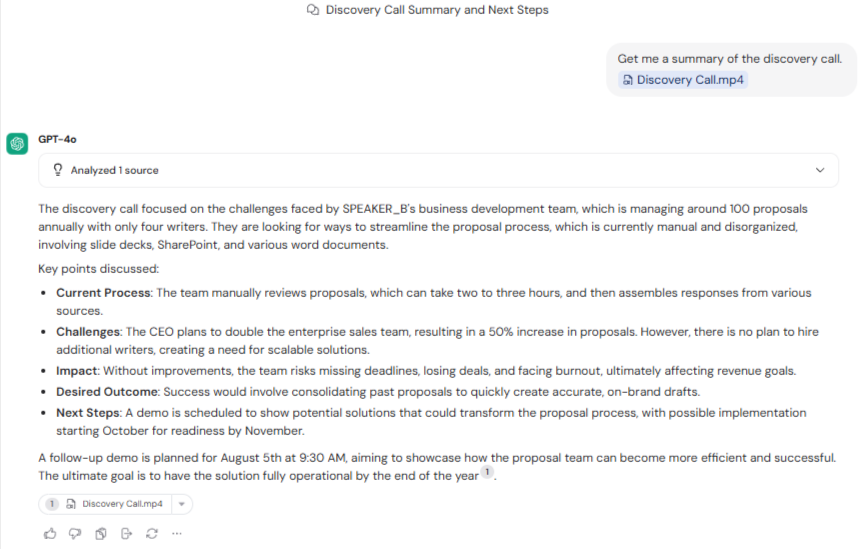
Share files, images, videos, and audio directly in chat to ask questions about their content. These uploads are temporary — they are not saved to your Knowledge Base.
In the bottom-left corner of the text box, click **+** to open attachment options.
Send your message with the referenced item. The Agent uses that specific document as context for its response. For example:
* "Can you summarize the main points of this employee handbook?"
* "How many vacation days am I entitled to according to this policy?"
* "What is the process for requesting time off?"
The **#** reference is useful when you want to point the Agent at a specific
document for a single question. To have an Agent always search certain
Knowledge Base items, add them to the Agent's configuration — see [Build and
configure an Agent](/agents/build-and-configure) for details.
The **#** picker can include recorded [meetings](/meetings/getting-started),
not only Knowledge Base items. To search **across** your meeting library in
chat (with citations back to recordings), add the [Meetings
Connector](/agents/connectors/meetings) to the Agent — see [Chat with your
meetings](/meetings/knowledge-base).
## Upload files and media
Share files, images, videos, and audio directly in chat to ask questions about their content. These uploads are temporary — they are not saved to your Knowledge Base.
In the bottom-left corner of the text box, click **+** to open attachment options.
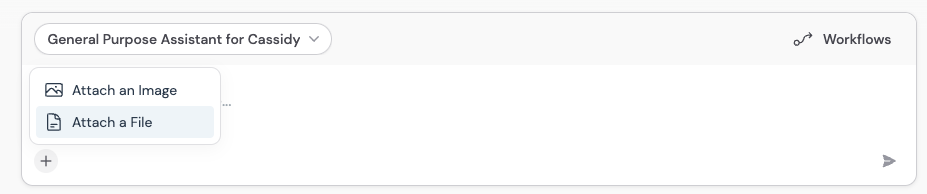 Select **Attach a File** or **Attach an Image** from the menu. You can also drag and drop files directly into the chat window.
Once uploaded, the Agent can analyze the content. Try prompts like:
* "Summarize the key findings in this report"
* "What text is visible in this screenshot?"
* "Extract the data from this chart"
Select **Attach a File** or **Attach an Image** from the menu. You can also drag and drop files directly into the chat window.
Once uploaded, the Agent can analyze the content. Try prompts like:
* "Summarize the key findings in this report"
* "What text is visible in this screenshot?"
* "Extract the data from this chart"
 Uploaded files are temporary and tied to the chat session. If you need to
store a file permanently, [upload it to your Knowledge
Base](/knowledge-base/setup) first, then reference it with **#**.
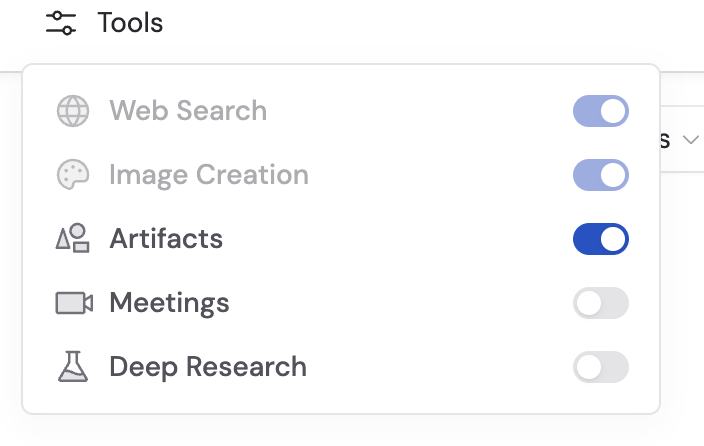
## Use the tools picker
The tools picker lets you control some [capabilities](/agents/capabilities/overview) and [connectors](/agents/connectors/overview) for a given chat. Click the **Tools** button at the bottom of the text box to toggle tools like [Web Search](/agents/capabilities/web-search), [Image Generation](/agents/capabilities/image-generation), [Artifacts](/agents/capabilities/artifacts), and [Browser Use](/agents/capabilities/browser-use) on or off.
[Code Execution & File Creation](/agents/advanced/code-execution-file-creation) is configured on the Agent itself. New custom Agents have it enabled by default. If it is missing, edit the Agent and enable **Code Execution & File Creation** under **Customize** > **Advanced Settings**.
Uploaded files are temporary and tied to the chat session. If you need to
store a file permanently, [upload it to your Knowledge
Base](/knowledge-base/setup) first, then reference it with **#**.
## Use the tools picker
The tools picker lets you control some [capabilities](/agents/capabilities/overview) and [connectors](/agents/connectors/overview) for a given chat. Click the **Tools** button at the bottom of the text box to toggle tools like [Web Search](/agents/capabilities/web-search), [Image Generation](/agents/capabilities/image-generation), [Artifacts](/agents/capabilities/artifacts), and [Browser Use](/agents/capabilities/browser-use) on or off.
[Code Execution & File Creation](/agents/advanced/code-execution-file-creation) is configured on the Agent itself. New custom Agents have it enabled by default. If it is missing, edit the Agent and enable **Code Execution & File Creation** under **Customize** > **Advanced Settings**.
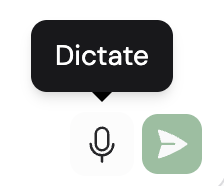
 ## Use voice mode
Voice mode lets you have a spoken conversation with your Agent instead of typing. Click the **microphone** icon in the text box to start speaking. The Agent transcribes your speech, processes it, and responds — both in text and, optionally, with audio playback.
## Use voice mode
Voice mode lets you have a spoken conversation with your Agent instead of typing. Click the **microphone** icon in the text box to start speaking. The Agent transcribes your speech, processes it, and responds — both in text and, optionally, with audio playback.
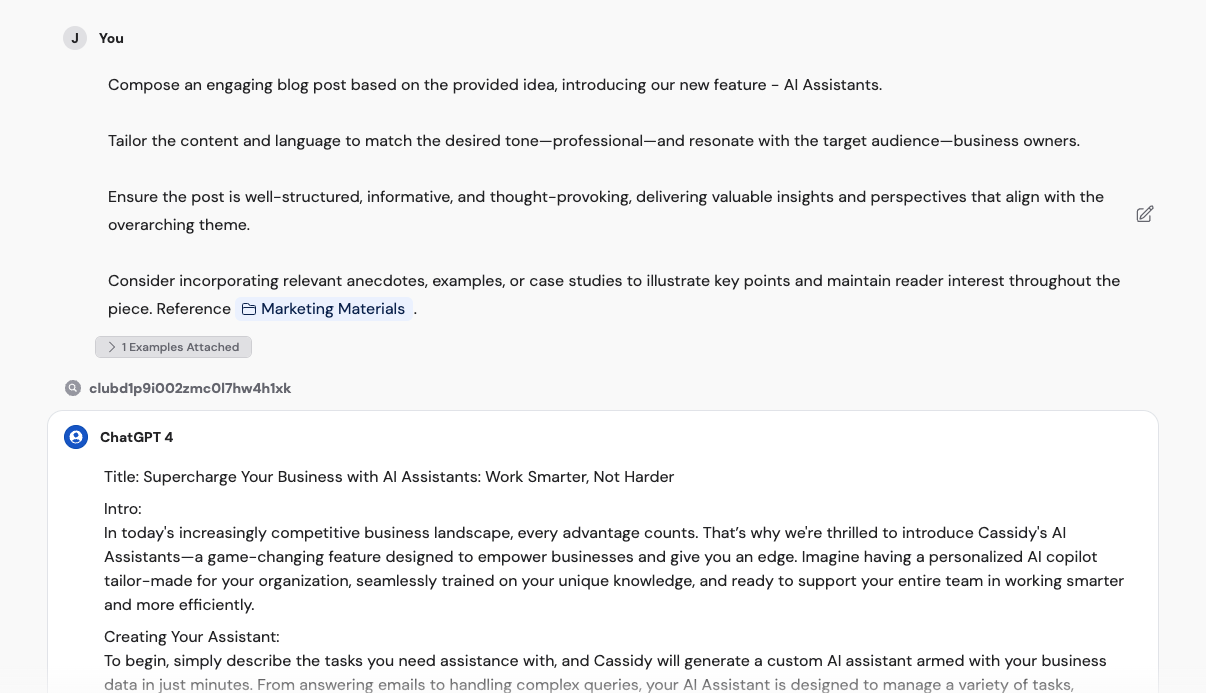
 ## Use the writing editor
The writing editor is a side-by-side panel where you can draft and refine content while chatting with an Agent.
Click **Open editor** in the top-right corner of the chat interface.
## Use the writing editor
The writing editor is a side-by-side panel where you can draft and refine content while chatting with an Agent.
Click **Open editor** in the top-right corner of the chat interface.
 Type directly in the rich text editor while chatting with the Agent. This is useful for researching ideas, drafting content, or getting real-time writing assistance.
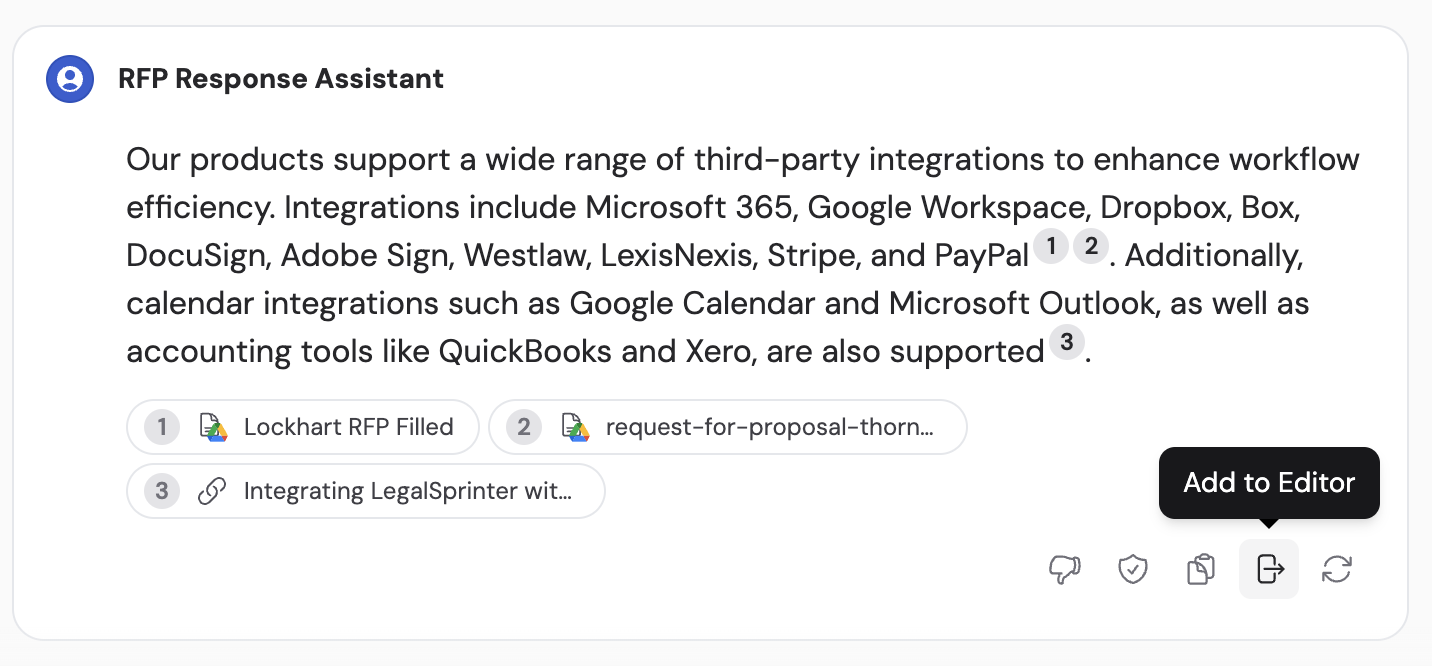
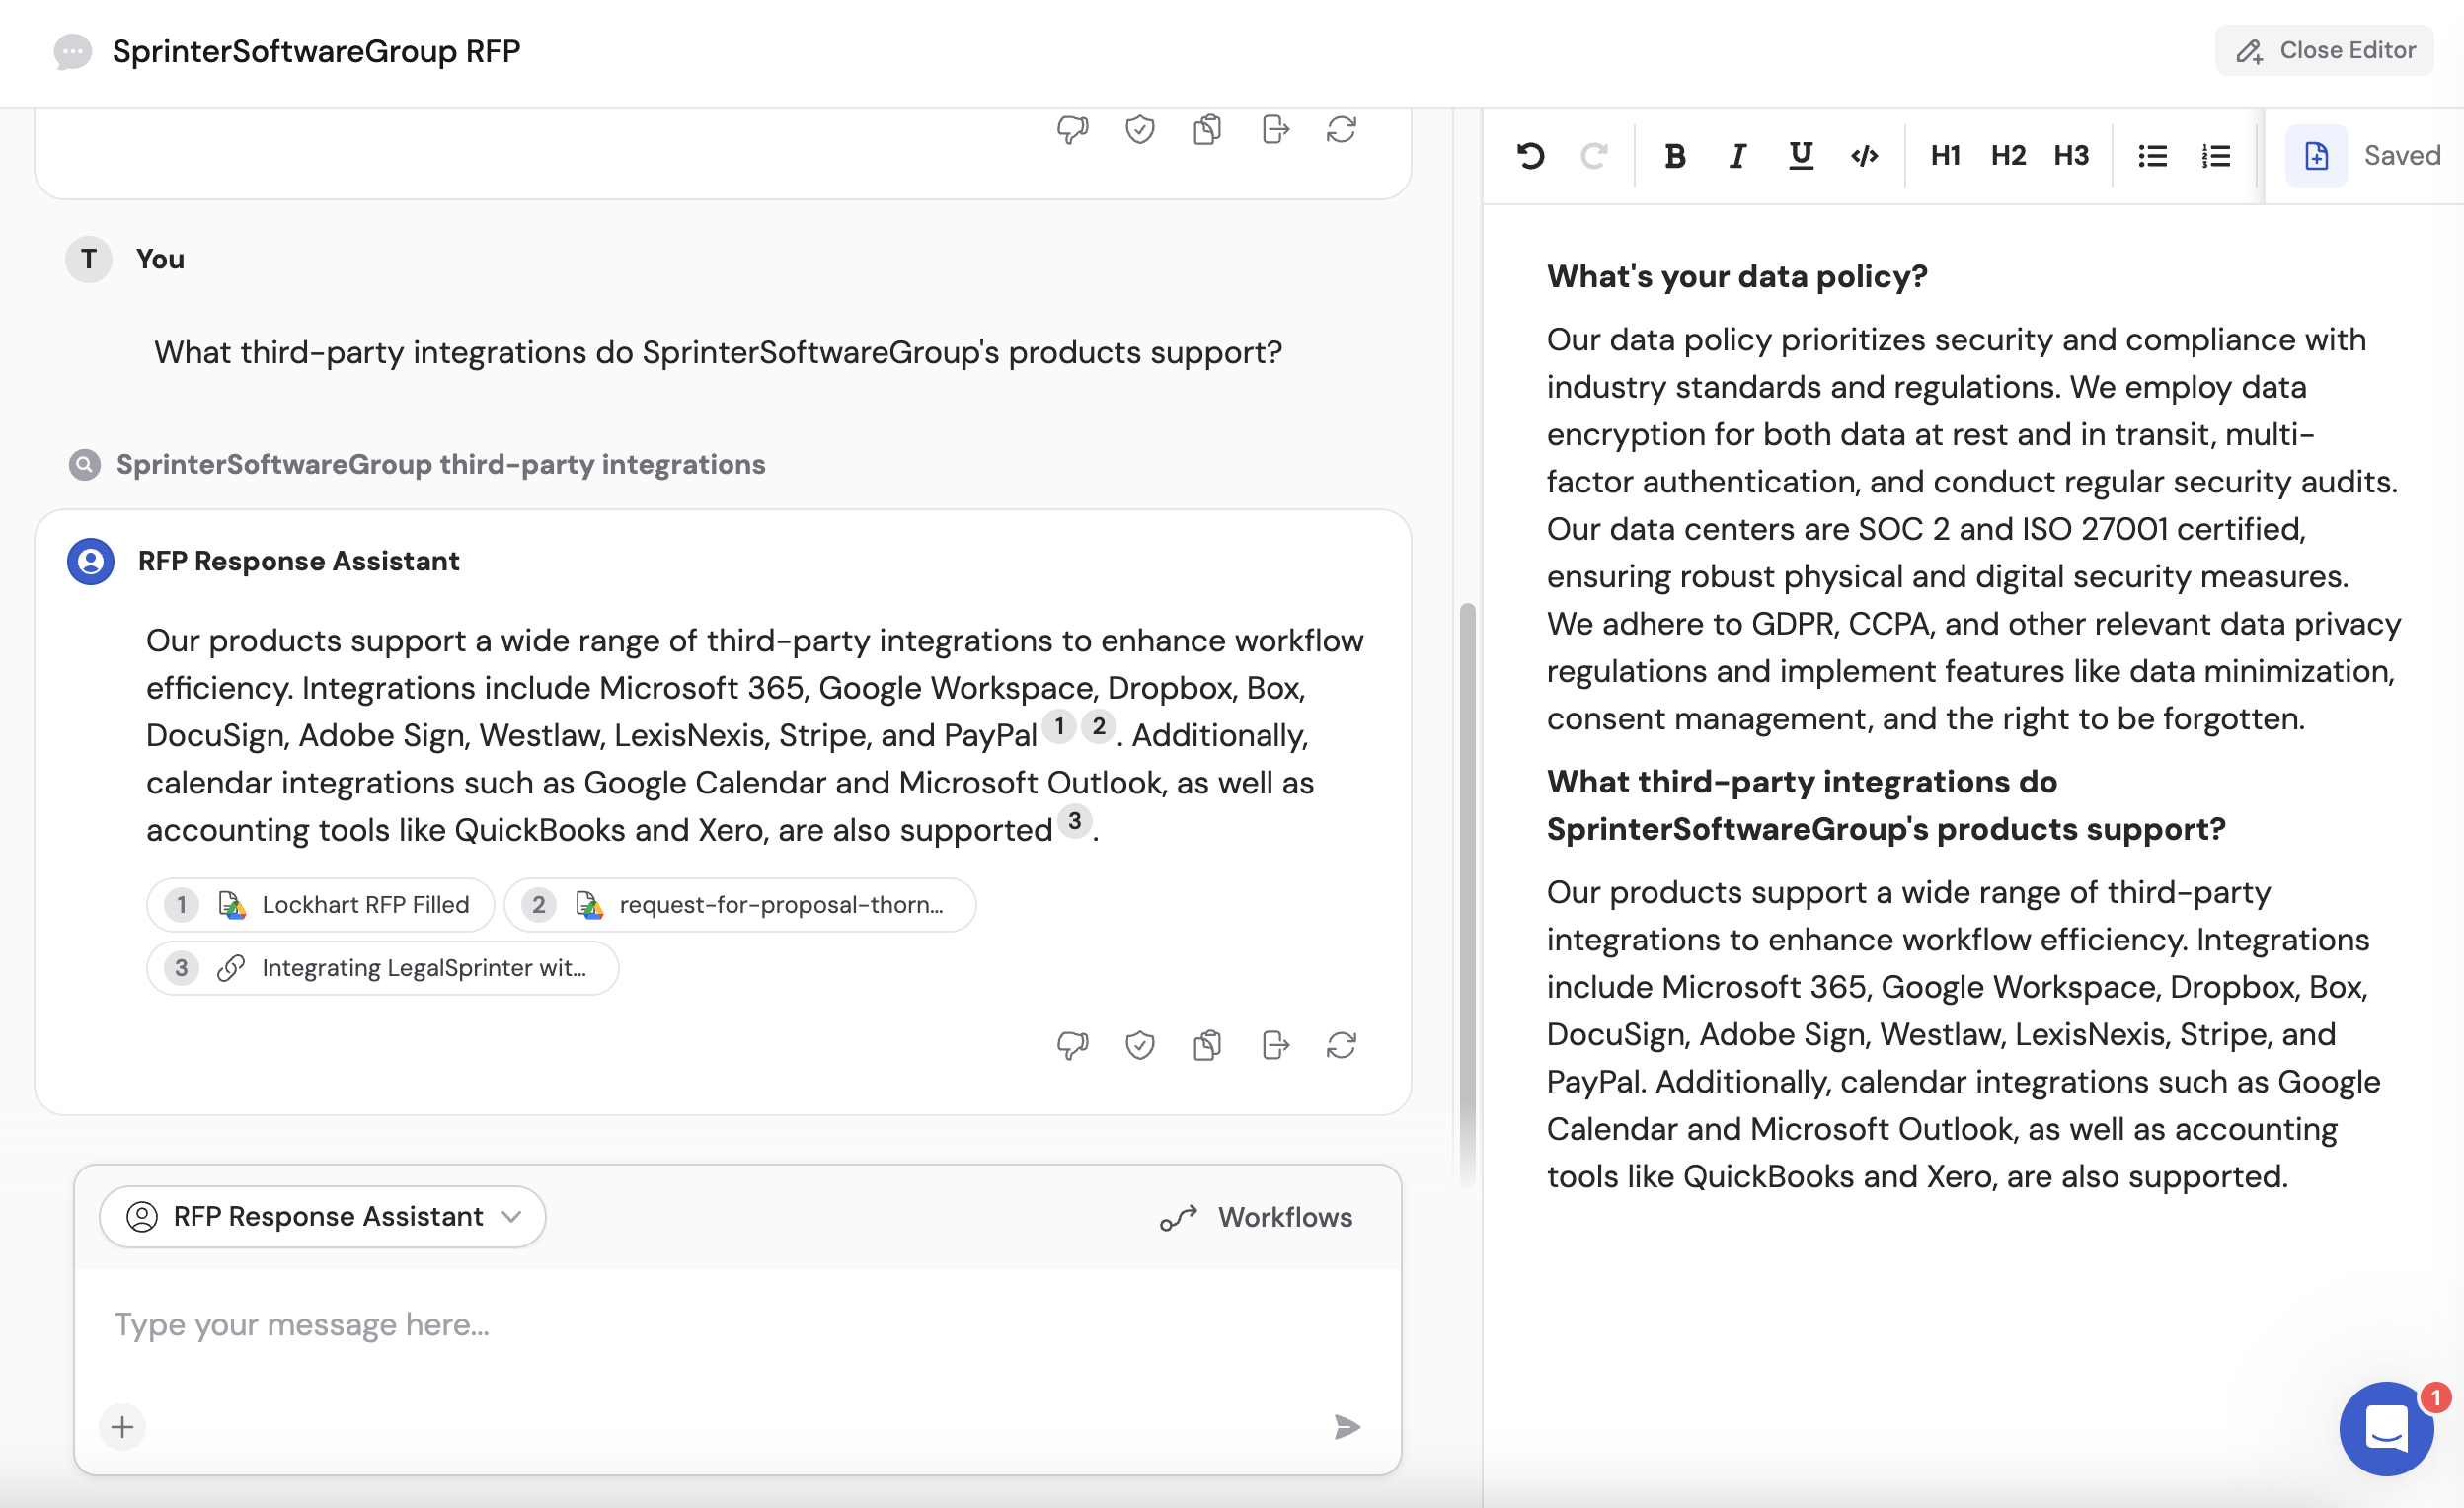 When the Agent generates something you want to keep, click **Add to Editor** on the message. The content is automatically added to your document.
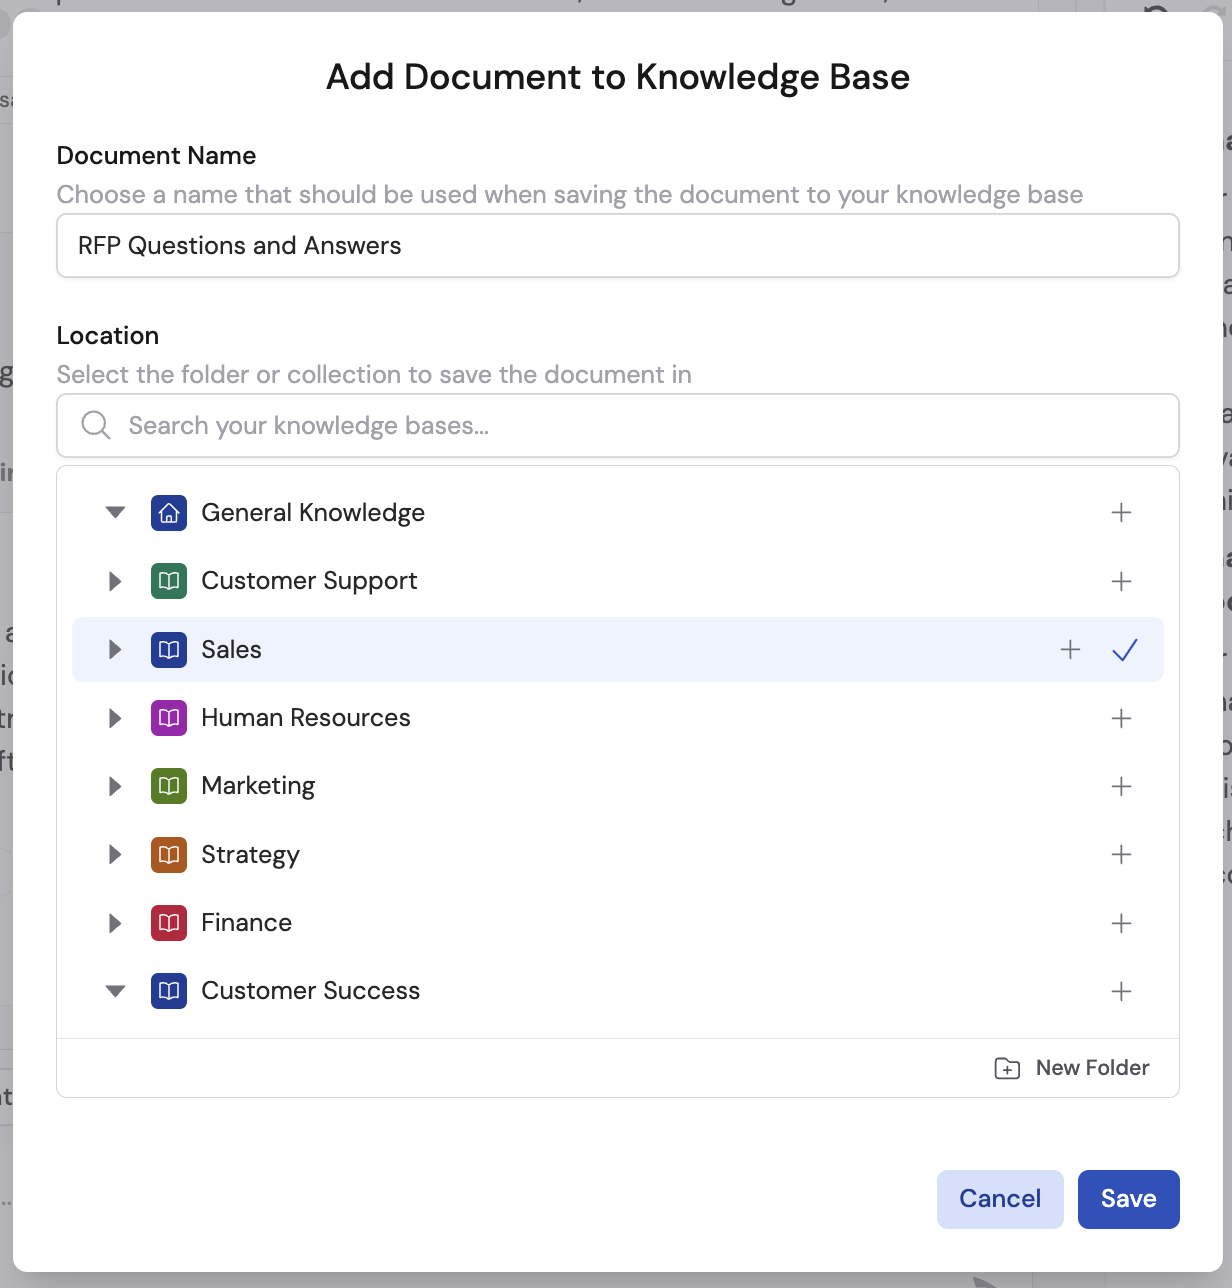
 Click **File** then **Save to Knowledge Base** to store your document permanently. Choose a name and folder location, then click **Save**.
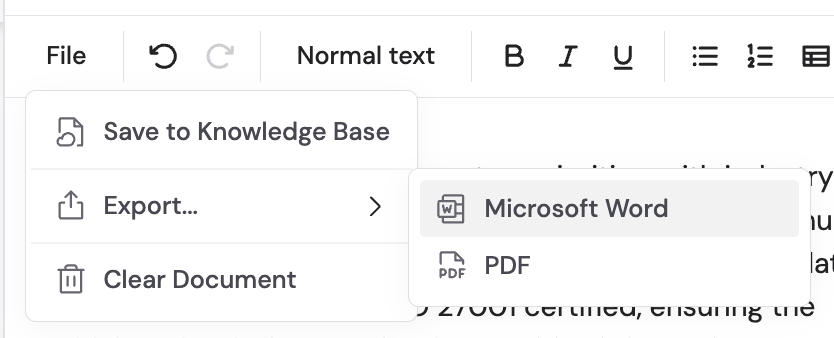
 You can also export to Microsoft Word or PDF format.
Once saved, changes sync automatically between the writing editor and the Knowledge Base document.
The writing editor is tied to each individual chat. Save your work to the
Knowledge Base before closing if you want to keep it.
## Run a Workflow in chat
You can execute [Workflows](/workflows/overview) directly within a chat conversation to automate tasks without leaving the interface.
In the text box, click the **Workflows** button to see available Workflows.
You can also export to Microsoft Word or PDF format.
Once saved, changes sync automatically between the writing editor and the Knowledge Base document.
The writing editor is tied to each individual chat. Save your work to the
Knowledge Base before closing if you want to keep it.
## Run a Workflow in chat
You can execute [Workflows](/workflows/overview) directly within a chat conversation to automate tasks without leaving the interface.
In the text box, click the **Workflows** button to see available Workflows.
 Choose the Workflow you want to run from the list.
A form replaces the text box with input fields for the Workflow. Fill in the required information.
Choose the Workflow you want to run from the list.
A form replaces the text box with input fields for the Workflow. Fill in the required information.
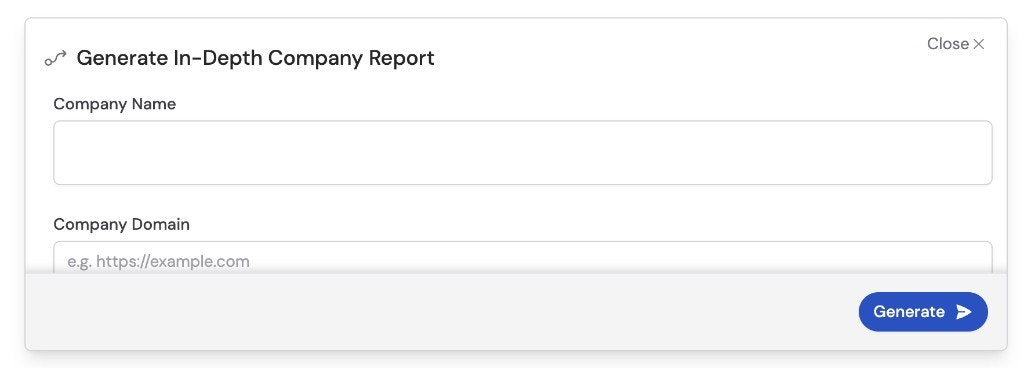 Click **Generate** to run the Workflow. Results appear directly in the chat.
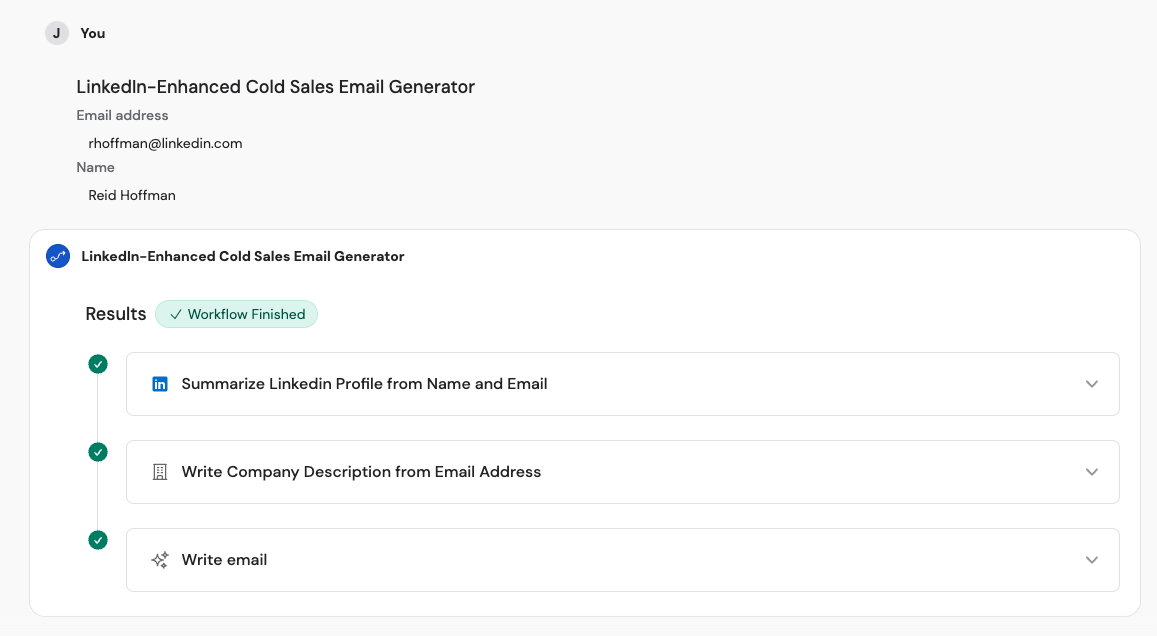 After the Workflow runs, you can ask follow-up questions, refine inputs, or explore the results further in the same chat.
## Use the prompt library
The prompt library lets you create reusable prompt templates so you can quickly apply consistent instructions across chats.
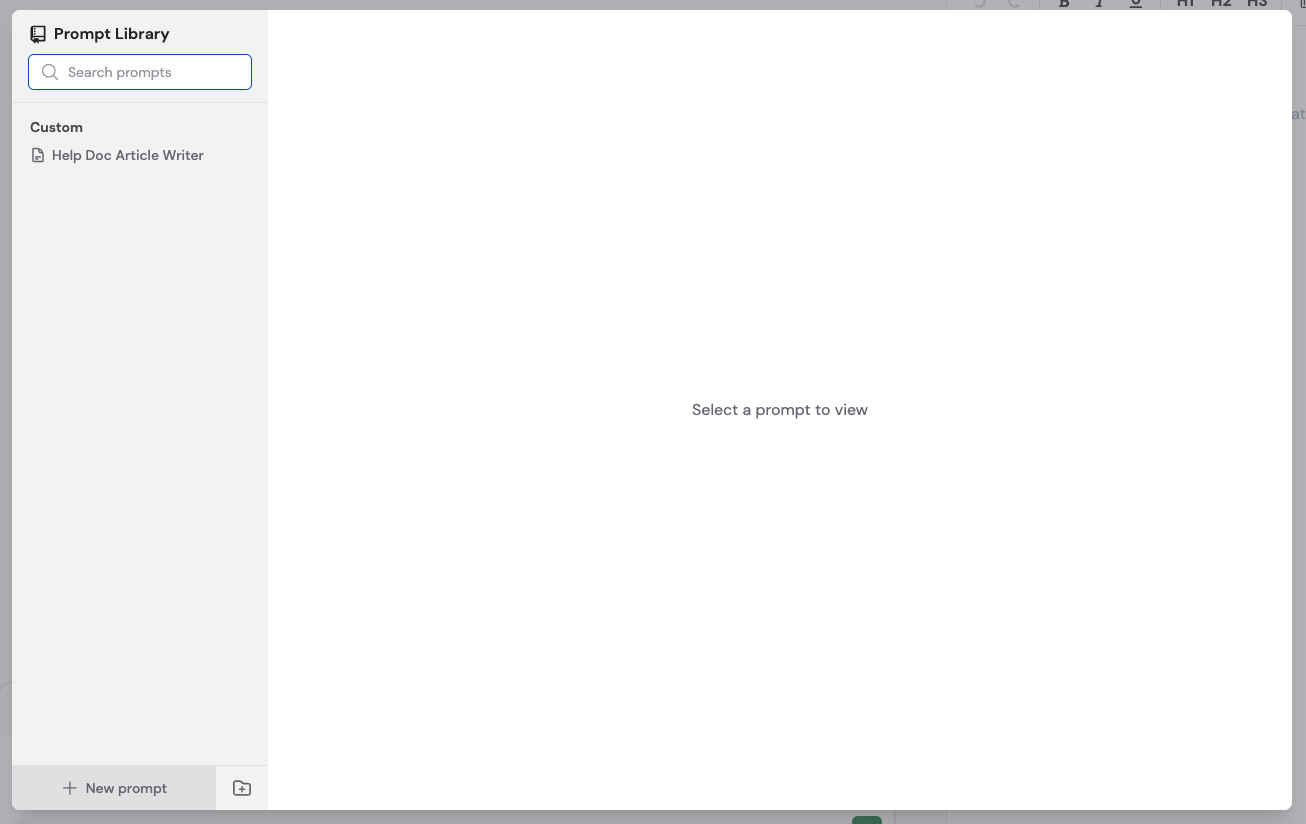
### Manage your prompts
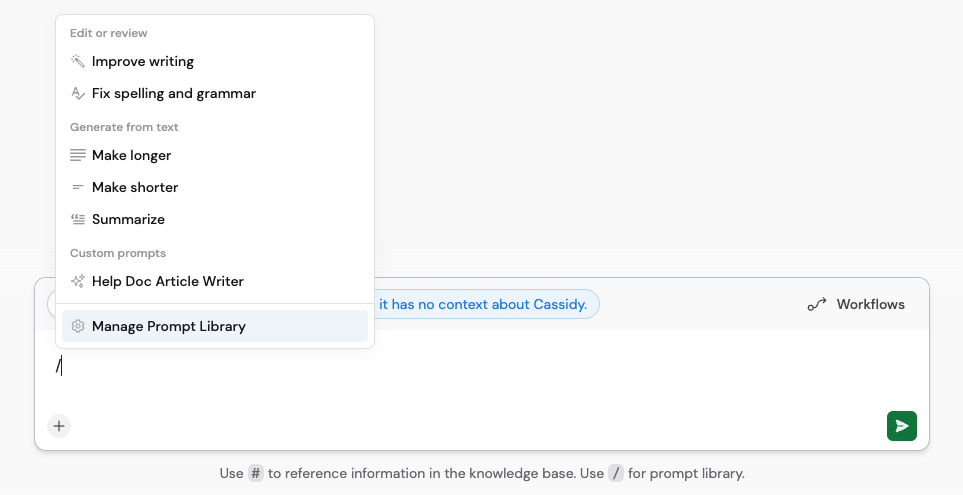
In the chat text box, type **/** and click **Manage prompt library** from the menu.
After the Workflow runs, you can ask follow-up questions, refine inputs, or explore the results further in the same chat.
## Use the prompt library
The prompt library lets you create reusable prompt templates so you can quickly apply consistent instructions across chats.
### Manage your prompts
In the chat text box, type **/** and click **Manage prompt library** from the menu.
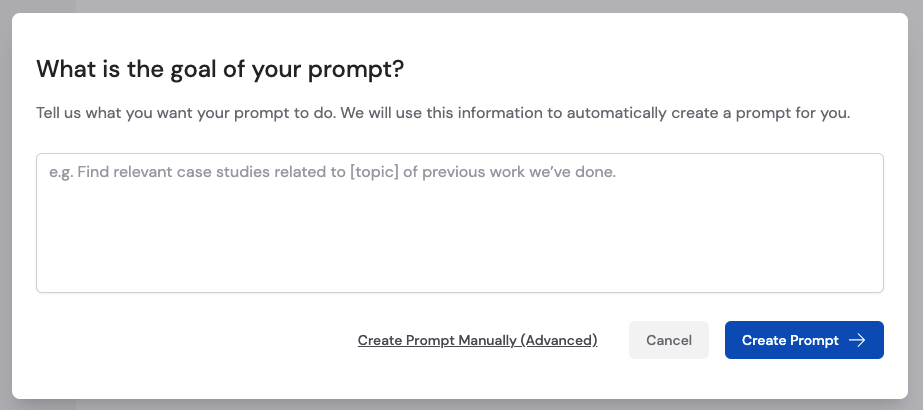
 Click **+ New prompt**. Describe what you want, and Cassidy generates a refined prompt for you. Or click **Create prompt manually (advanced)** to write it yourself.
 When writing prompts manually, you can:
* Use **\[brackets]** for placeholders that change each time (e.g., \[professional] or \[witty] for tone)
* Type **#** to reference [Knowledge Base](/knowledge-base/overview) items
* Add example outputs so the Agent matches your preferred style
When writing prompts manually, you can:
* Use **\[brackets]** for placeholders that change each time (e.g., \[professional] or \[witty] for tone)
* Type **#** to reference [Knowledge Base](/knowledge-base/overview) items
* Add example outputs so the Agent matches your preferred style
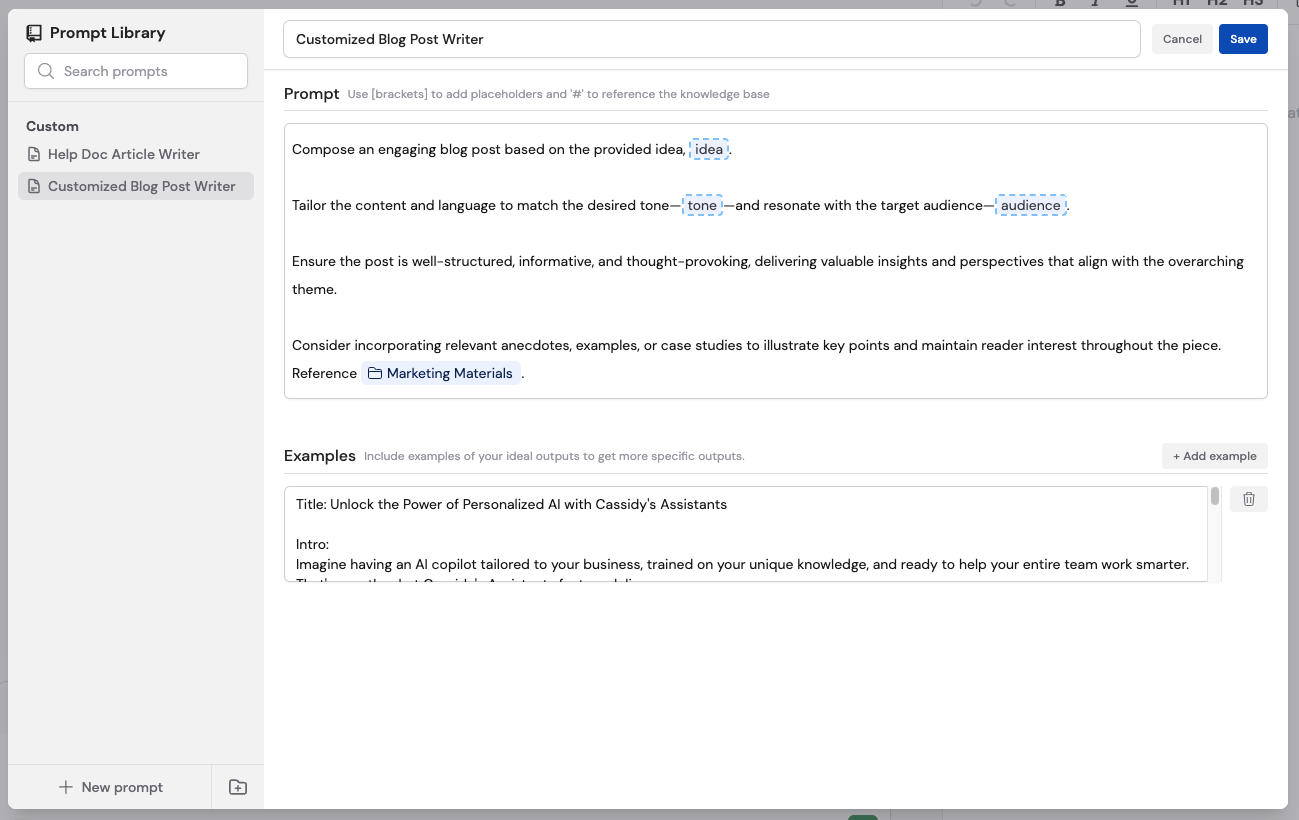 Click **Save** to store it. You can then click **Use prompt** to apply it immediately.
 Prompts created in the library are visible to everyone in your organization.
### Apply a prompt in chat
The menu shows Cassidy's default prompts (like **Improve writing** and **Summarize**) and your custom prompts.
Prompts created in the library are visible to everyone in your organization.
### Apply a prompt in chat
The menu shows Cassidy's default prompts (like **Improve writing** and **Summarize**) and your custom prompts.
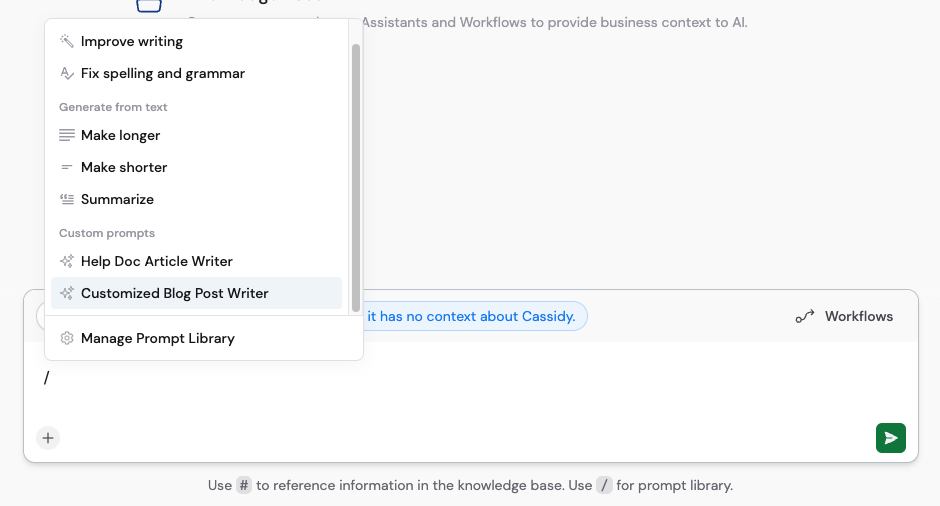 Click a custom prompt to insert it. Replace any placeholders with your actual values — these edits do not change the saved template.
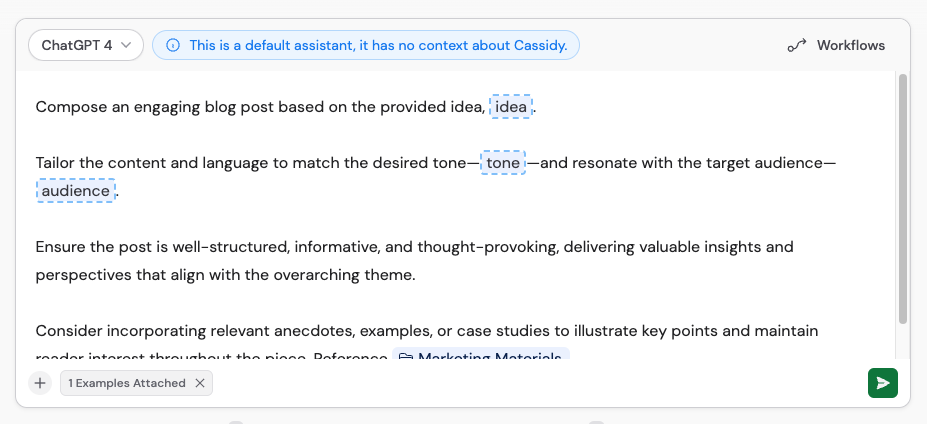 Send the message. The Agent generates a response using your prompt template.
 For default prompts like **Improve writing** or **Summarize**, a quick form
appears where you paste your text and click **Generate**.
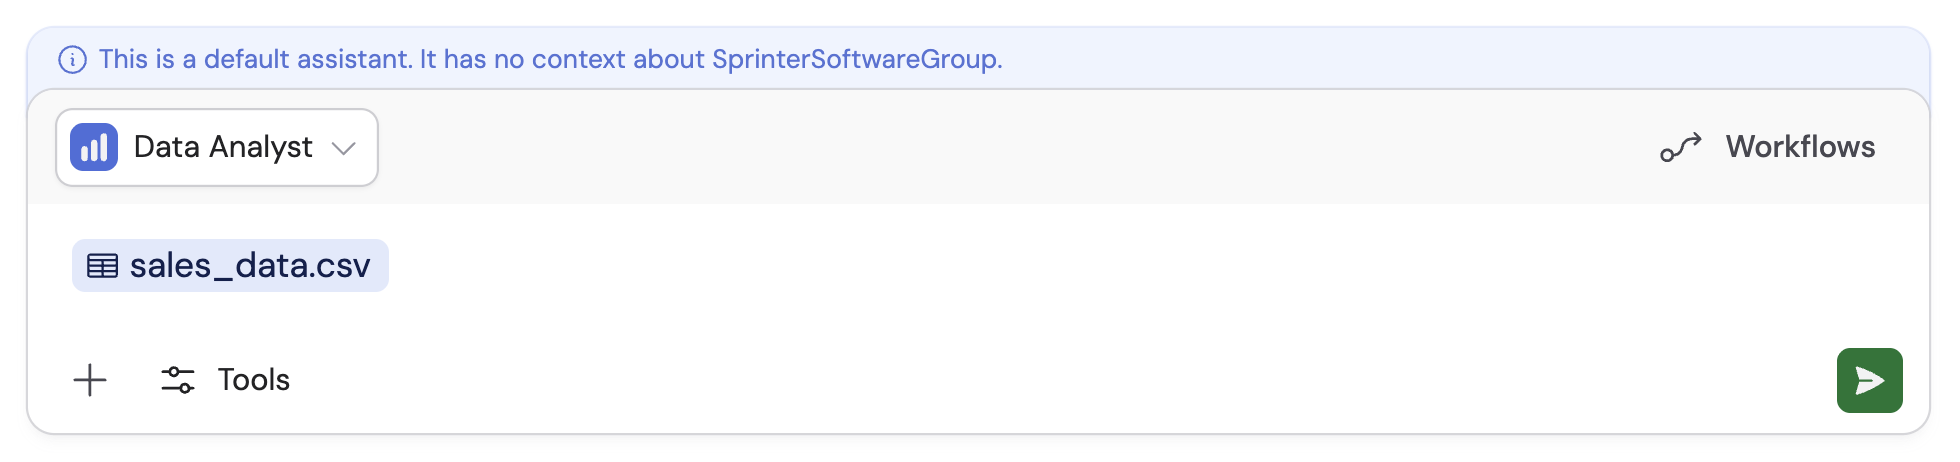
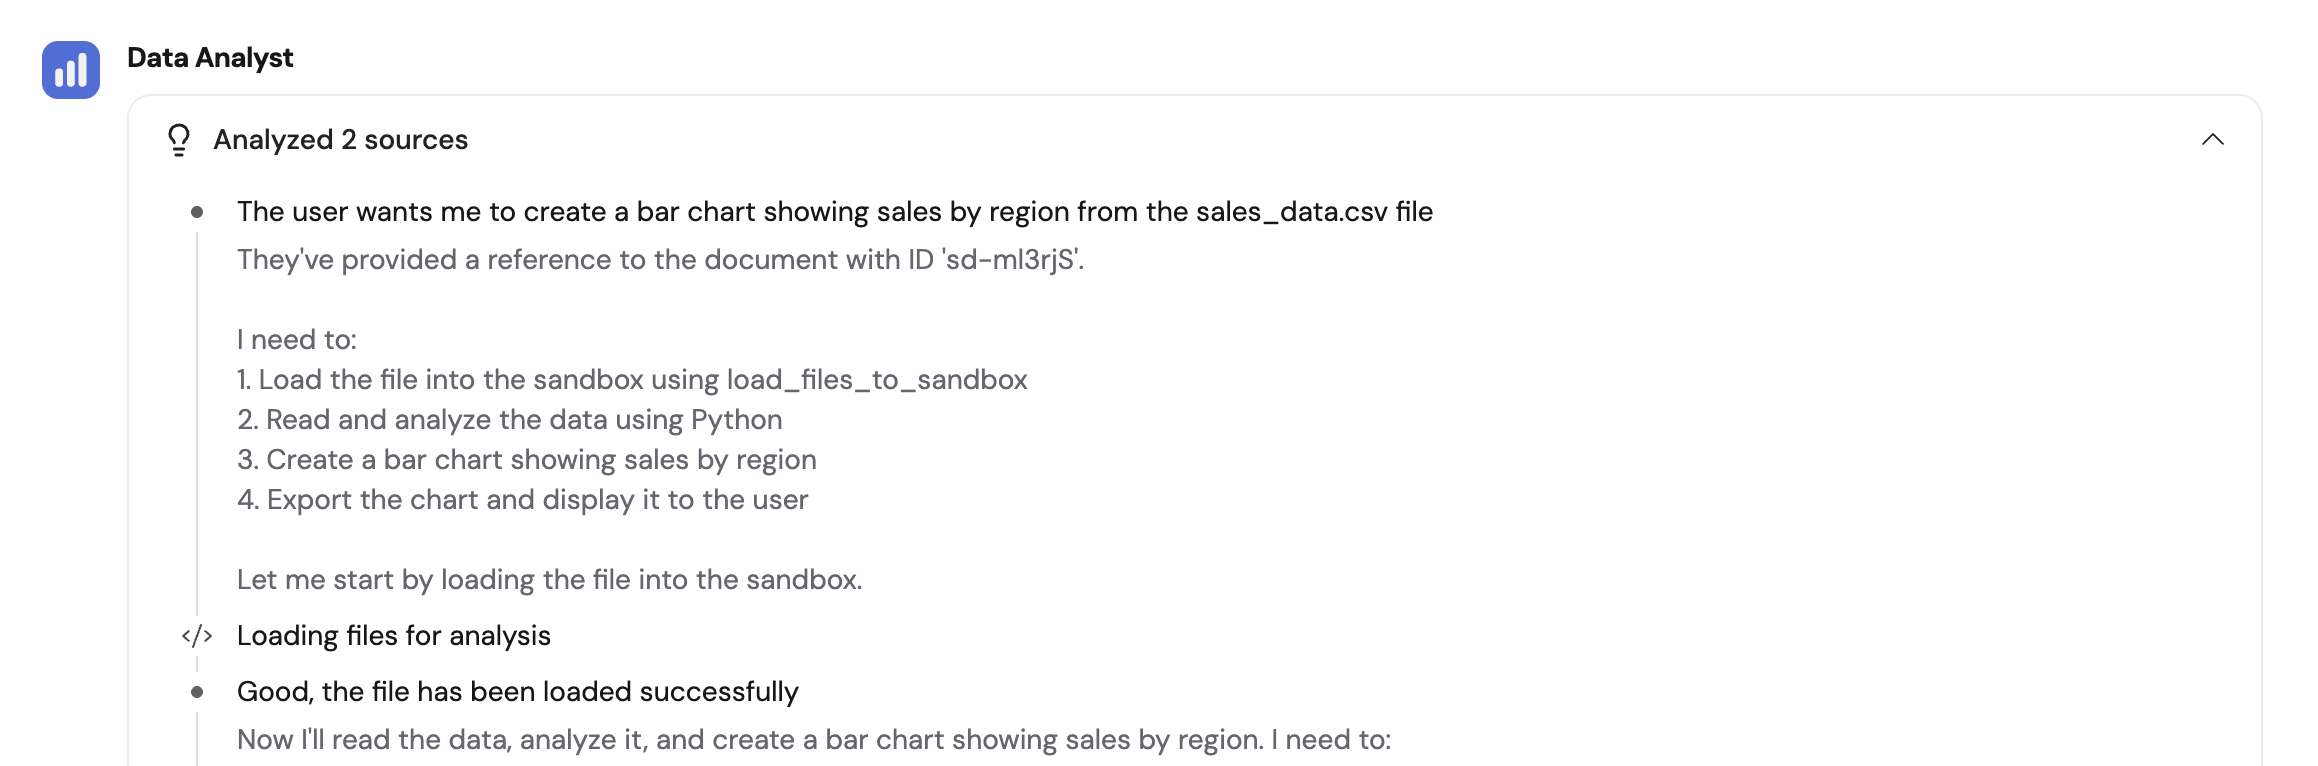
## Analyze data
Upload spreadsheets or data files and let the Agent create charts, run calculations, and extract insights.
Choose the **Data Analyst** default Agent, or use a custom Agent. New custom Agents have [Code Execution & File Creation](/agents/advanced/code-execution-file-creation) enabled by default.
For default prompts like **Improve writing** or **Summarize**, a quick form
appears where you paste your text and click **Generate**.
## Analyze data
Upload spreadsheets or data files and let the Agent create charts, run calculations, and extract insights.
Choose the **Data Analyst** default Agent, or use a custom Agent. New custom Agents have [Code Execution & File Creation](/agents/advanced/code-execution-file-creation) enabled by default.
 Click **+** and attach a CSV or Excel file, or drag and drop it into the chat.
 Describe what you need:
* "Create a bar chart showing sales by region"
* "What are the key trends in customer behavior?"
* "What was the total revenue for Q1?"
Describe what you need:
* "Create a bar chart showing sales by region"
* "What are the key trends in customer behavior?"
* "What was the total revenue for Q1?"
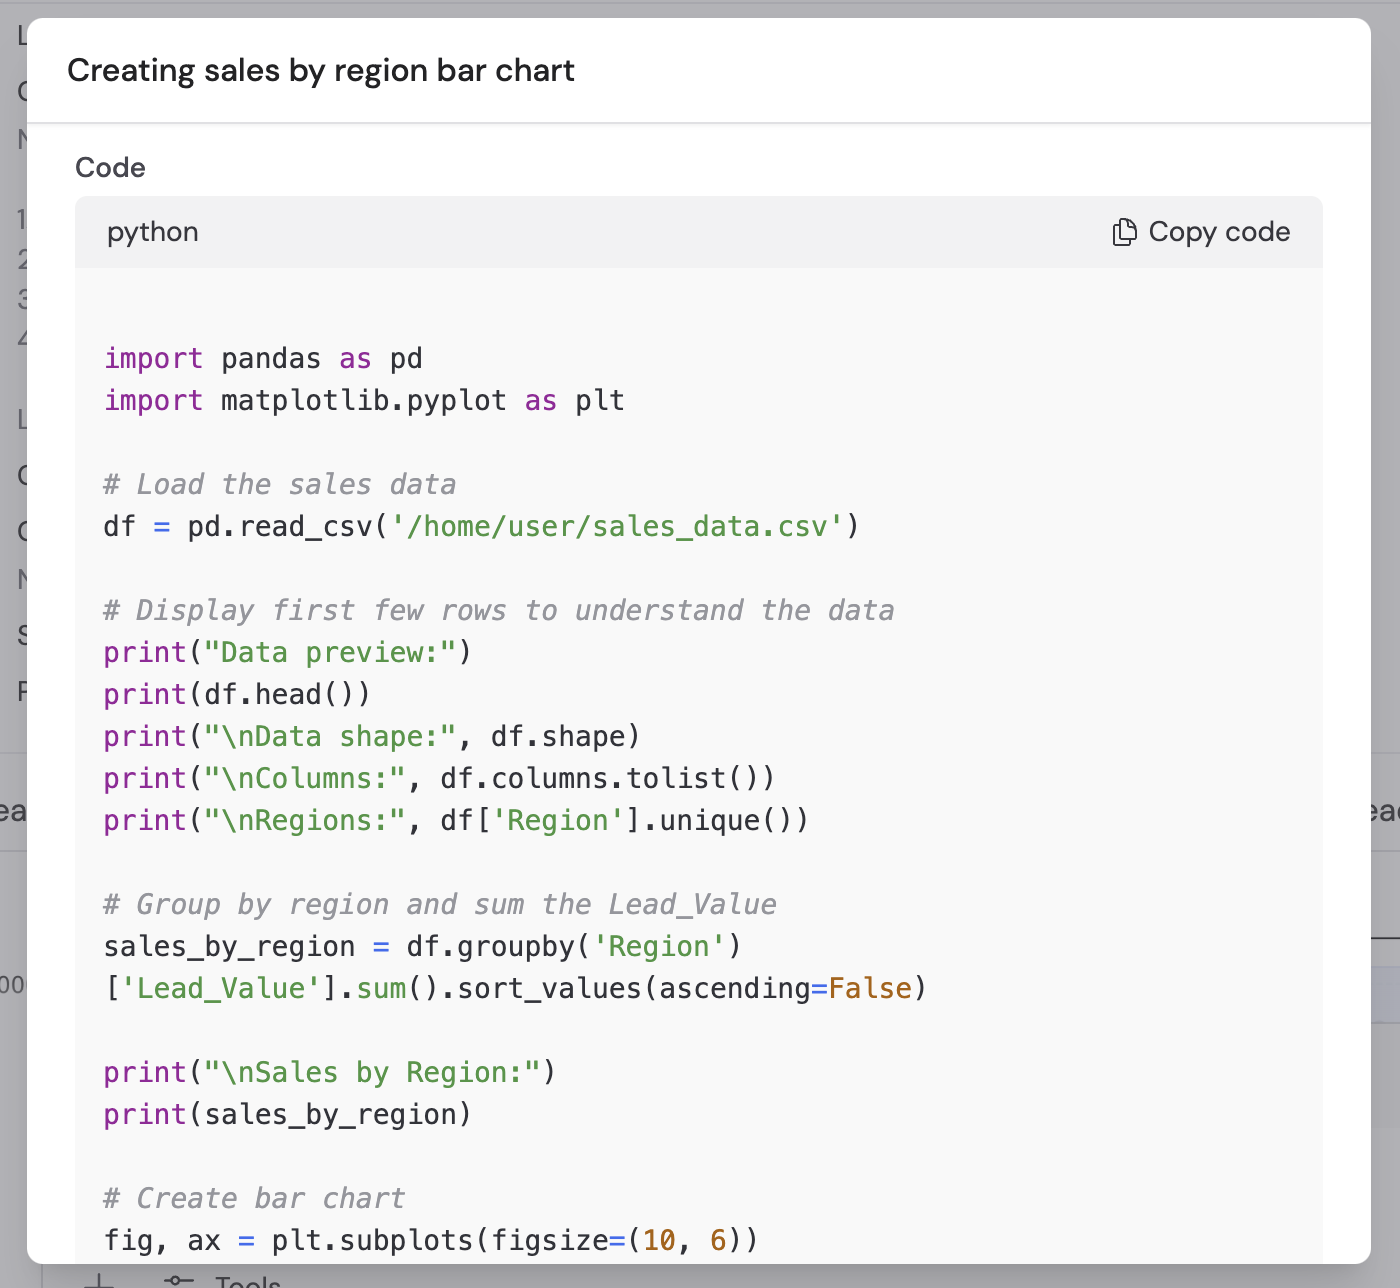
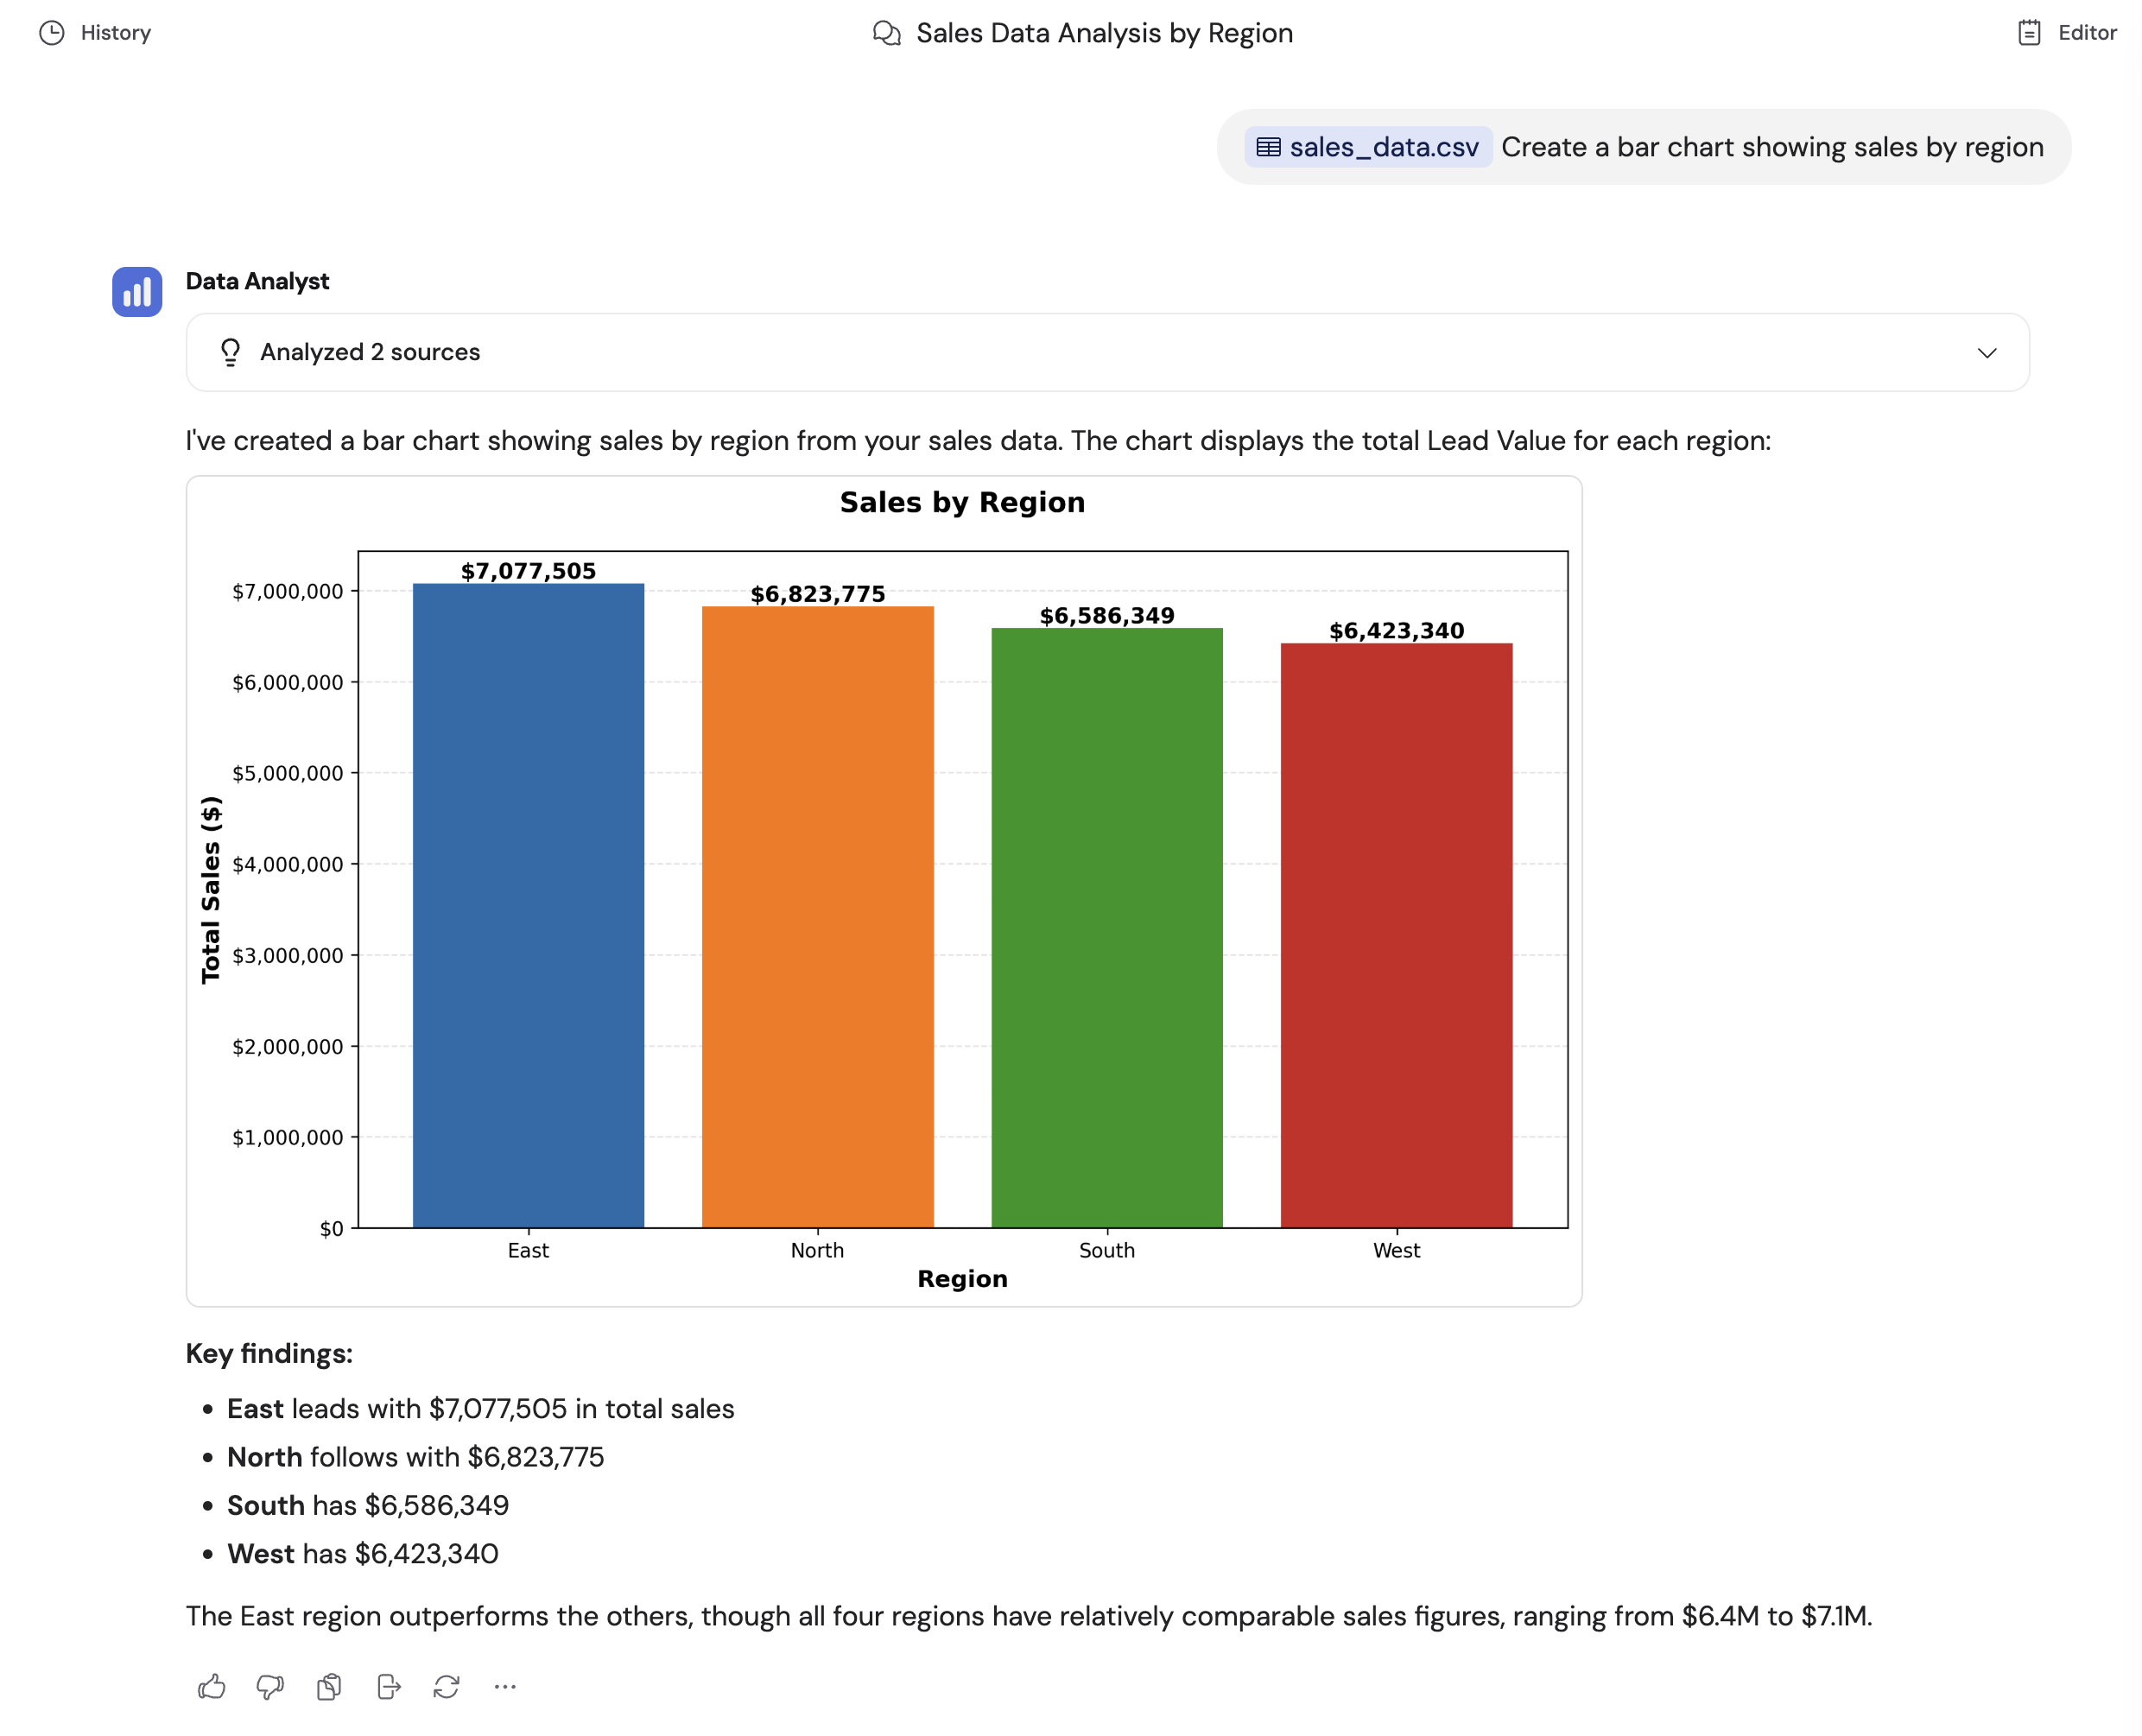 Click **Analyzed sources** in the results, then click the code icon (``) next to any step to see the Python code the Agent used to process your data.
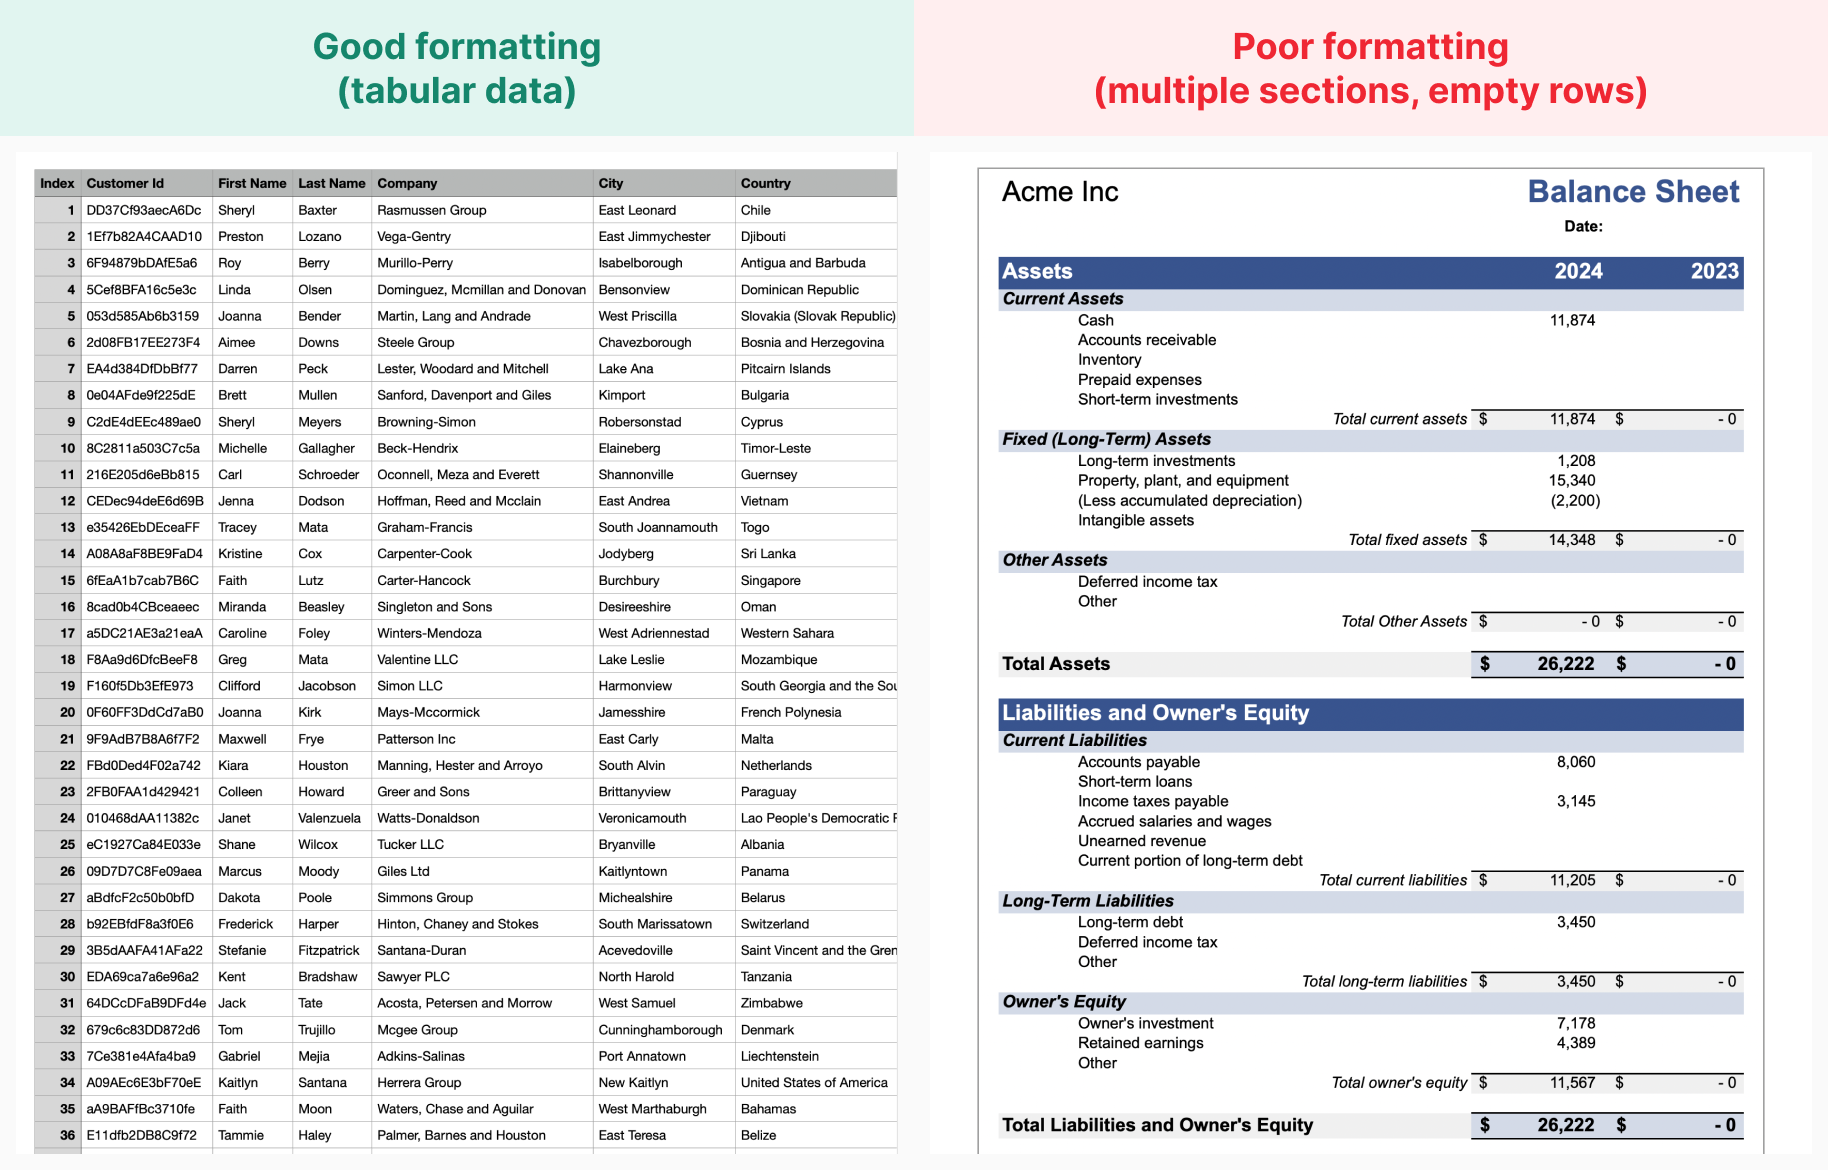
 * **Use CSV or Excel format** — these are the only supported file types for data analysis
* **Organize data in rows and columns** — each row is a record, each column is a variable
* **Include descriptive column headers** in the first row — avoid blank rows above the headers
* **Keep data consistent** — no empty rows between entries, no multiple tables in one file, avoid multiple worksheets
* **Use CSV or Excel format** — these are the only supported file types for data analysis
* **Organize data in rows and columns** — each row is a record, each column is a variable
* **Include descriptive column headers** in the first row — avoid blank rows above the headers
* **Keep data consistent** — no empty rows between entries, no multiple tables in one file, avoid multiple worksheets
 Code Execution & File Creation can also:
* **Manipulate branded templates** — fill out forms, convert reports to presentations, edit Word documents and PDFs
* **Create synthetic data** — generate sample datasets for testing or demonstrations
For more on generating files, see [Create files in Cassidy](/guides/create-files).
## Edit and regenerate messages
You can modify a sent message and have the Agent generate a new response.
Move your cursor over the message you want to change. An edit icon appears on the right.
Code Execution & File Creation can also:
* **Manipulate branded templates** — fill out forms, convert reports to presentations, edit Word documents and PDFs
* **Create synthetic data** — generate sample datasets for testing or demonstrations
For more on generating files, see [Create files in Cassidy](/guides/create-files).
## Edit and regenerate messages
You can modify a sent message and have the Agent generate a new response.
Move your cursor over the message you want to change. An edit icon appears on the right.
 Click the edit icon, modify your text, and press **Enter**. The Agent generates a new response based on your updated message.
 Click the left and right arrows at the top of the Agent's response to cycle through all generated versions.
 You cannot edit Agent messages directly, but you can click **Regenerate** to
produce a new response with the same prompt.
## Branch a conversation
Branching creates a copy of a conversation up to a specific message, so you can explore a different direction without losing the original thread.
Open a chat and scroll to the message you want to branch from.
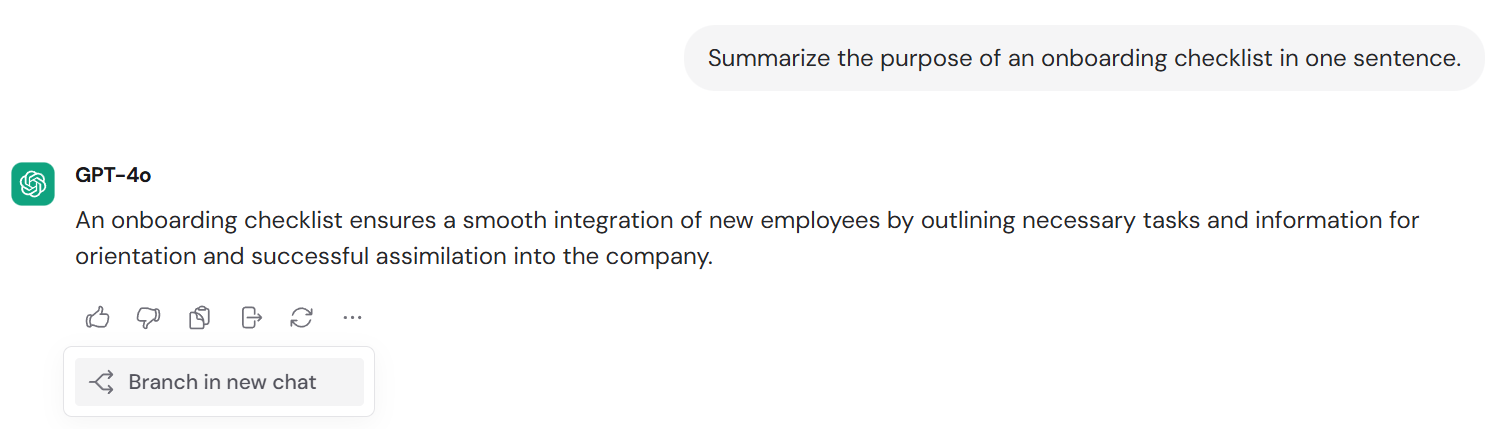
Click the **...** menu below the message and select **Branch in new chat**.
You cannot edit Agent messages directly, but you can click **Regenerate** to
produce a new response with the same prompt.
## Branch a conversation
Branching creates a copy of a conversation up to a specific message, so you can explore a different direction without losing the original thread.
Open a chat and scroll to the message you want to branch from.
Click the **...** menu below the message and select **Branch in new chat**.
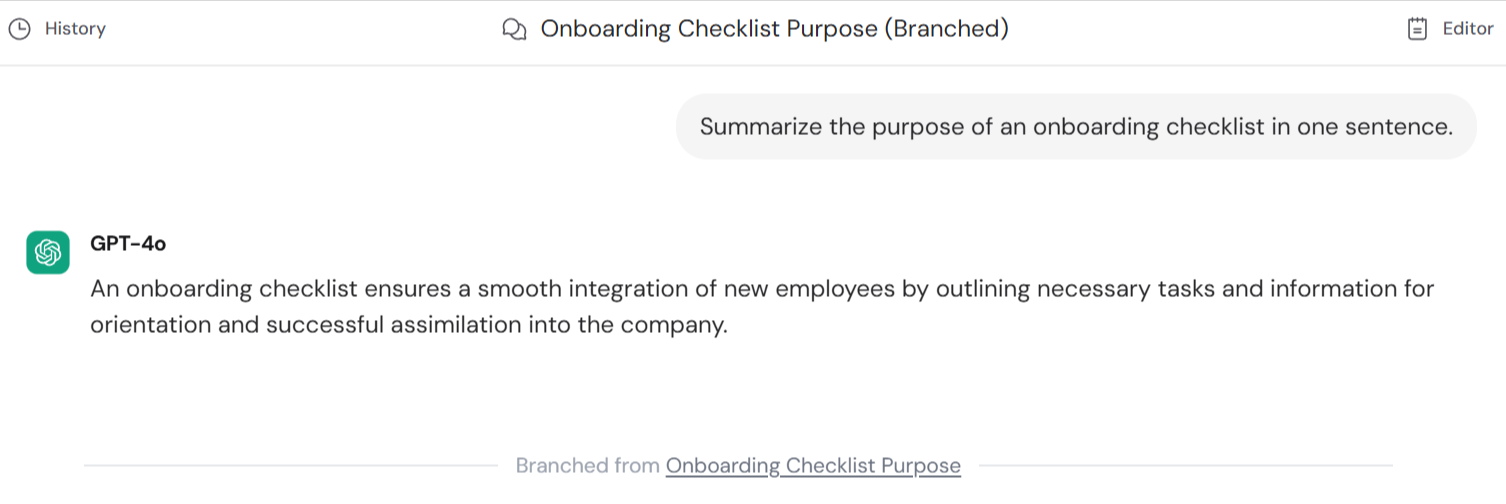
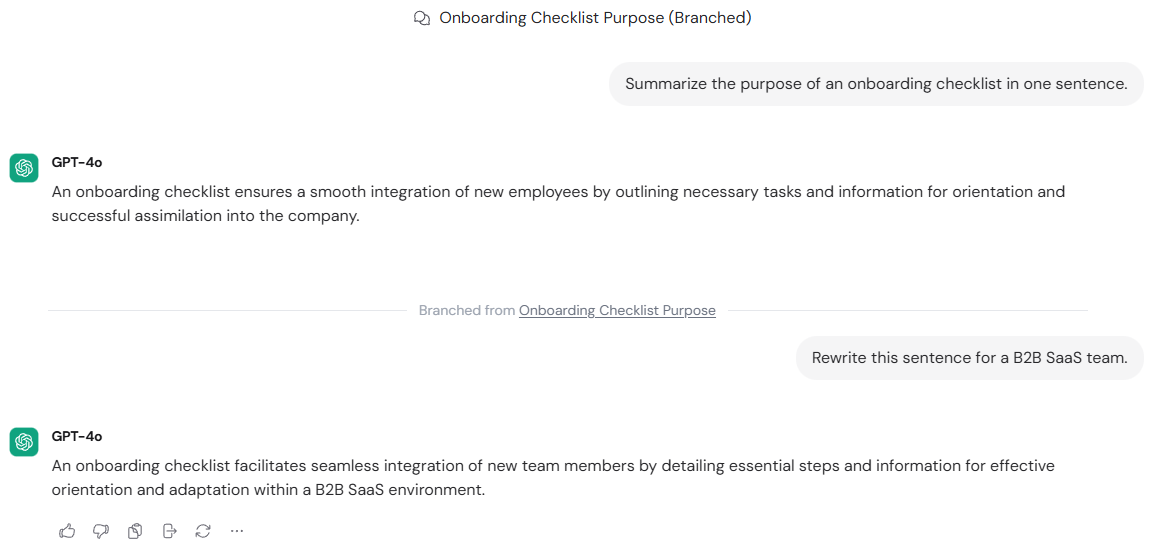
 A new chat opens in a separate tab with the full conversation history up to that message. The original chat remains unchanged. The new chat is labeled "Branched from \[Chat Title]."
 ## Share and organize chats
Chats use the same sharing model as [Agents](/agents/sharing-and-management) and [Workflows](/workflows/sharing-and-deployment) — you can share with specific teammates, [groups](/settings/roles-and-groups), or your whole organization, and set each person's access to **View** (read-only) or **Edit** (can send messages).
### Share a chat
Open the **...** menu on any chat and select **Share**, or click the **Share** button in the chat header. Choose who can access it and set their permission level. Sharing a chat does not notify the recipient — you'll need to send them the link directly.
## Share and organize chats
Chats use the same sharing model as [Agents](/agents/sharing-and-management) and [Workflows](/workflows/sharing-and-deployment) — you can share with specific teammates, [groups](/settings/roles-and-groups), or your whole organization, and set each person's access to **View** (read-only) or **Edit** (can send messages).
### Share a chat
Open the **...** menu on any chat and select **Share**, or click the **Share** button in the chat header. Choose who can access it and set their permission level. Sharing a chat does not notify the recipient — you'll need to send them the link directly.
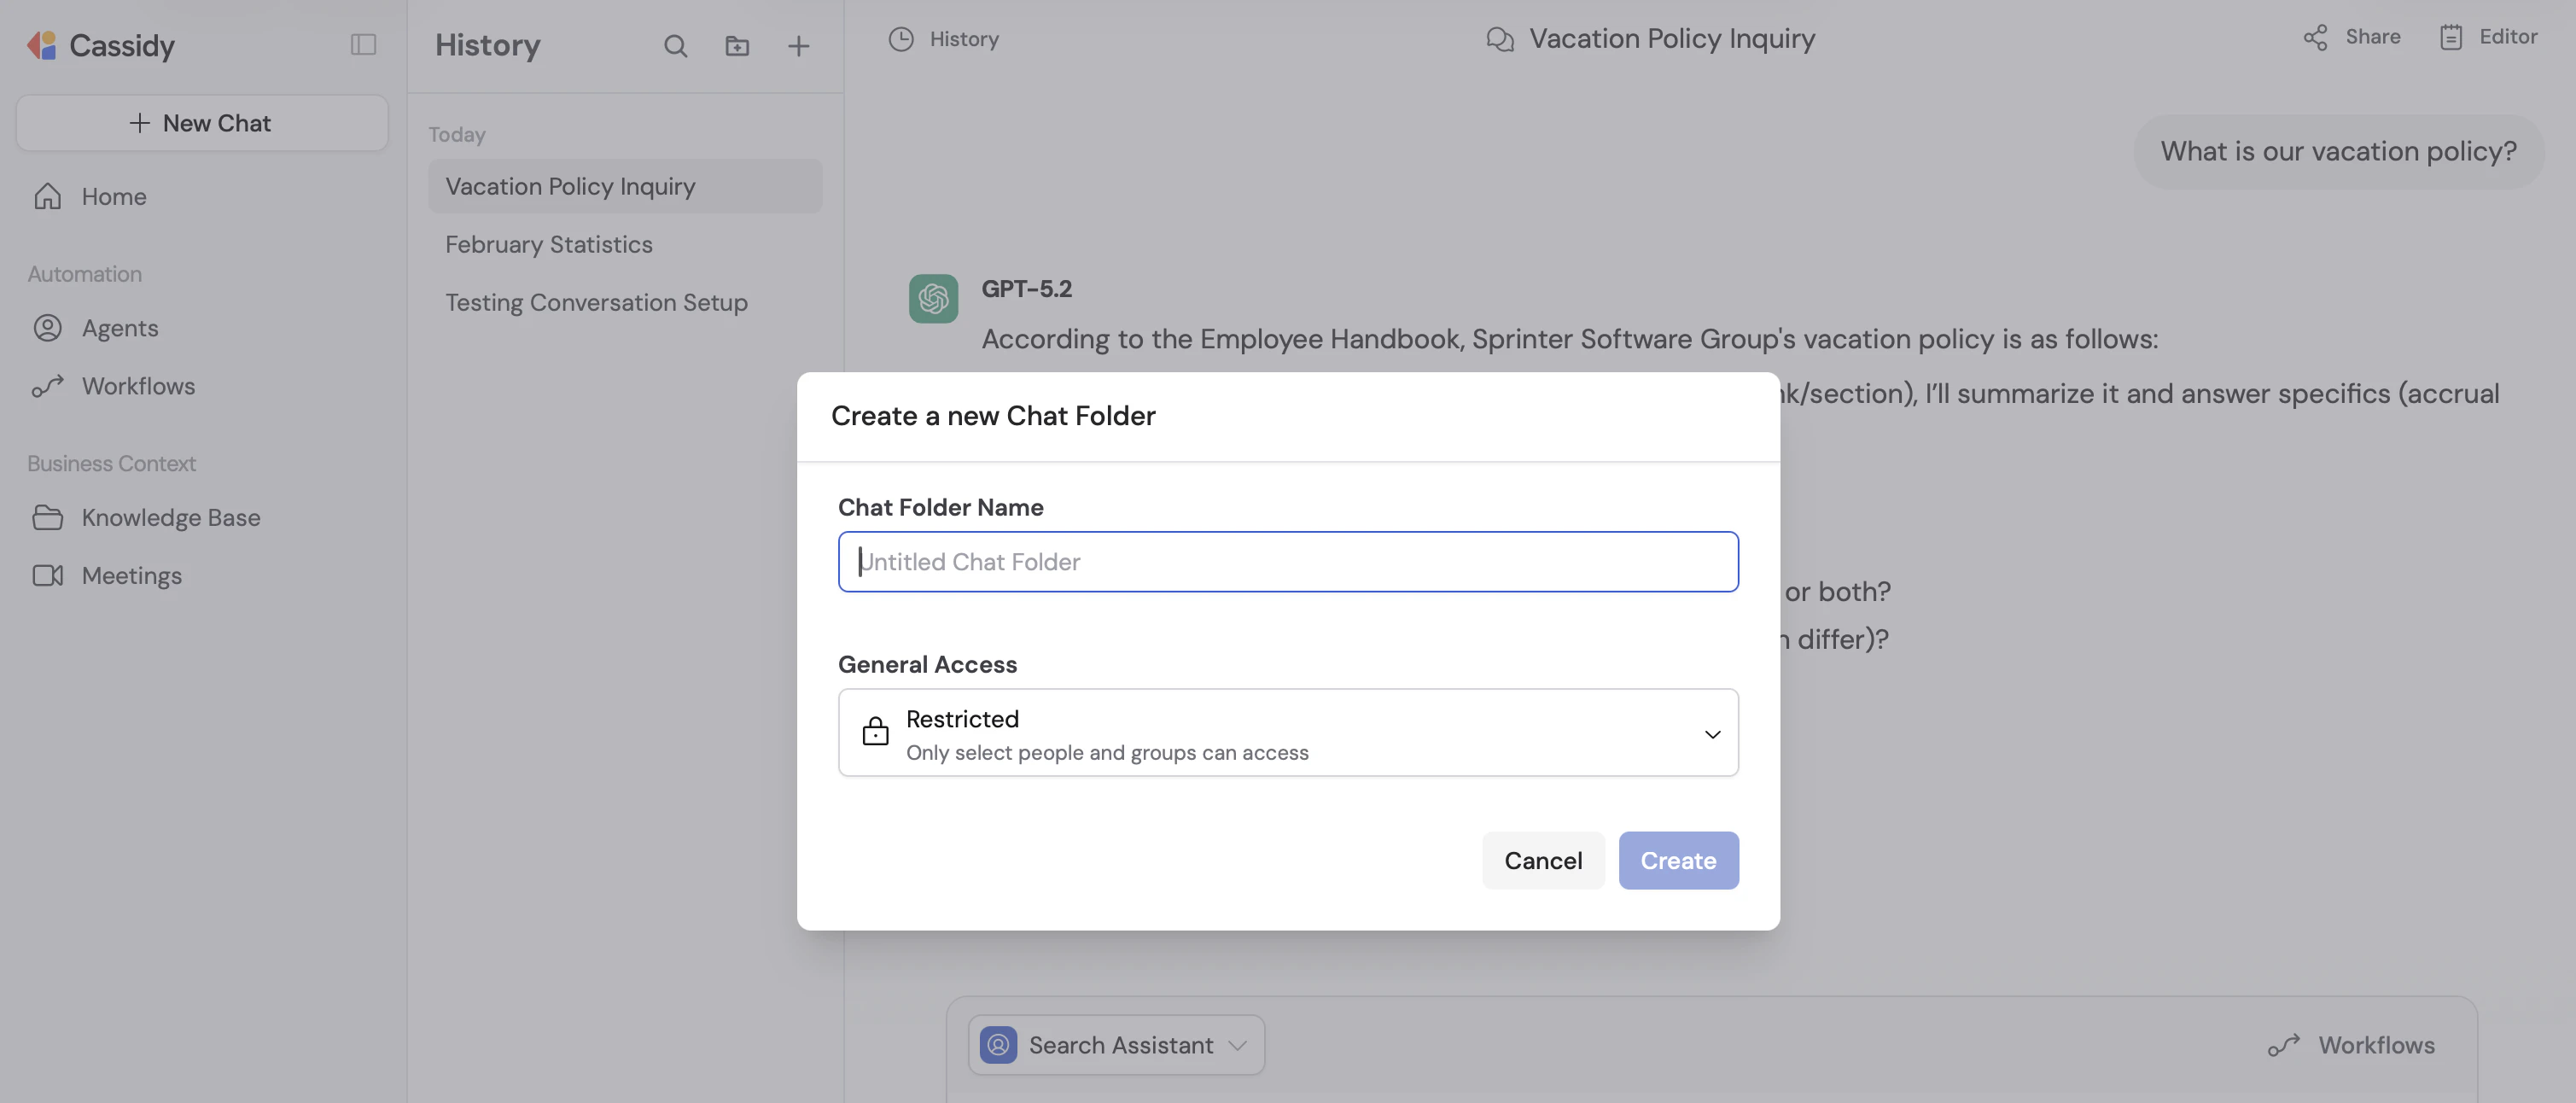
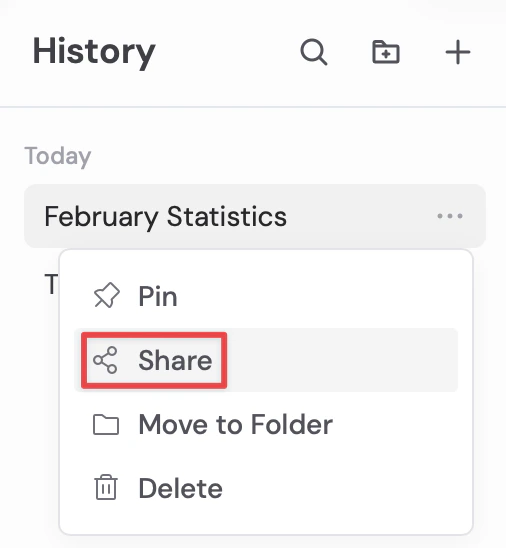 ### Organize chats with folders
Folders let you group related chats and control access for the whole collection at once. To create a folder, click the **folder +** icon in the chat sidebar, give it a name, and choose an access level. You can then drag chats into it or use the **Move to folder** option in a chat's **...** menu.
### Organize chats with folders
Folders let you group related chats and control access for the whole collection at once. To create a folder, click the **folder +** icon in the chat sidebar, give it a name, and choose an access level. You can then drag chats into it or use the **Move to folder** option in a chat's **...** menu.
 Chats inside a folder inherit the folder's sharing settings — they cannot be shared individually while in a folder. Moving an already-shared chat into a folder will switch it to use the folder's permissions instead.
When a chat folder is shared with you, it automatically appears in your chat history sidebar. You can pin shared folders to keep them at the top of your sidebar for quick access.
Keep these things in mind when sharing chats:
* Chats inside a folder use the folder's sharing settings and cannot be shared individually
* New messages added to a shared chat are visible to everyone with access in real time
* Shared folders appear in the history sidebar for everyone they're shared with and can be pinned for easy access
## Use Cassidy in multiple languages
While the Cassidy interface is in English, the AI models can understand and respond in virtually any language. Type your message in the language you prefer, and the Agent responds in the same language.
Chats inside a folder inherit the folder's sharing settings — they cannot be shared individually while in a folder. Moving an already-shared chat into a folder will switch it to use the folder's permissions instead.
When a chat folder is shared with you, it automatically appears in your chat history sidebar. You can pin shared folders to keep them at the top of your sidebar for quick access.
Keep these things in mind when sharing chats:
* Chats inside a folder use the folder's sharing settings and cannot be shared individually
* New messages added to a shared chat are visible to everyone with access in real time
* Shared folders appear in the history sidebar for everyone they're shared with and can be pinned for easy access
## Use Cassidy in multiple languages
While the Cassidy interface is in English, the AI models can understand and respond in virtually any language. Type your message in the language you prefer, and the Agent responds in the same language.
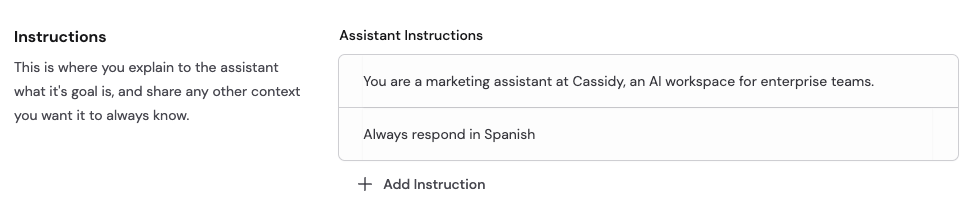
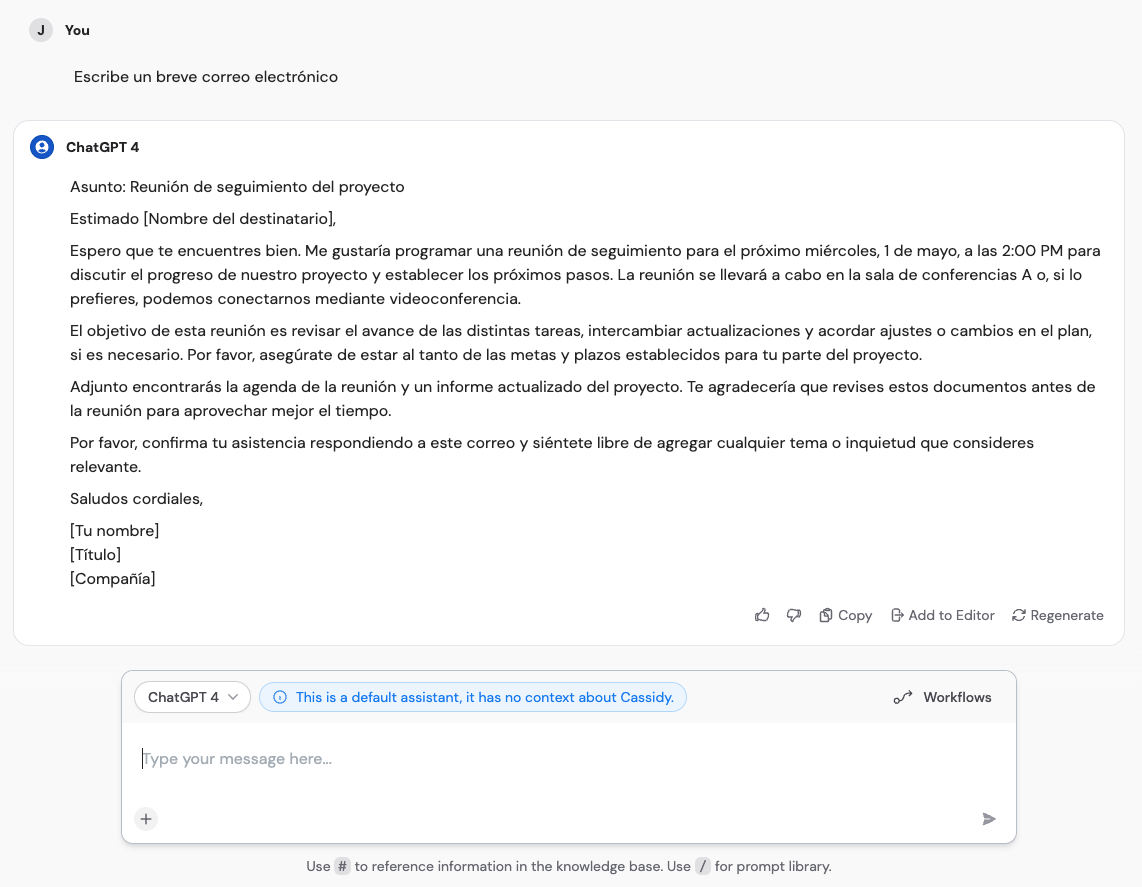 If the Agent doesn't consistently use your preferred language, add a specific instruction to the Agent's settings — for example, "Always respond in Spanish."
 For more on customizing Agent behavior, see [Build and configure an Agent](/agents/build-and-configure).
## Next steps
Create a custom Agent with tailored instructions and Knowledge Base access.
Compare GPT, Claude, and Gemini to pick the best model for each task.
Write effective prompts for better, more consistent AI outputs.
Generate documents, spreadsheets, and presentations through chat.
For more on customizing Agent behavior, see [Build and configure an Agent](/agents/build-and-configure).
## Next steps
Create a custom Agent with tailored instructions and Knowledge Base access.
Compare GPT, Claude, and Gemini to pick the best model for each task.
Write effective prompts for better, more consistent AI outputs.
Generate documents, spreadsheets, and presentations through chat.