> ## Documentation Index
> Fetch the complete documentation index at: https://docs.cassidyai.com/llms.txt
> Use this file to discover all available pages before exploring further.
# Assign roles and groups
> Set up roles and groups to control what team members can do and what resources they can access in Cassidy.
Roles and groups work together to control access across your Cassidy workspace. **Roles** control what a person can do. **Groups** control which shared resources a person can see.
To manage roles, groups, or team members, you need the matching admin privilege in Cassidy. In many workspaces, Admins have these privileges by default.
If your workspace still uses group permissions, read the migration guide before changing roles or groups.
## Understand roles and groups
Use roles and groups together:
Roles define what someone can do in Cassidy, such as create Agents, edit Workflows, invite members, manage billing, or configure SSO.
Groups define which shared resources someone can access, such as Sales Agents, Sales Workflows, or Sales Knowledge Base collections.
For most teams, roles are based on responsibilities and groups are based on teams or departments. For example, a sales operations teammate might have a custom role that lets them create and edit Workflows, plus membership in the **Sales** group so they can access Sales resources.
Some existing workspaces were created before Cassidy separated roles and groups. In those workspaces, groups controlled both what users could see and what users could do.
If your workspace still uses legacy group permissions, Cassidy shows a migration prompt in Organization Settings. The migration creates roles that preserve the permissions previously granted by groups.
Follow the migration guide to understand what changes, review the migration plan, and clean up generated roles afterward.
When you are deciding where to put an access rule, ask: "Is this about what the person can do, or what the person can see?" Use a role for what they can do. Use a group for what they can see.
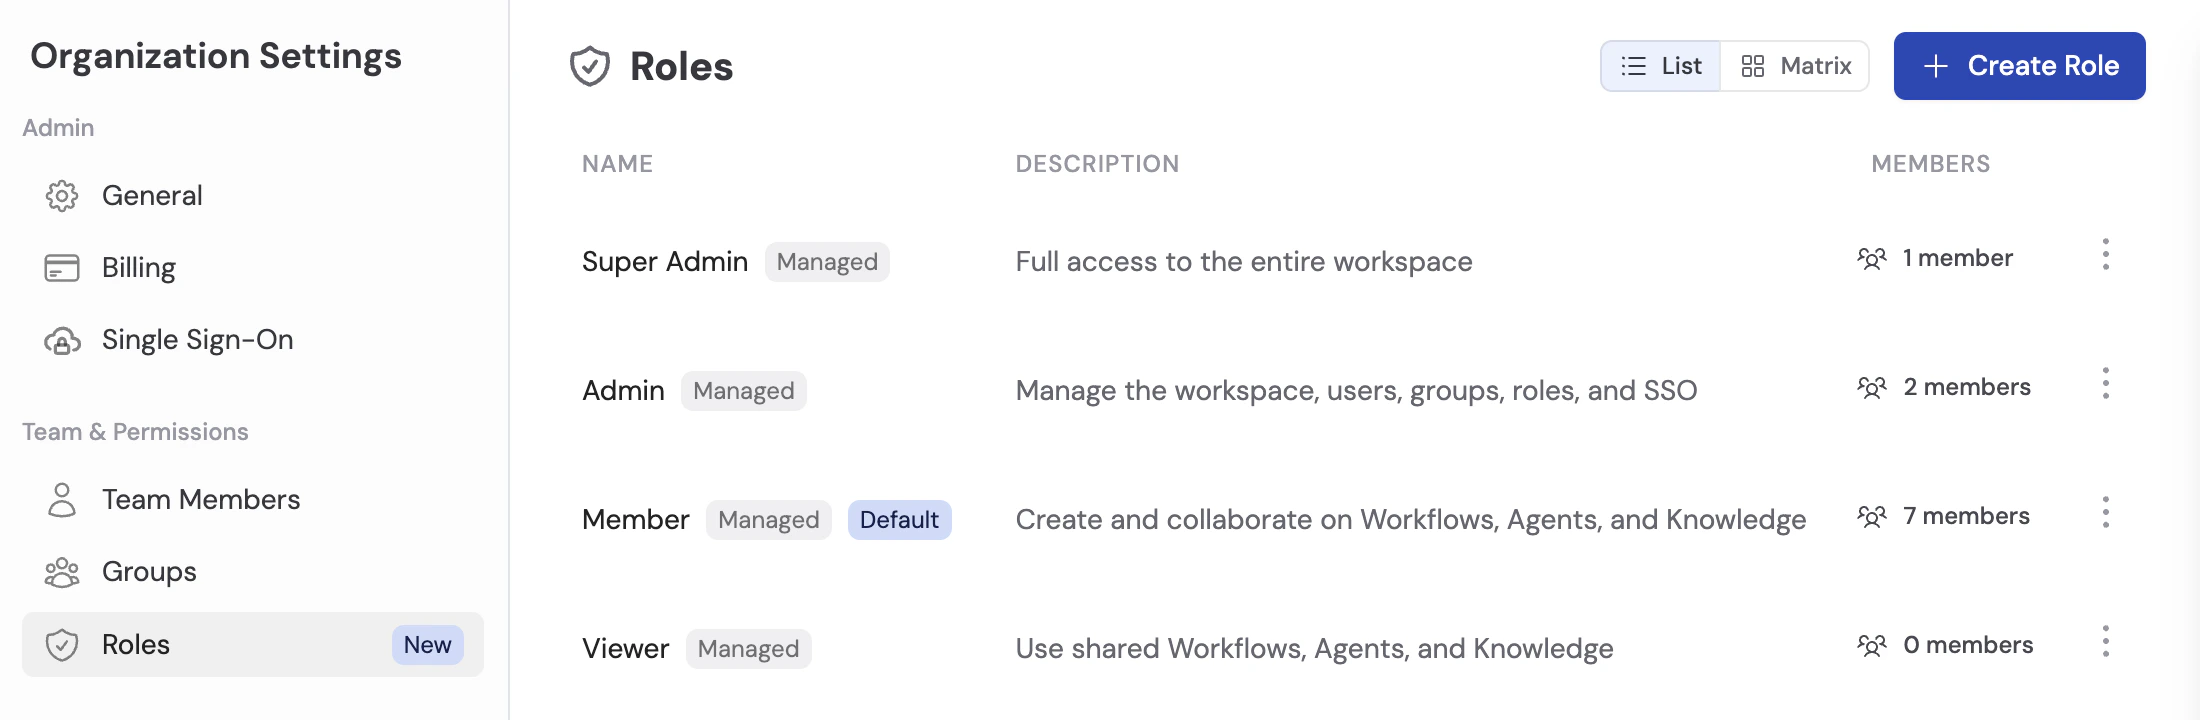
## Roles
Roles define a team member's privileges across Cassidy. A person can have more than one role, and their effective privileges are the union of all assigned roles.
Cassidy includes managed roles you can assign right away:
Basic access to shared resources. Best for people who need to view or use resources but should not create or manage them.
Standard access for regular team members. Best for people who use shared Agents, Workflows, and Knowledge Base content.
Administrative access for managing team settings, integrations, users, and workspace configuration.
You can also create **custom roles** when a team needs a more specific set of privileges. For example, you can create a **Workflow Builder** role that can create and edit Workflows without giving that person billing or SSO access.
### Create a custom role
Click your account name at the bottom of the sidebar, then click the **gear icon** next to your organization name.
Click **Roles** in the left sidebar.
 Click **Create Role**. Add a clear name and description, such as **Workflow Builder** or **Support Manager**.
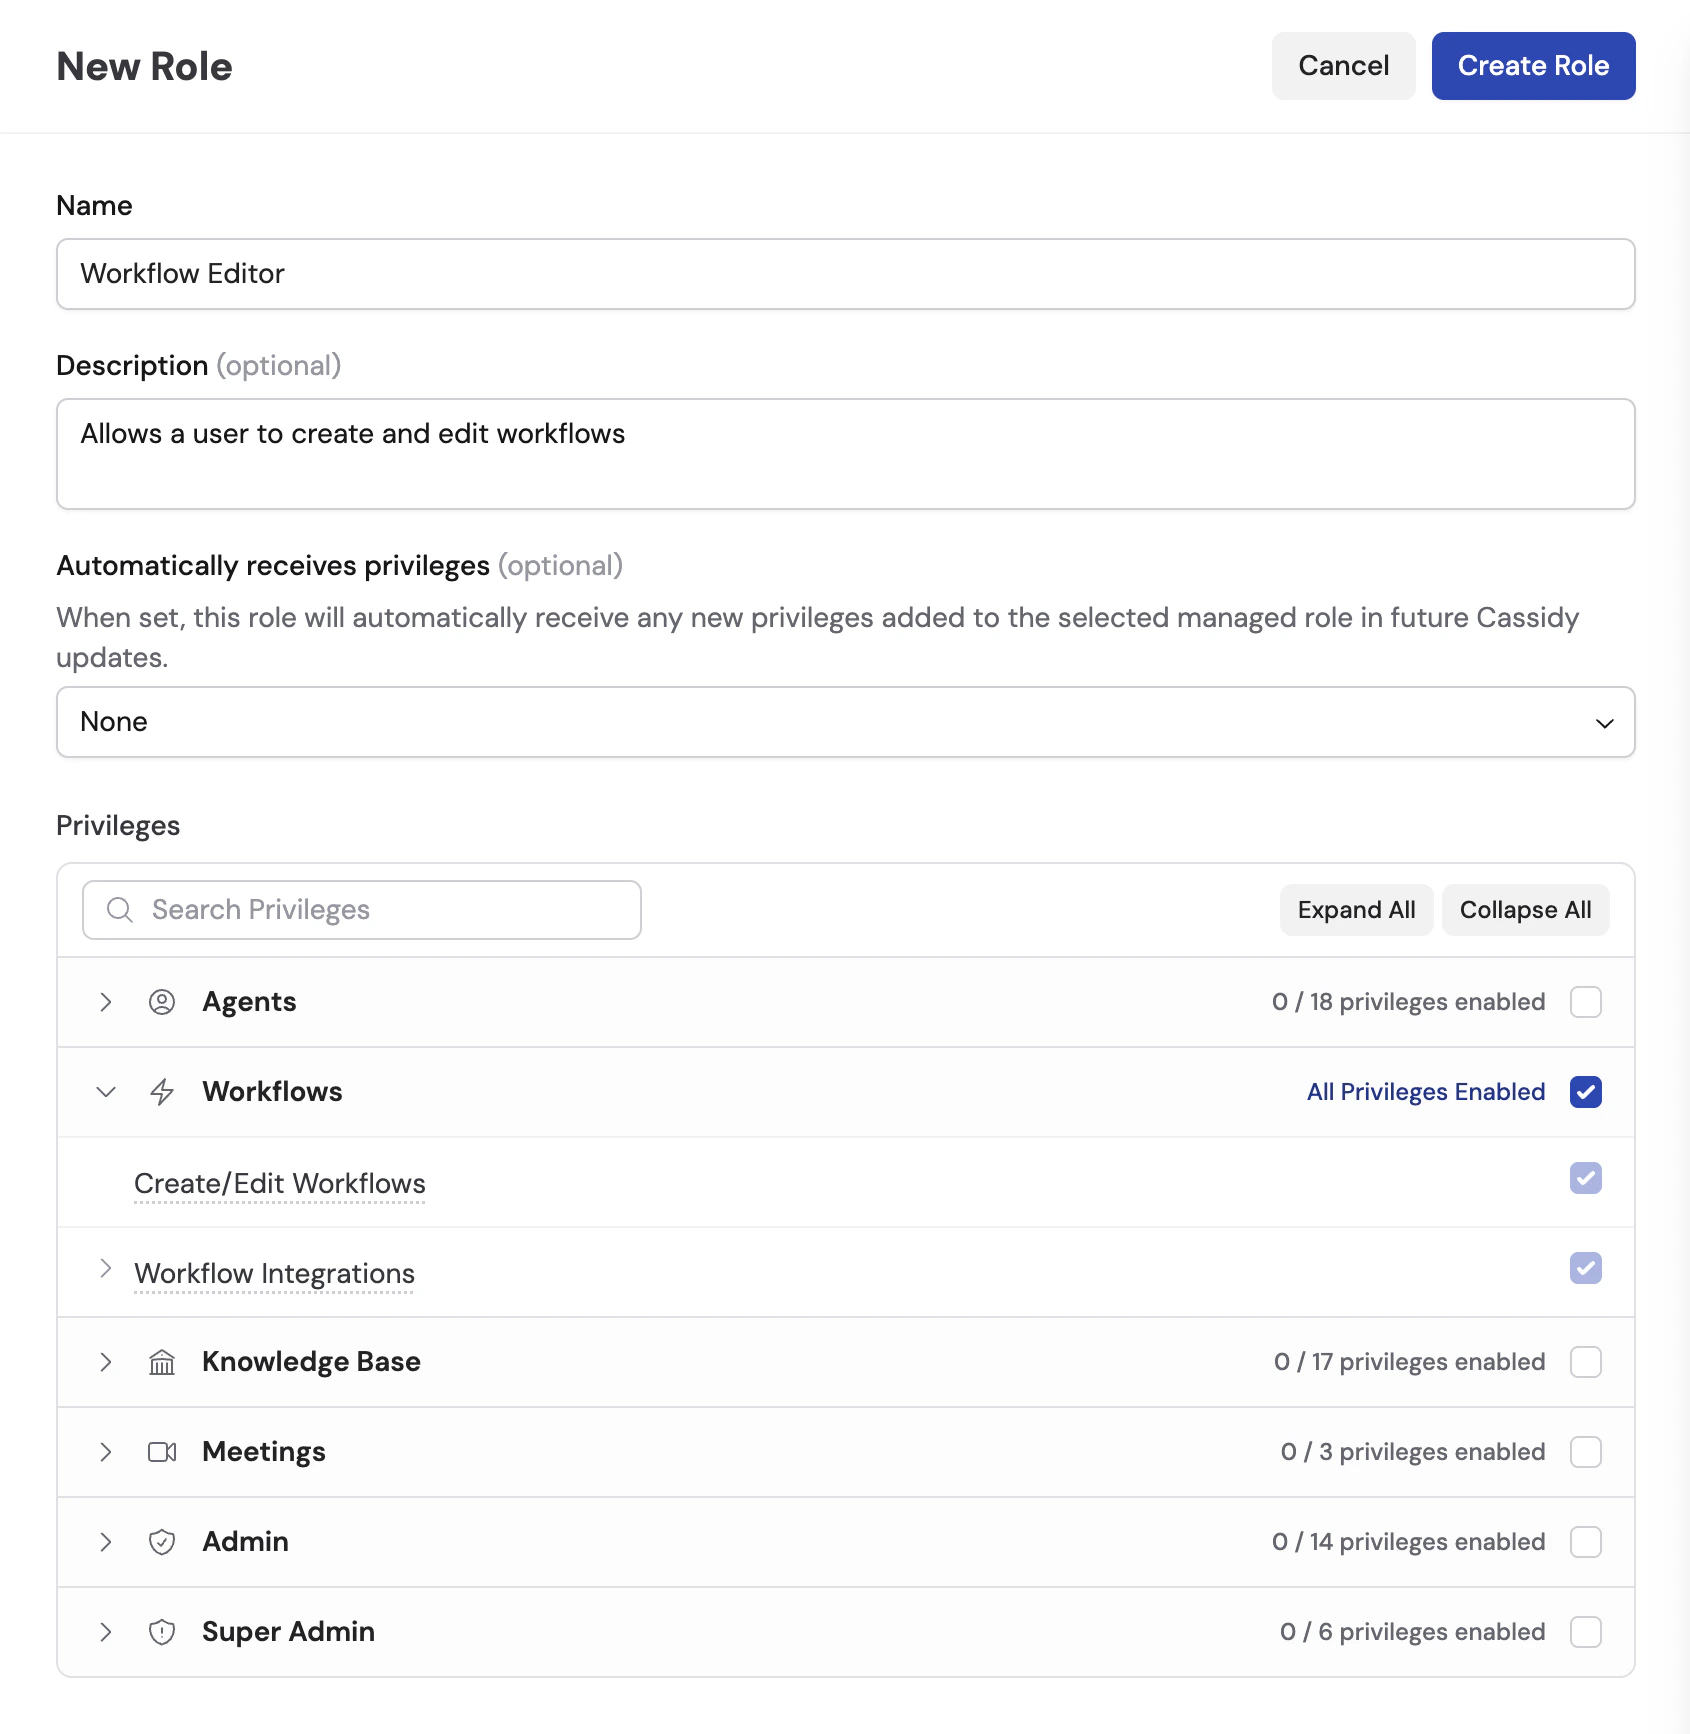 Use **Automatically receives privileges** if the role should stay aligned with one of Cassidy's managed roles.
When this setting is enabled, Cassidy automatically adds future privileges from the selected managed role to your custom role. Use this for broad roles that should evolve with Cassidy, such as a custom role based on **Member**. Leave it blank for tightly controlled roles where you want to review every new privilege manually.
Turn on the privileges this role should grant. Privileges are grouped by area, such as Agents, Workflows, Knowledge Base, meetings, and admin settings.
Click **Create Role**.
Your custom role is ready to assign to team members.
### Assign roles to a team member
Click your account name at the bottom of the sidebar, then click the **gear icon** next to your organization name.
Click **Team Members** in the left sidebar. Find the user you want to update.
Use **Automatically receives privileges** if the role should stay aligned with one of Cassidy's managed roles.
When this setting is enabled, Cassidy automatically adds future privileges from the selected managed role to your custom role. Use this for broad roles that should evolve with Cassidy, such as a custom role based on **Member**. Leave it blank for tightly controlled roles where you want to review every new privilege manually.
Turn on the privileges this role should grant. Privileges are grouped by area, such as Agents, Workflows, Knowledge Base, meetings, and admin settings.
Click **Create Role**.
Your custom role is ready to assign to team members.
### Assign roles to a team member
Click your account name at the bottom of the sidebar, then click the **gear icon** next to your organization name.
Click **Team Members** in the left sidebar. Find the user you want to update.
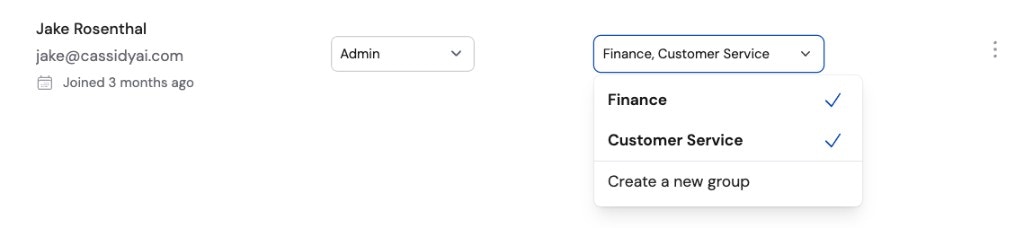
 Click the role selector next to the user's name. Add or remove managed roles and custom roles.
Save the update. The team member's privileges update immediately.
Assign the narrowest role that lets someone do their job. Add another role only when they need another clear set of privileges.
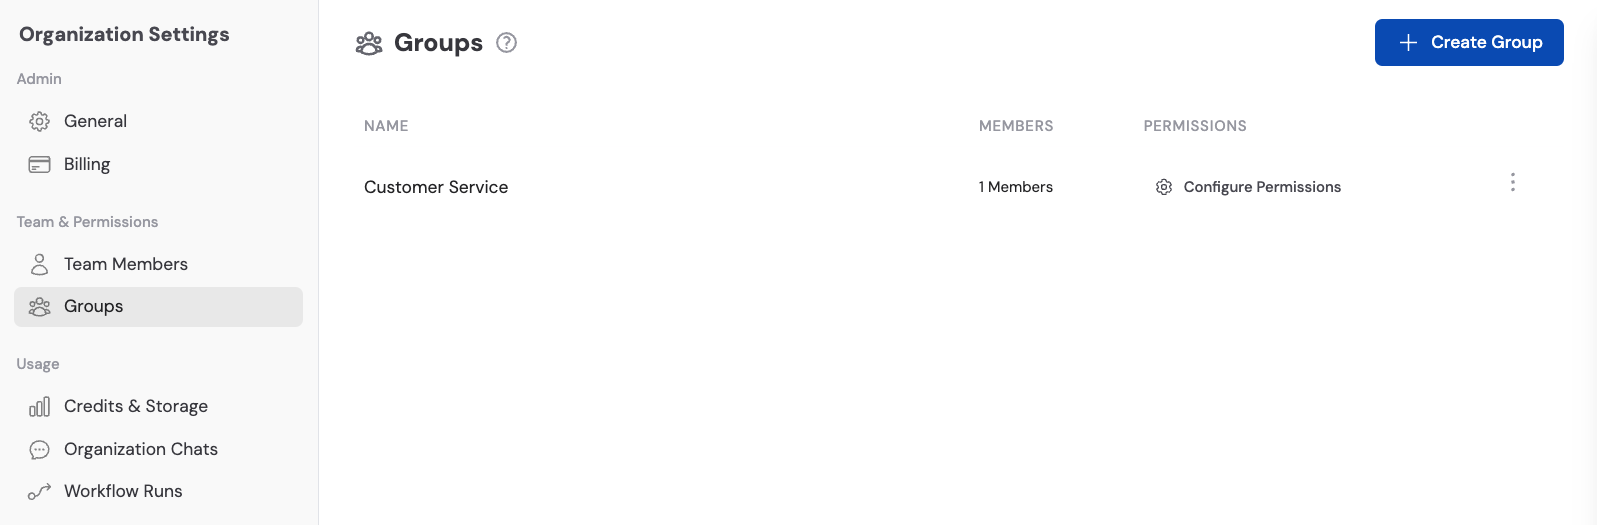
## Groups
Groups organize team members so you can share resources with many people at once. Groups do not grant workspace privileges like creating Agents, editing Workflows, inviting members, or managing billing. Use roles for those privileges.
When you share an Agent, Workflow, Knowledge Base collection, Chat folder, or Meeting folder, you can choose which groups and individuals can access it. See the sharing and permissions guides for each:
* [Agent sharing and management](/agents/sharing-and-management)
* [Workflow sharing and deployment](/workflows/sharing-and-deployment)
* [Knowledge Base permissions and structure](/knowledge-base/permissions-and-structure)
* [Meeting sharing and permissions](/meetings/sharing-and-permissions)
* [Share and organize chats](/guides/chatting-with-an-agent#share-and-organize-chats)
### Create a group
Click your account name at the bottom of the sidebar, then click the **gear icon** next to your organization name.
Click **Groups** in the left sidebar.
Click the role selector next to the user's name. Add or remove managed roles and custom roles.
Save the update. The team member's privileges update immediately.
Assign the narrowest role that lets someone do their job. Add another role only when they need another clear set of privileges.
## Groups
Groups organize team members so you can share resources with many people at once. Groups do not grant workspace privileges like creating Agents, editing Workflows, inviting members, or managing billing. Use roles for those privileges.
When you share an Agent, Workflow, Knowledge Base collection, Chat folder, or Meeting folder, you can choose which groups and individuals can access it. See the sharing and permissions guides for each:
* [Agent sharing and management](/agents/sharing-and-management)
* [Workflow sharing and deployment](/workflows/sharing-and-deployment)
* [Knowledge Base permissions and structure](/knowledge-base/permissions-and-structure)
* [Meeting sharing and permissions](/meetings/sharing-and-permissions)
* [Share and organize chats](/guides/chatting-with-an-agent#share-and-organize-chats)
### Create a group
Click your account name at the bottom of the sidebar, then click the **gear icon** next to your organization name.
Click **Groups** in the left sidebar.
 Click **Create Group**. Give the group a descriptive name (e.g., "Sales Team", "Marketing", "Customer Support").
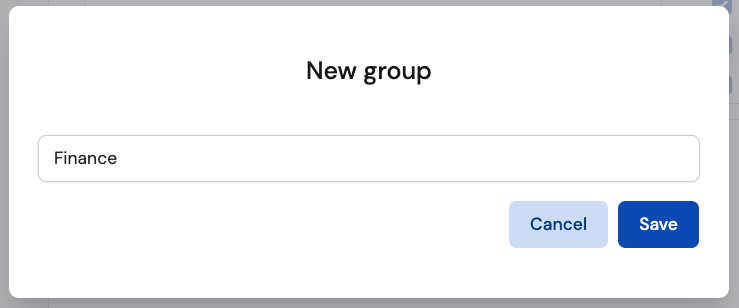 Search for and select team members to add to the group. You can also add members later.
 Click **Save** to create the group.
Your group is now active. You can share Agents, Workflows, Knowledge Base collections, chats, and meetings with the group.
### How multiple groups work now
A user can belong to multiple groups. Each group can make different shared resources visible to that user.
For example, if a user is in the **Sales** group and the **Customer Success** group, they can see resources shared with either group. Whether they can create or edit resources depends on their roles.
For most teams, a simple structure works well:
* **All Employees**: A broad group for resources everyone should see.
* **Department groups**: Sales, Marketing, Support, Operations, or other teams that need access to department-specific resources.
* **Project groups**: Temporary or cross-functional teams that need access to a focused set of Agents, Workflows, or Knowledge Base collections.
Avoid using groups to mirror every job title. Use roles for job responsibilities and groups for resource visibility.
## Next steps
Add colleagues to your workspace and assign their roles and groups.
Automatically assign roles and groups based on your identity provider.
Click **Save** to create the group.
Your group is now active. You can share Agents, Workflows, Knowledge Base collections, chats, and meetings with the group.
### How multiple groups work now
A user can belong to multiple groups. Each group can make different shared resources visible to that user.
For example, if a user is in the **Sales** group and the **Customer Success** group, they can see resources shared with either group. Whether they can create or edit resources depends on their roles.
For most teams, a simple structure works well:
* **All Employees**: A broad group for resources everyone should see.
* **Department groups**: Sales, Marketing, Support, Operations, or other teams that need access to department-specific resources.
* **Project groups**: Temporary or cross-functional teams that need access to a focused set of Agents, Workflows, or Knowledge Base collections.
Avoid using groups to mirror every job title. Use roles for job responsibilities and groups for resource visibility.
## Next steps
Add colleagues to your workspace and assign their roles and groups.
Automatically assign roles and groups based on your identity provider.