> ## Documentation Index
> Fetch the complete documentation index at: https://docs.cassidyai.com/llms.txt
> Use this file to discover all available pages before exploring further.
# Build a Workflow
> Create, configure, and publish AI-powered Workflows using templates, the Copilot, or a blank canvas.
Build a [Workflow](/workflows/overview) to automate a multi-step process in Cassidy — whether from a plain-language description, a template, or a blank canvas. Once created, you can configure every aspect of your Workflow manually or use the [Workflow Copilot](#use-the-workflow-copilot) to do it with plain language.
## Create a new Workflow
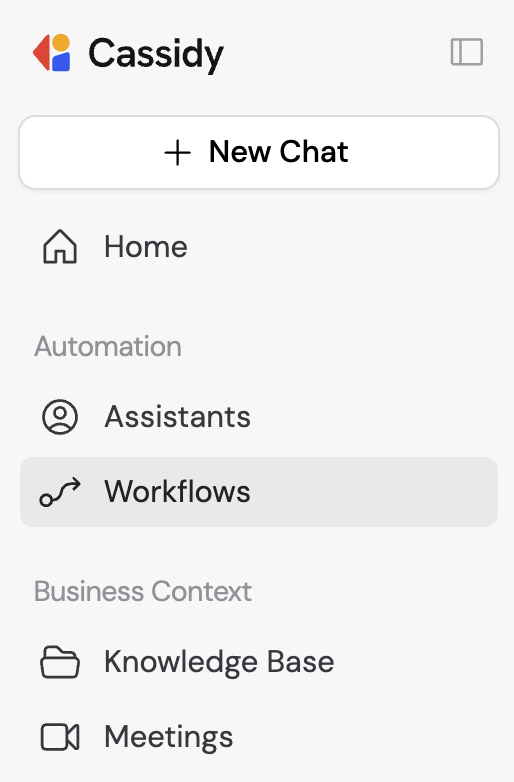
Click **Workflows** in the left sidebar of your Cassidy dashboard.
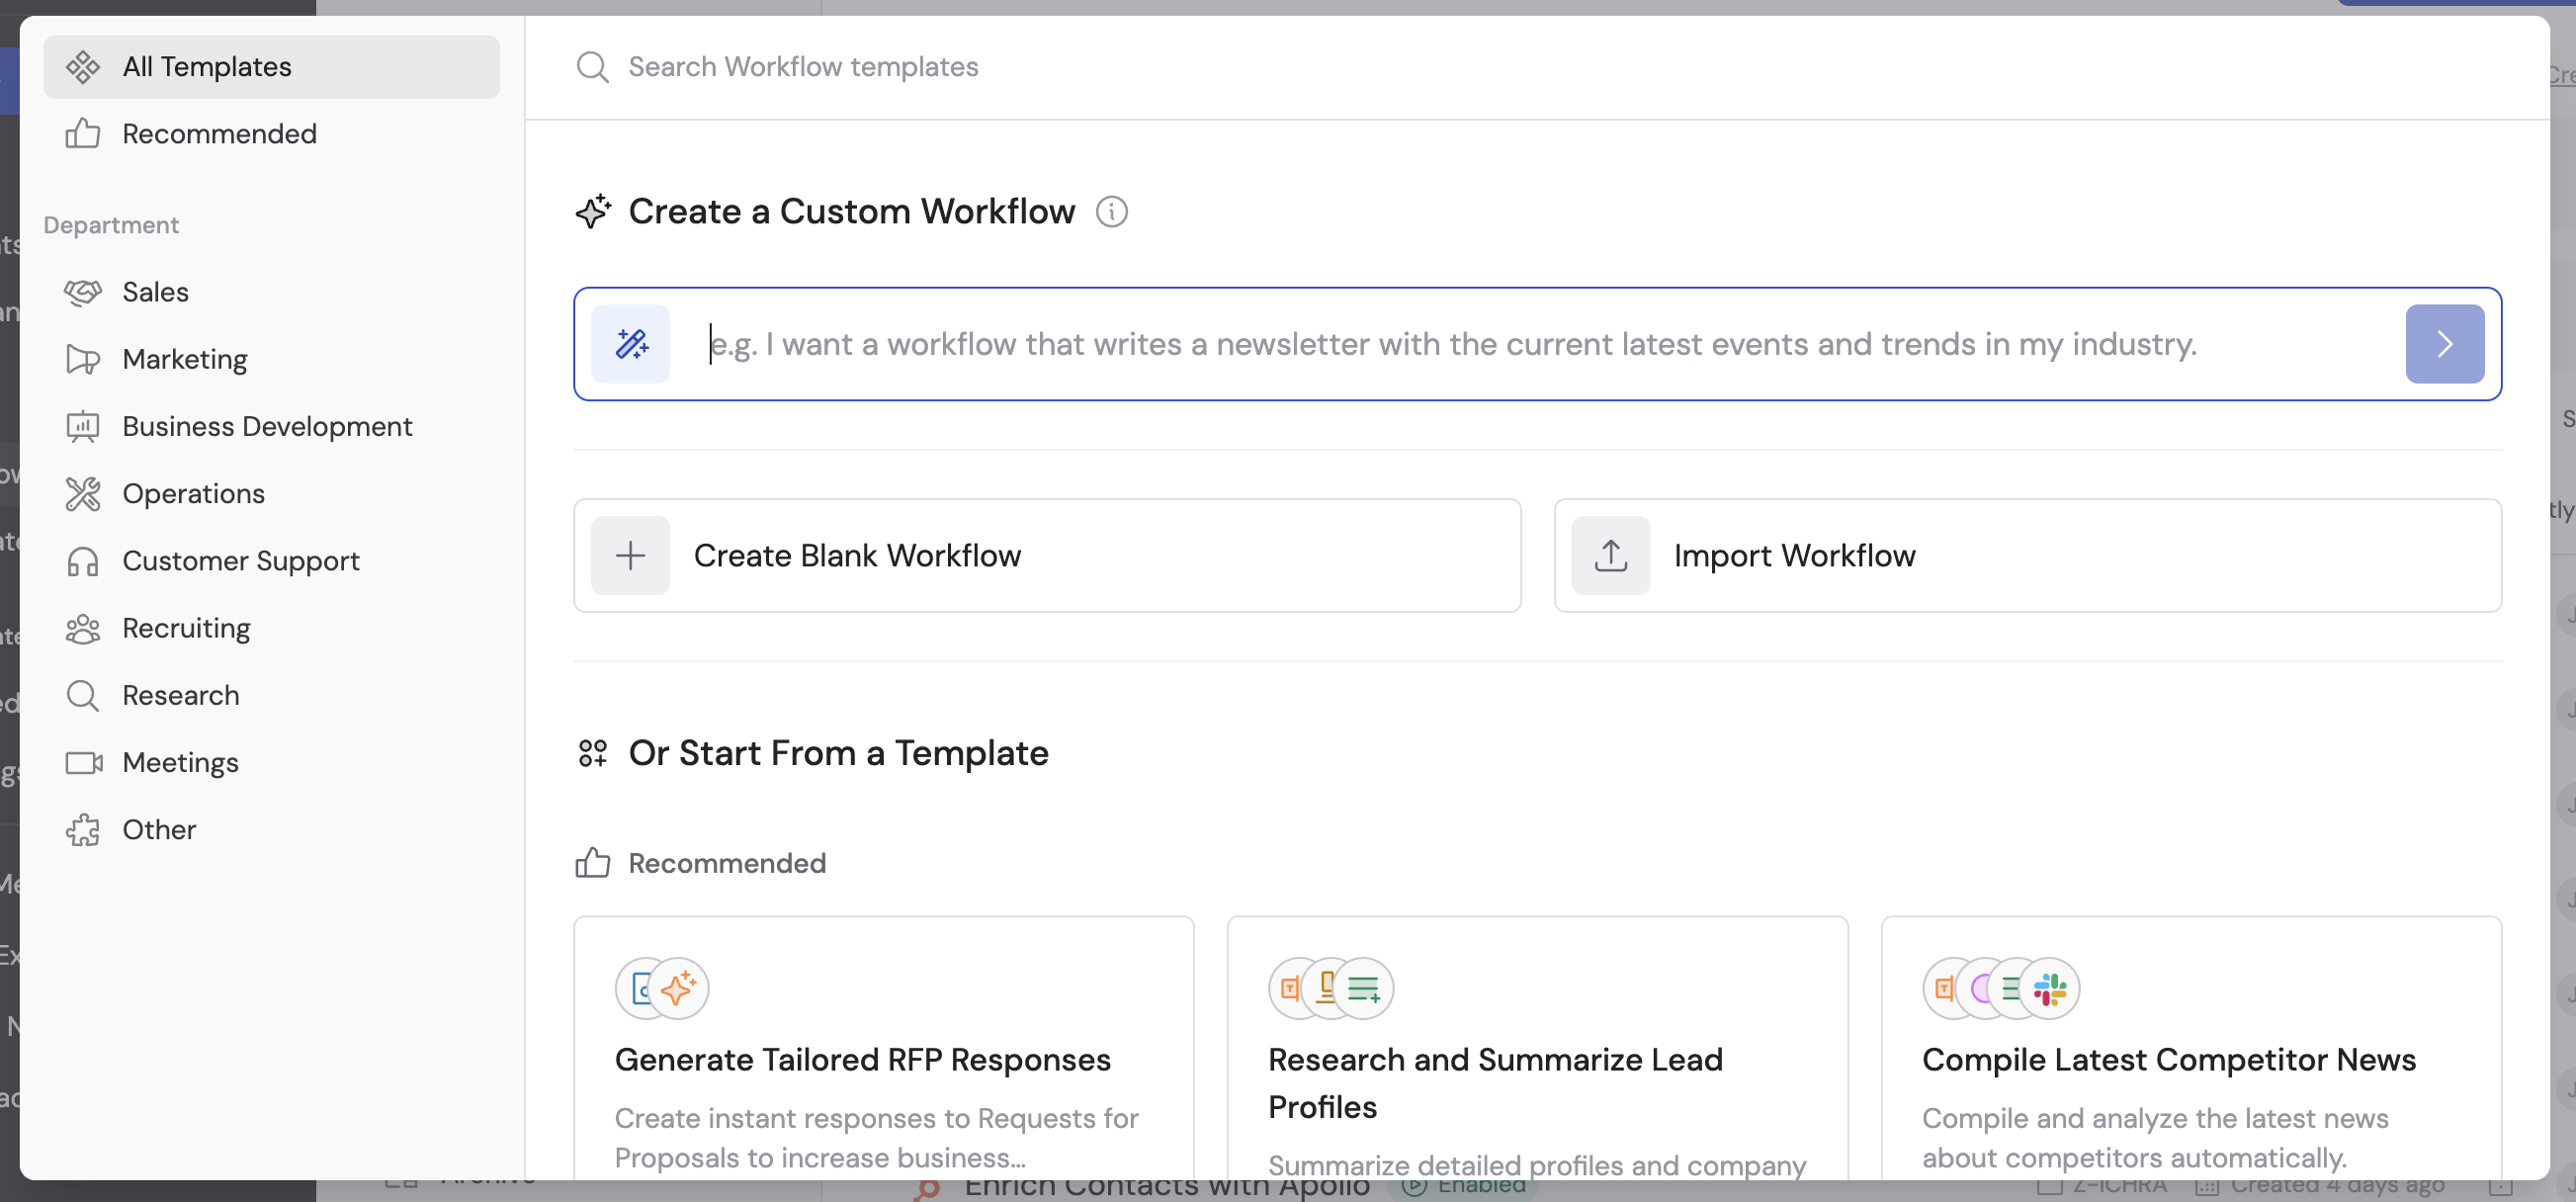
 In the top-right corner, click **+ New Workflow**. Select one of four options:
* **Custom Workflow** — Describe your automation in plain language and the [Workflow Copilot](#use-the-workflow-copilot) generates it for you.
* **Blank Workflow** — Start from scratch with an empty canvas.
* **Import Workflow** — Upload a Workflow JSON file to add it to your organization.
* **Template** — Browse pre-built Workflows for common use cases and customize them.
In the top-right corner, click **+ New Workflow**. Select one of four options:
* **Custom Workflow** — Describe your automation in plain language and the [Workflow Copilot](#use-the-workflow-copilot) generates it for you.
* **Blank Workflow** — Start from scratch with an empty canvas.
* **Import Workflow** — Upload a Workflow JSON file to add it to your organization.
* **Template** — Browse pre-built Workflows for common use cases and customize them.
 If you selected **Custom Workflow**, the [Workflow Copilot](#use-the-workflow-copilot) opens automatically. Describe what you want to automate, answer clarifying questions, and the Copilot builds out the trigger, actions, and configuration for you.
 After creation, review and fine-tune your Workflow in the editor. You can adjust the trigger, add or remove actions, update prompts, and connect integrations at any time.
When you're satisfied, click **Publish** to make the Workflow available for your team. See [Share and deploy Workflows](/workflows/sharing-and-deployment) for details on versioning, publishing, and permissions.
After creation, review and fine-tune your Workflow in the editor. You can adjust the trigger, add or remove actions, update prompts, and connect integrations at any time.
When you're satisfied, click **Publish** to make the Workflow available for your team. See [Share and deploy Workflows](/workflows/sharing-and-deployment) for details on versioning, publishing, and permissions.
 Once published, your Workflow is ready to [run and test](/workflows/running-and-testing).
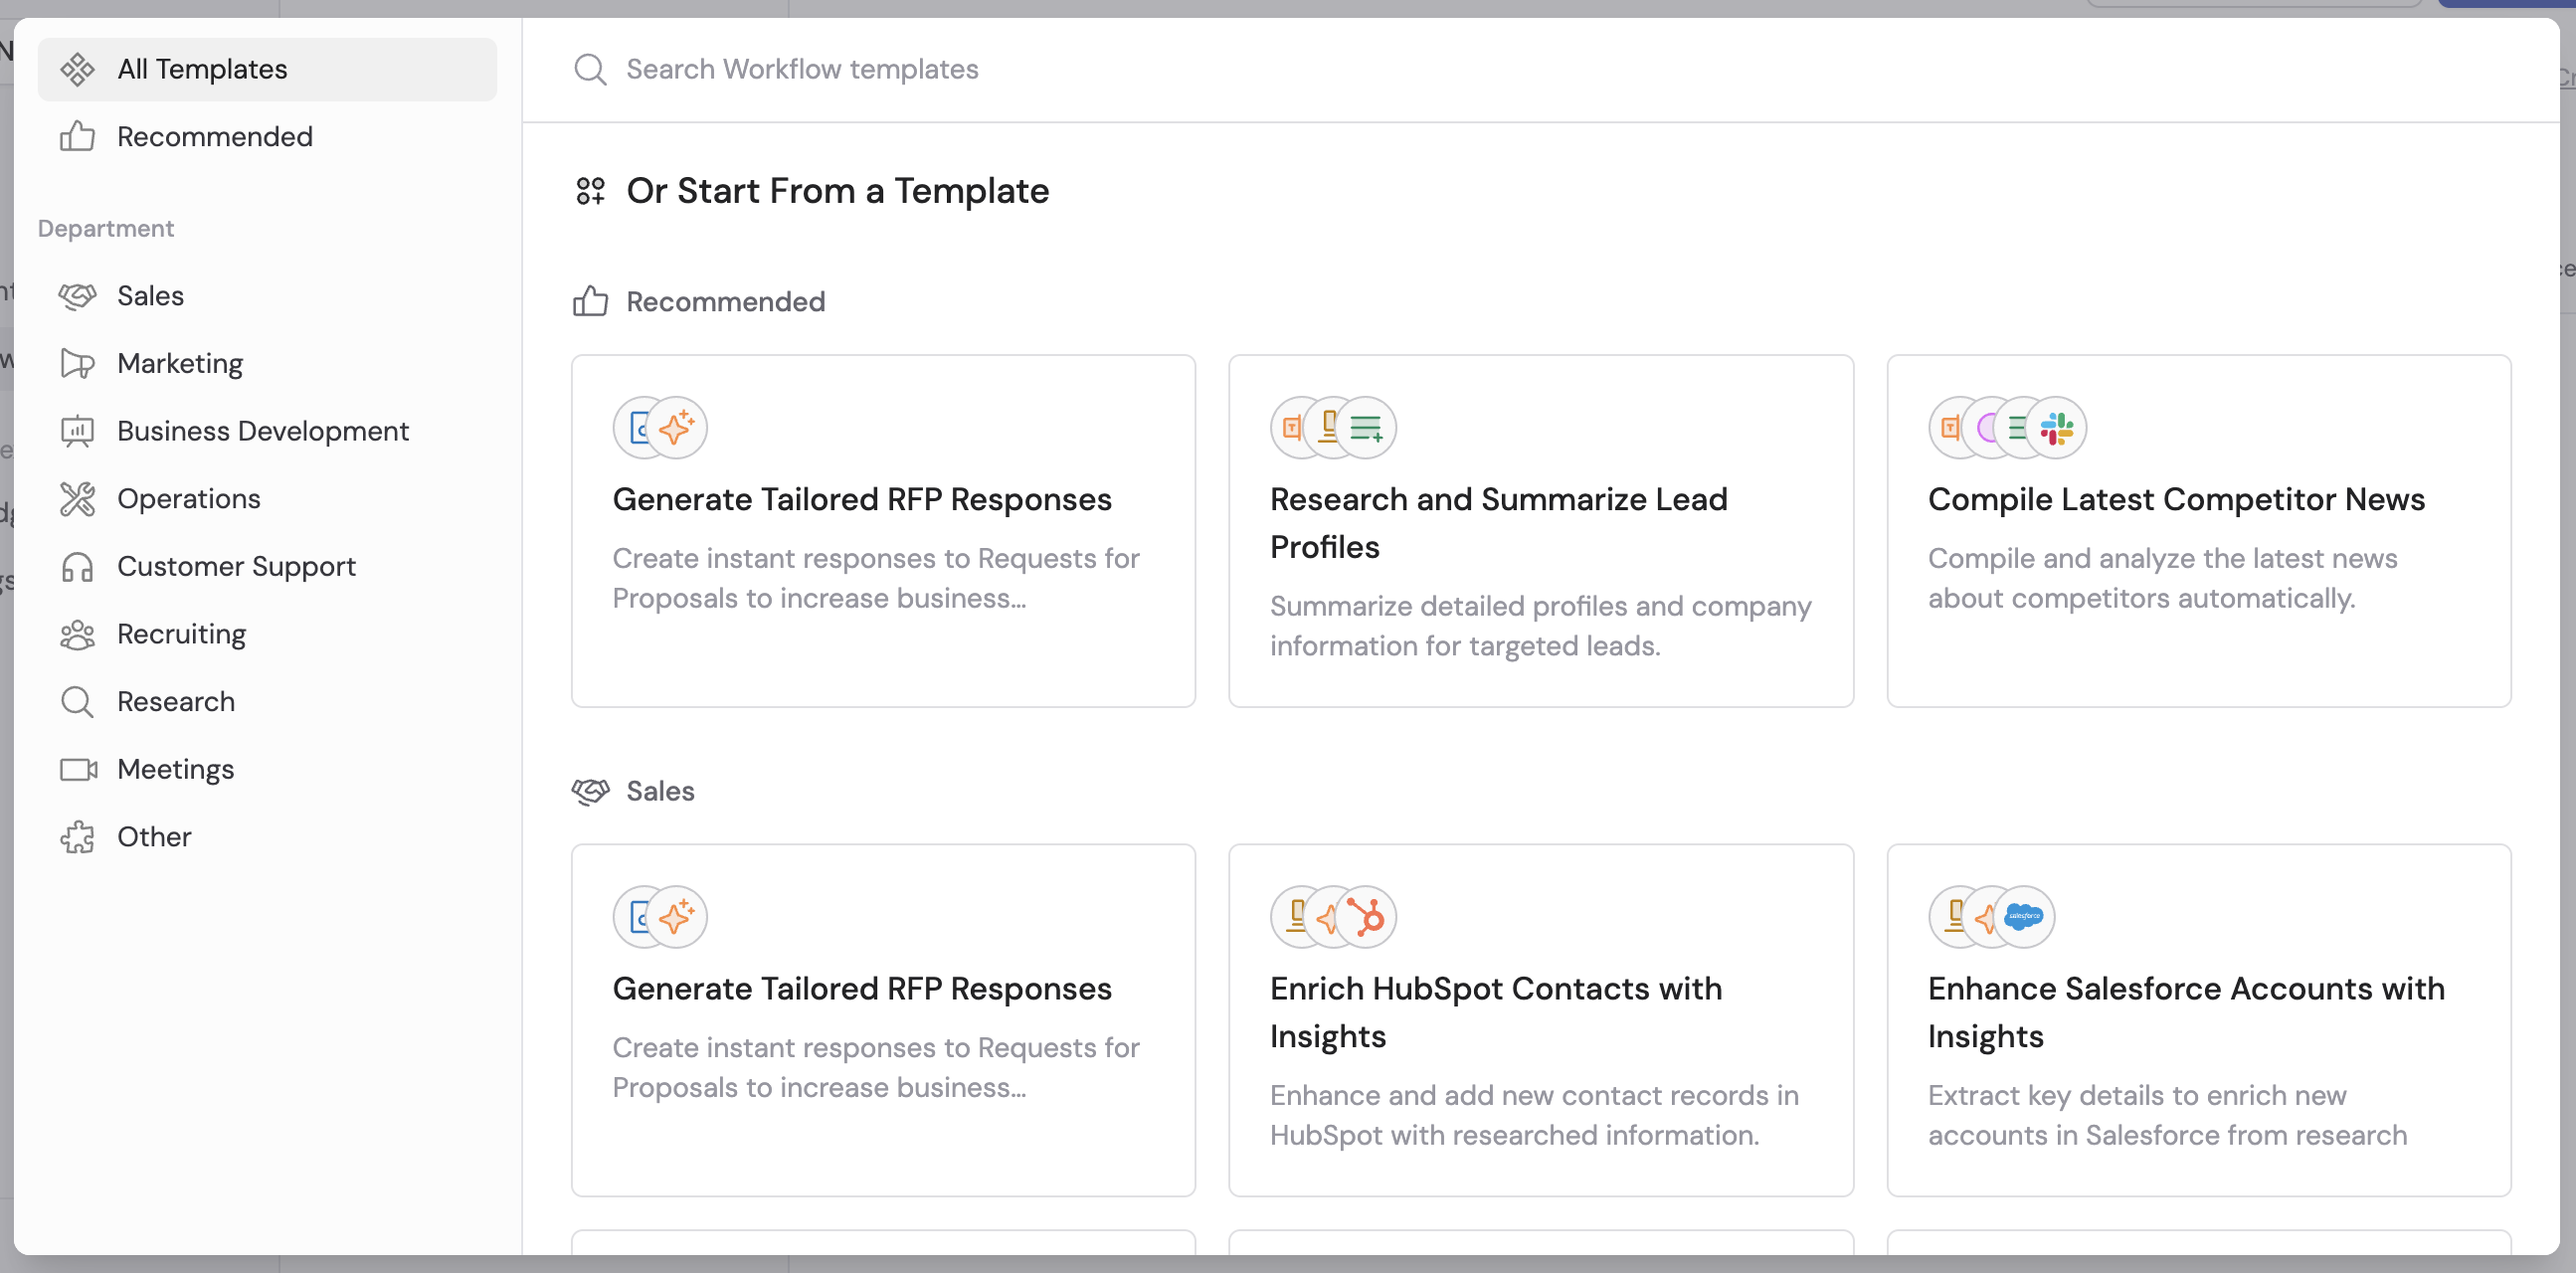
### Start from a template
Templates are pre-built Workflows for common tasks like writing personalized sales emails, summarizing support tickets, or generating meeting follow-ups.
Click **+ New Workflow** and select **Template**, or click **Browse Templates** on the Workflows page.
Once published, your Workflow is ready to [run and test](/workflows/running-and-testing).
### Start from a template
Templates are pre-built Workflows for common tasks like writing personalized sales emails, summarizing support tickets, or generating meeting follow-ups.
Click **+ New Workflow** and select **Template**, or click **Browse Templates** on the Workflows page.
 Use the search bar to find templates by keyword or browse by category. Click on a template that matches your goal.
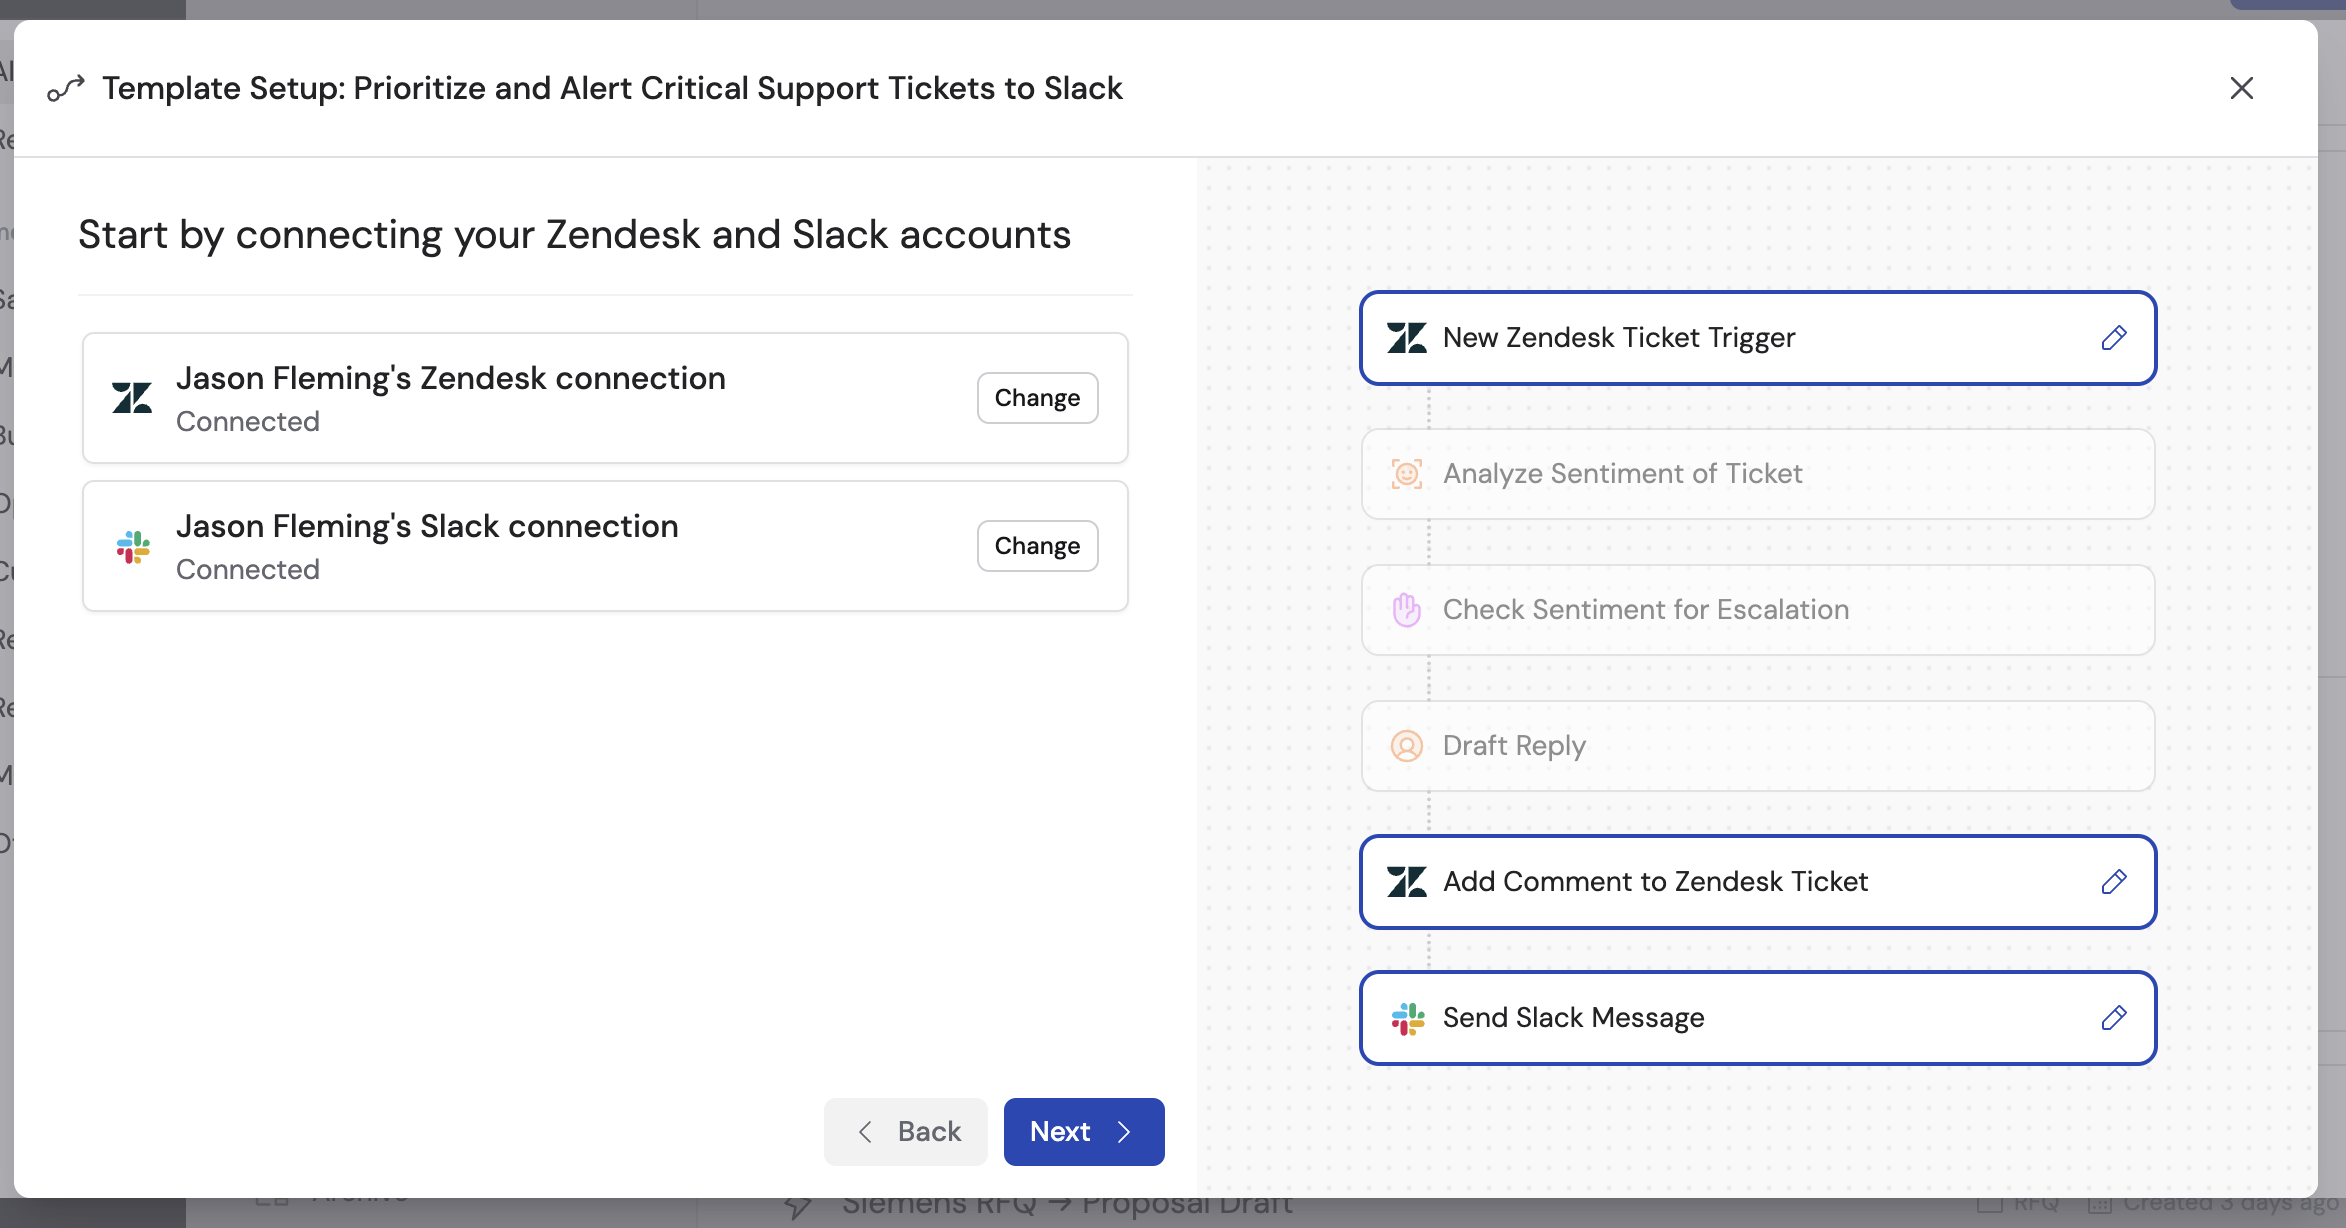
 Follow the guided setup process to customize the template:
* For integrations, you'll be prompted to authorize connections
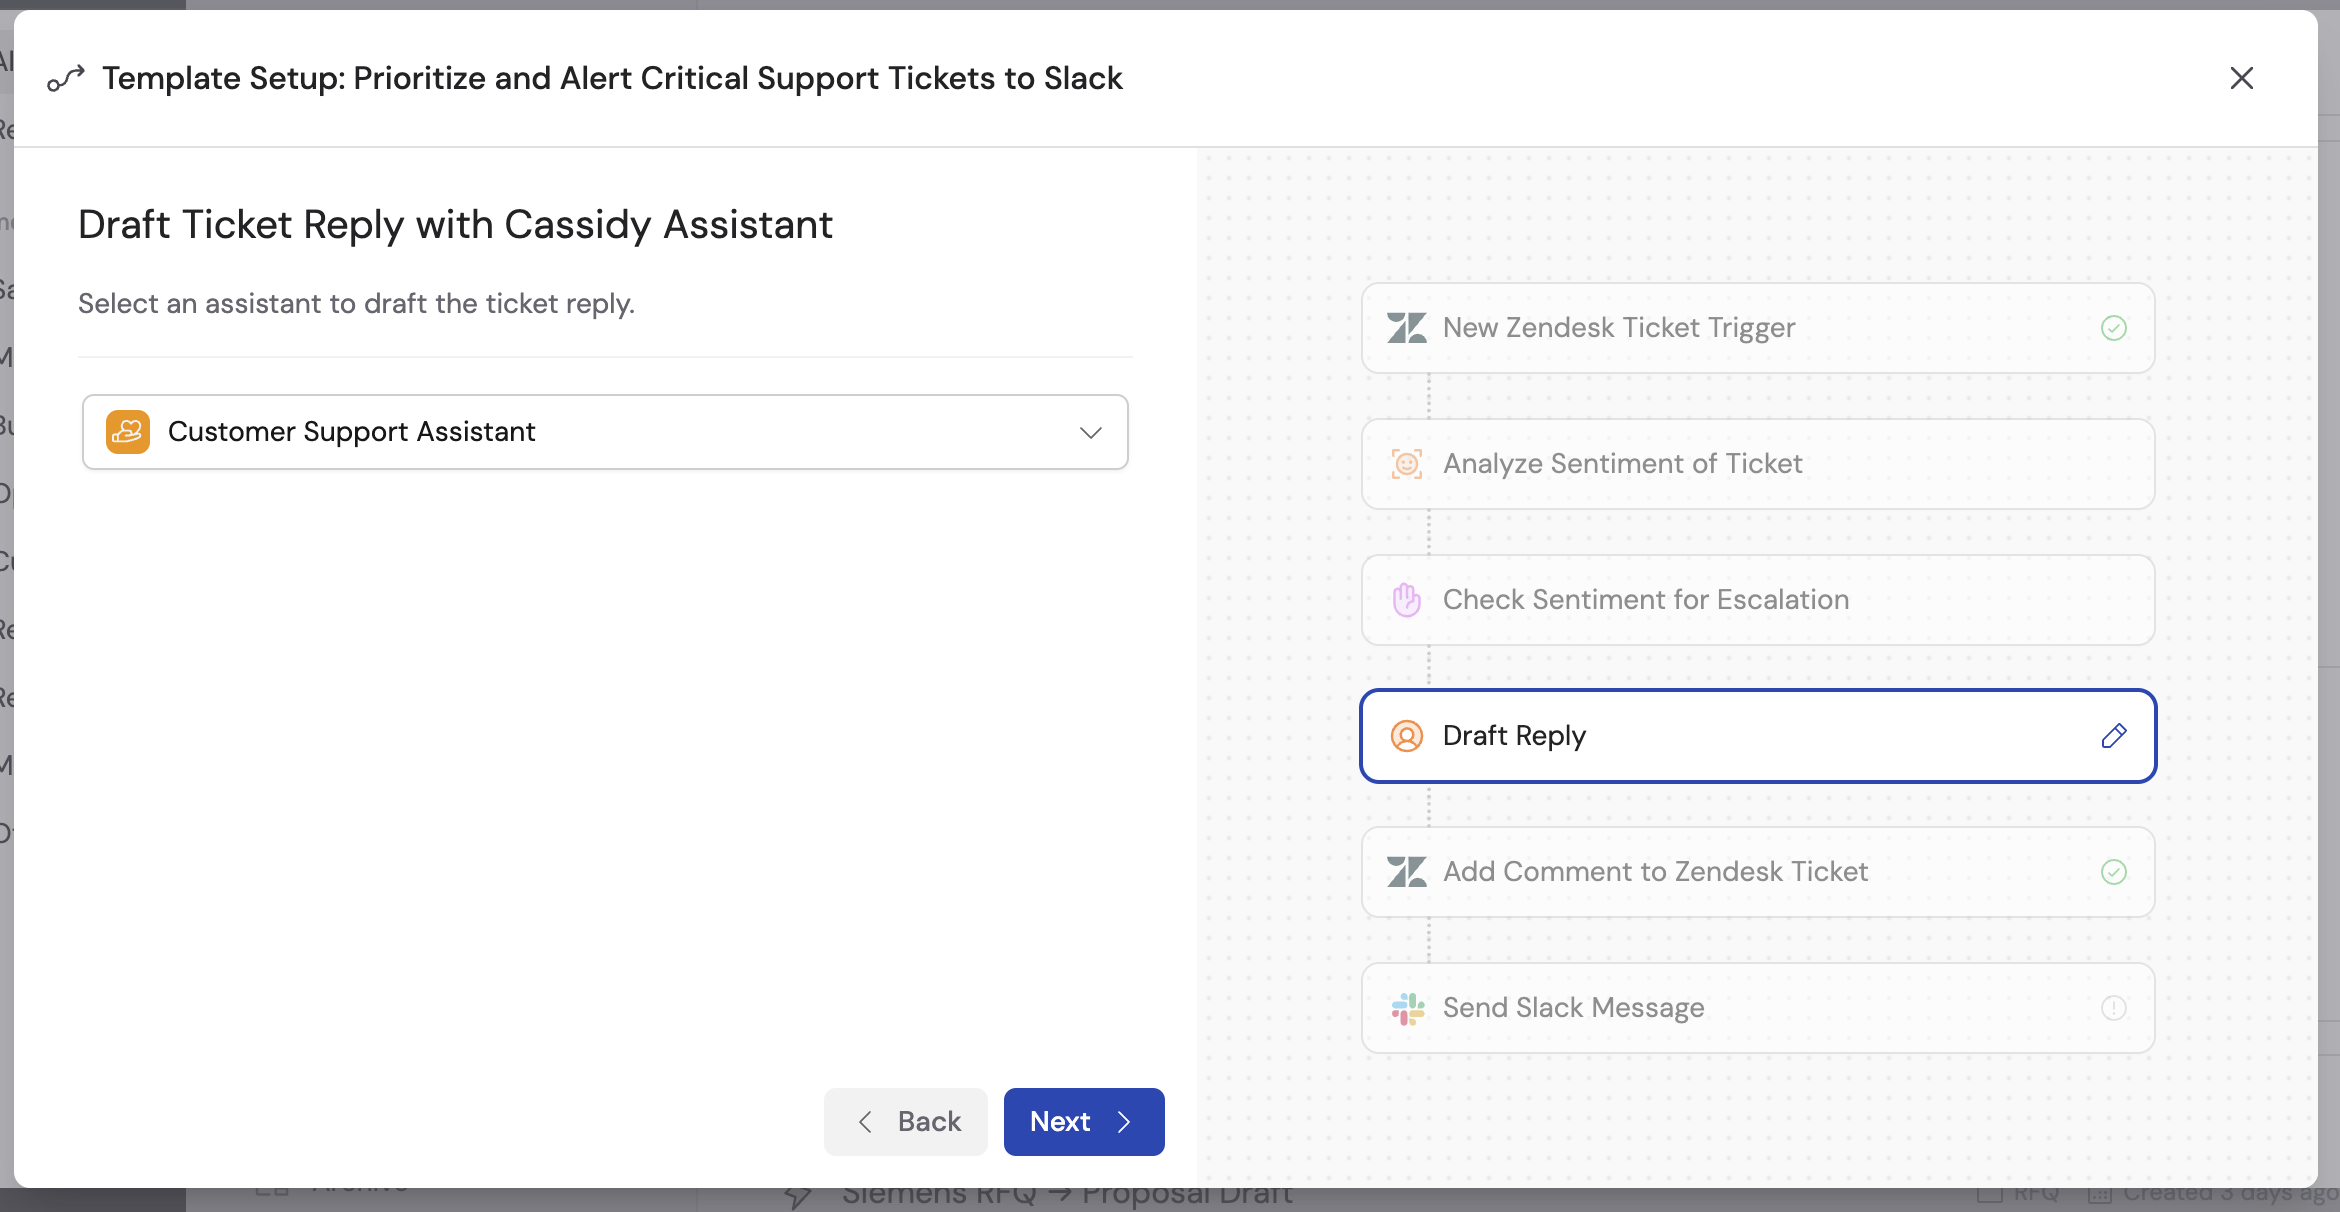
* Select the [Agent](/agents/overview) to use for certain steps
* Provide any other inputs needed for the specific Workflow
* Click **Next** to continue through each step
Follow the guided setup process to customize the template:
* For integrations, you'll be prompted to authorize connections
* Select the [Agent](/agents/overview) to use for certain steps
* Provide any other inputs needed for the specific Workflow
* Click **Next** to continue through each step
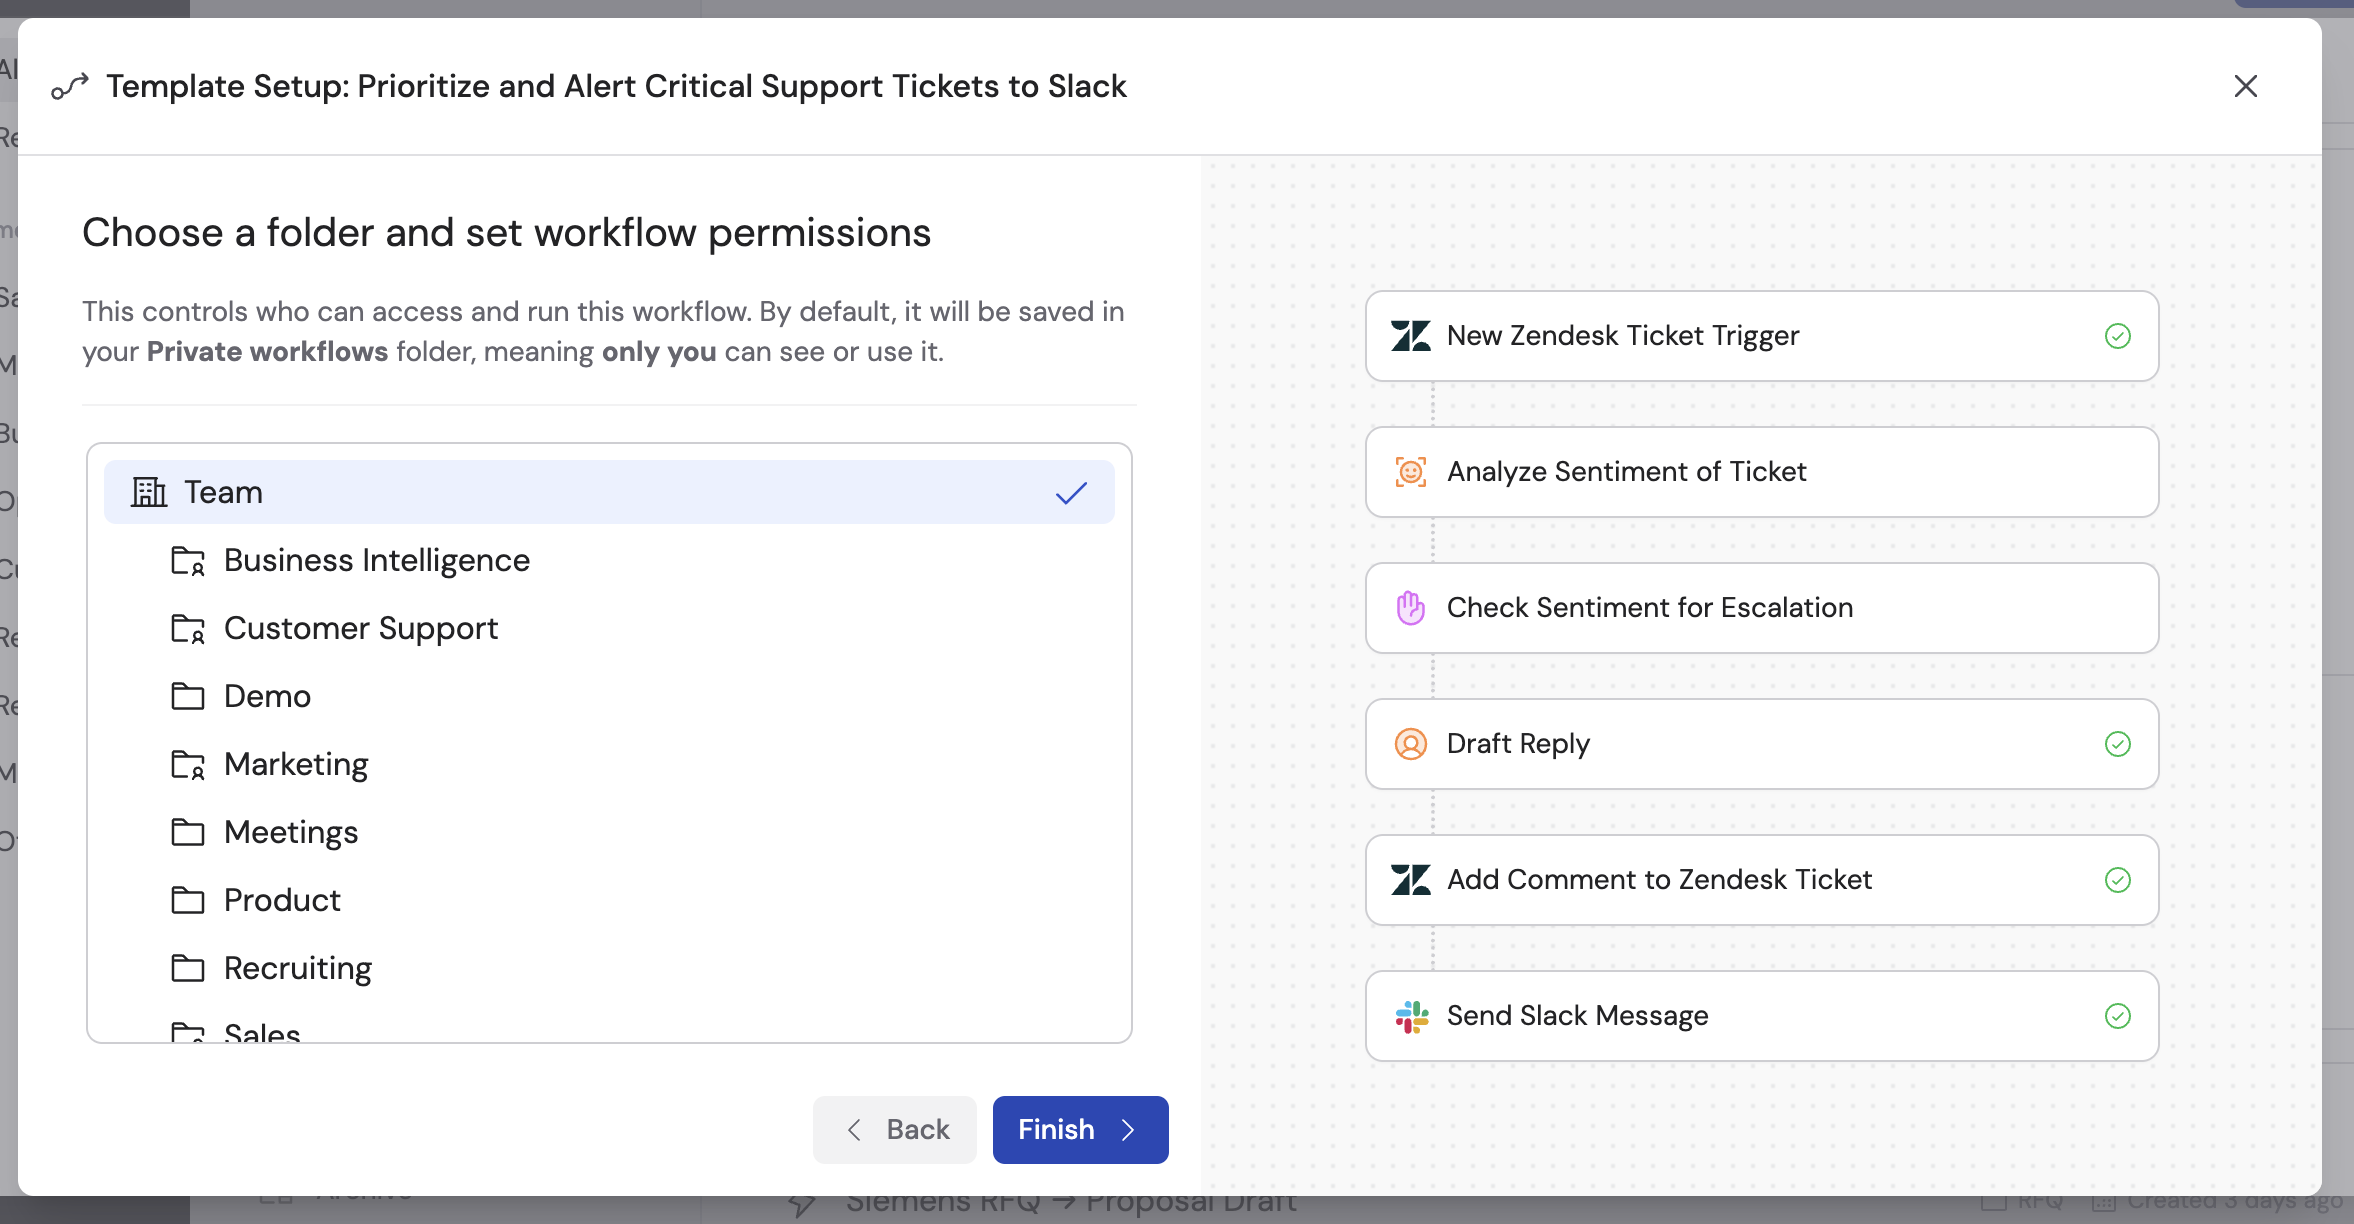
 Choose a folder to organize your Workflow and set permissions to control who can access it. Click **Finish** to complete creation.
 After the template is added to your Workflows, you can run it as-is or open the editor to adjust triggers, actions, prompts, and variables to fit your exact needs.
## The Workflow editor
The Workflow editor is where you build and configure your automation. You can configure your Workflow in two ways:
* **Manually** — Edit each setting directly in the editor. The sections below walk through the trigger, actions, and variables.
* **With the [Workflow Copilot](#use-the-workflow-copilot)** — Describe what you want in plain language and the Copilot updates the configuration for you. You can use the Copilot to build from scratch, make targeted changes, or troubleshoot issues.
Both approaches work together — use the Copilot to get started quickly, then fine-tune individual settings manually.
Use the top bar to **test** the Workflow, open **Previous Runs**, launch the **Workflow Copilot**, switch versions, and **publish**.
For Manual-style Workflows, the header also includes **Bulk Run** and **Interface** next to **Workflow**:
After the template is added to your Workflows, you can run it as-is or open the editor to adjust triggers, actions, prompts, and variables to fit your exact needs.
## The Workflow editor
The Workflow editor is where you build and configure your automation. You can configure your Workflow in two ways:
* **Manually** — Edit each setting directly in the editor. The sections below walk through the trigger, actions, and variables.
* **With the [Workflow Copilot](#use-the-workflow-copilot)** — Describe what you want in plain language and the Copilot updates the configuration for you. You can use the Copilot to build from scratch, make targeted changes, or troubleshoot issues.
Both approaches work together — use the Copilot to get started quickly, then fine-tune individual settings manually.
Use the top bar to **test** the Workflow, open **Previous Runs**, launch the **Workflow Copilot**, switch versions, and **publish**.
For Manual-style Workflows, the header also includes **Bulk Run** and **Interface** next to **Workflow**:
 What each tab is for:
* **Workflow** — The canvas (trigger, actions in order) and the settings sidebar when you select a block.
* **Bulk Run** — [Run the Workflow on a dataset](/workflows/bulk-runs).
* **Interface** — [How the Run tab looks](/workflows/interface) for people who run the Workflow after it is published.
**Manual-style Workflows:** **Bulk Run** and **Interface** show only when the trigger supports the interactive **Run** tab in Cassidy (for example **Manual**). Scheduled and integration triggers hide those two tabs.
To update the Workflow **name** and **description**, click the name in the top-left, open **...** → **Update Name & Description**, or—when **Interface** is available—edit the same fields in the **Customize** section on that tab.
## Configure your Workflow
### Trigger
The trigger defines how and when your Workflow starts. Click the trigger block at the top of the editor to configure it.
* **Manual** — Users fill in a form and click **Run**
* **Scheduled** — Runs automatically on a recurring schedule
* **Webhook** — Starts when an external system sends a POST request
* **Email** — Runs when an email is sent to the Workflow's [dedicated email address](/reference/triggers/email)
* **Integration trigger** — Fires on events like a new Slack message, Zendesk ticket, HubSpot record, or Google Calendar event
What each tab is for:
* **Workflow** — The canvas (trigger, actions in order) and the settings sidebar when you select a block.
* **Bulk Run** — [Run the Workflow on a dataset](/workflows/bulk-runs).
* **Interface** — [How the Run tab looks](/workflows/interface) for people who run the Workflow after it is published.
**Manual-style Workflows:** **Bulk Run** and **Interface** show only when the trigger supports the interactive **Run** tab in Cassidy (for example **Manual**). Scheduled and integration triggers hide those two tabs.
To update the Workflow **name** and **description**, click the name in the top-left, open **...** → **Update Name & Description**, or—when **Interface** is available—edit the same fields in the **Customize** section on that tab.
## Configure your Workflow
### Trigger
The trigger defines how and when your Workflow starts. Click the trigger block at the top of the editor to configure it.
* **Manual** — Users fill in a form and click **Run**
* **Scheduled** — Runs automatically on a recurring schedule
* **Webhook** — Starts when an external system sends a POST request
* **Email** — Runs when an email is sent to the Workflow's [dedicated email address](/reference/triggers/email)
* **Integration trigger** — Fires on events like a new Slack message, Zendesk ticket, HubSpot record, or Google Calendar event
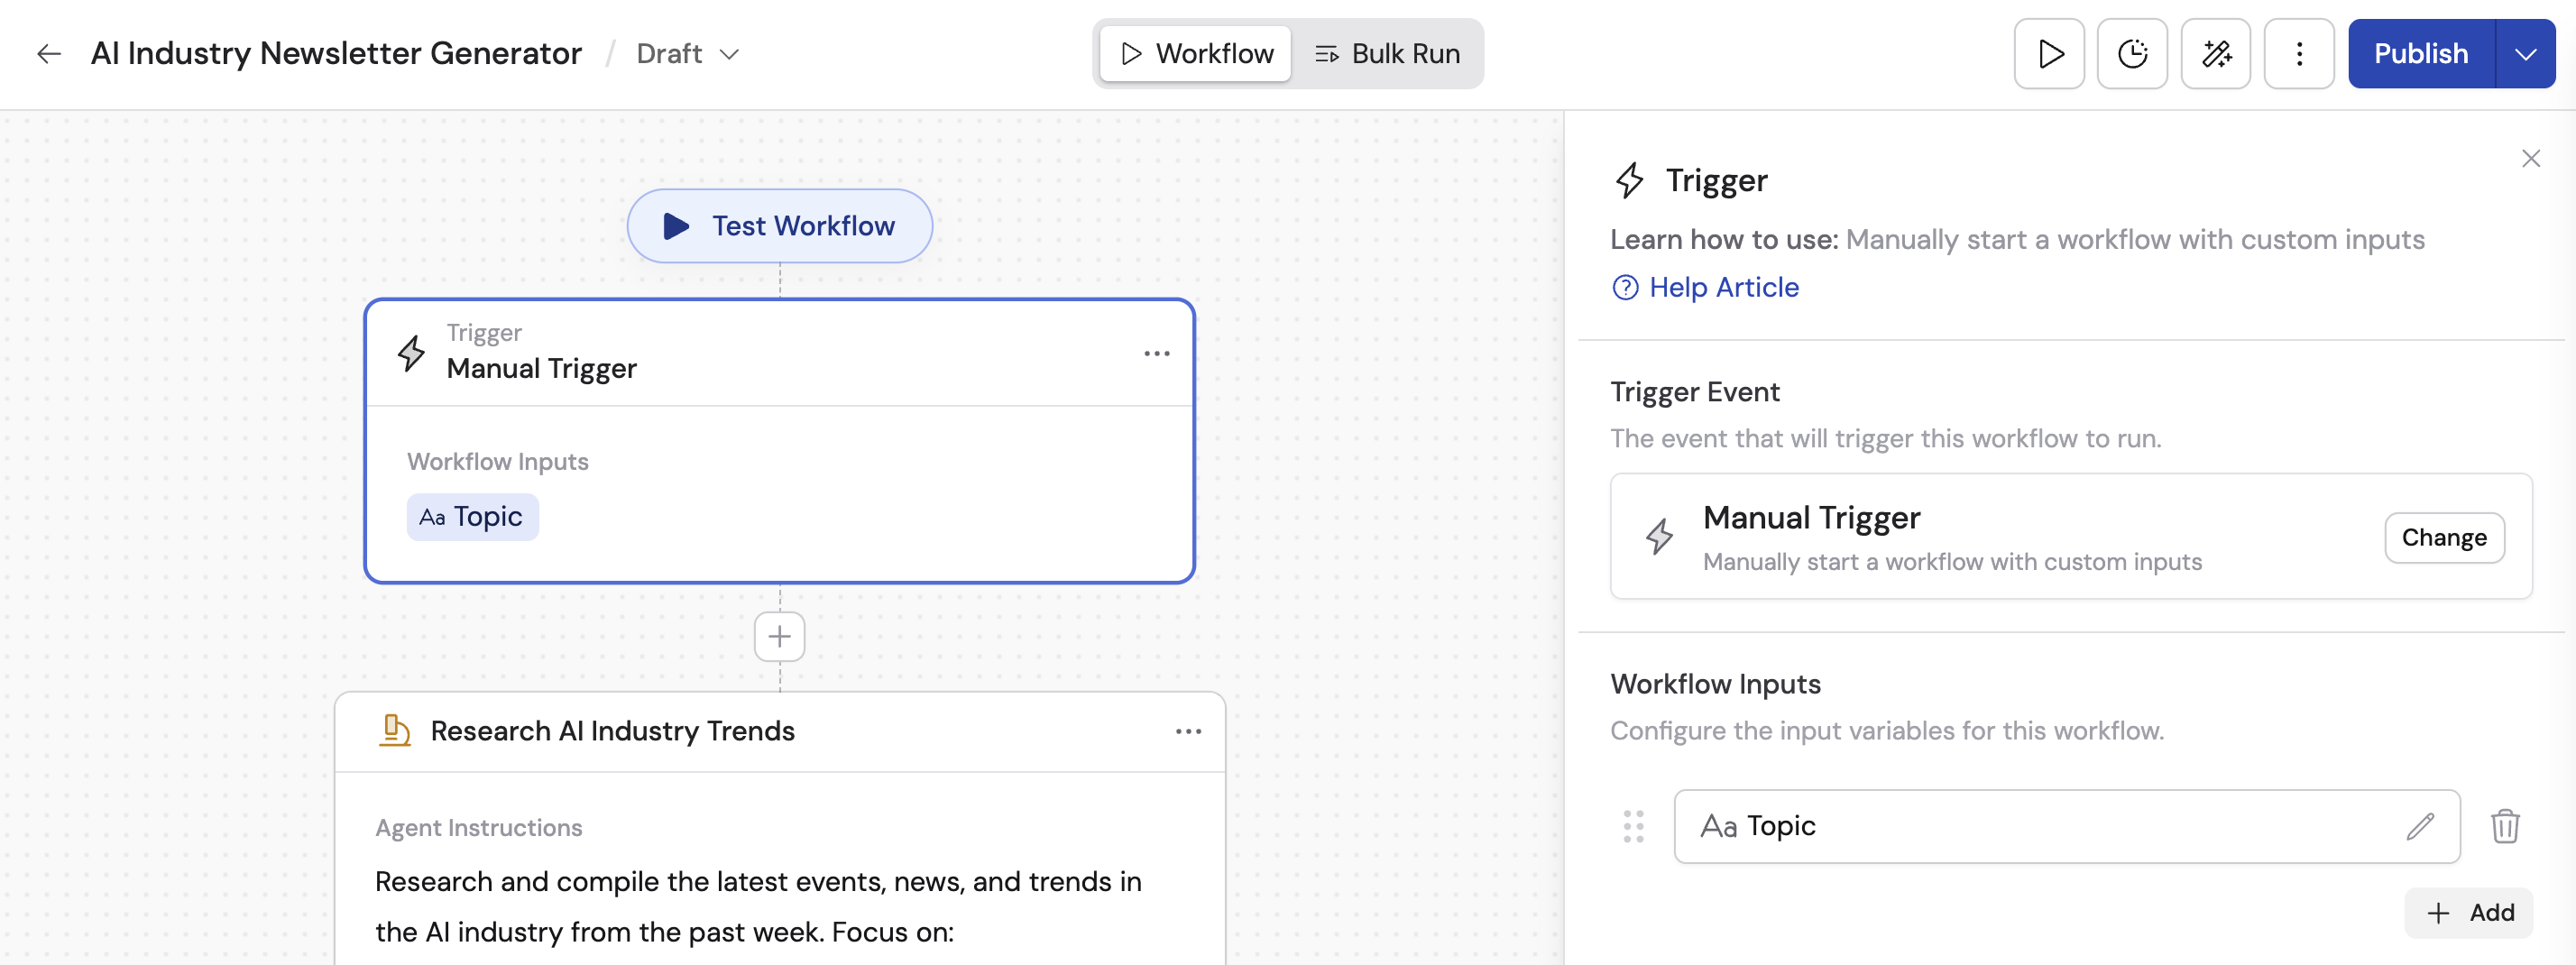 Depending on the trigger type, set up the required inputs. For a Manual trigger, add input fields (Text, Number, Yes/No, URL, File, Dropdown, Knowledge Base, or Object). For integration triggers, connect the relevant app and select the event.
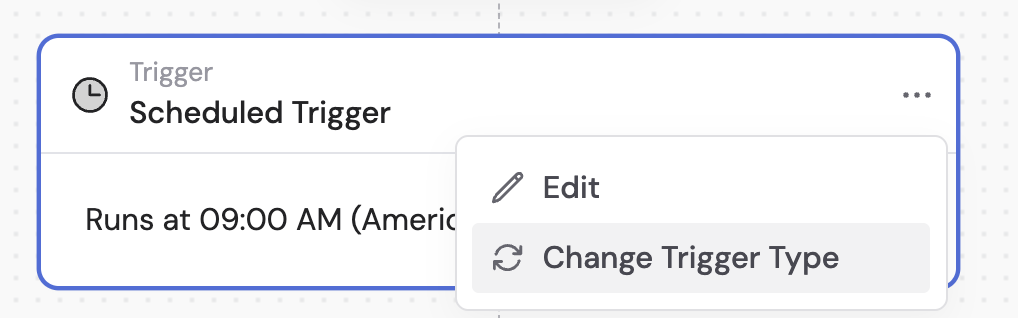
To swap trigger types on an existing Workflow, click the **...** menu on the trigger block and select **Change Trigger Type**.
Depending on the trigger type, set up the required inputs. For a Manual trigger, add input fields (Text, Number, Yes/No, URL, File, Dropdown, Knowledge Base, or Object). For integration triggers, connect the relevant app and select the event.
To swap trigger types on an existing Workflow, click the **...** menu on the trigger block and select **Change Trigger Type**.
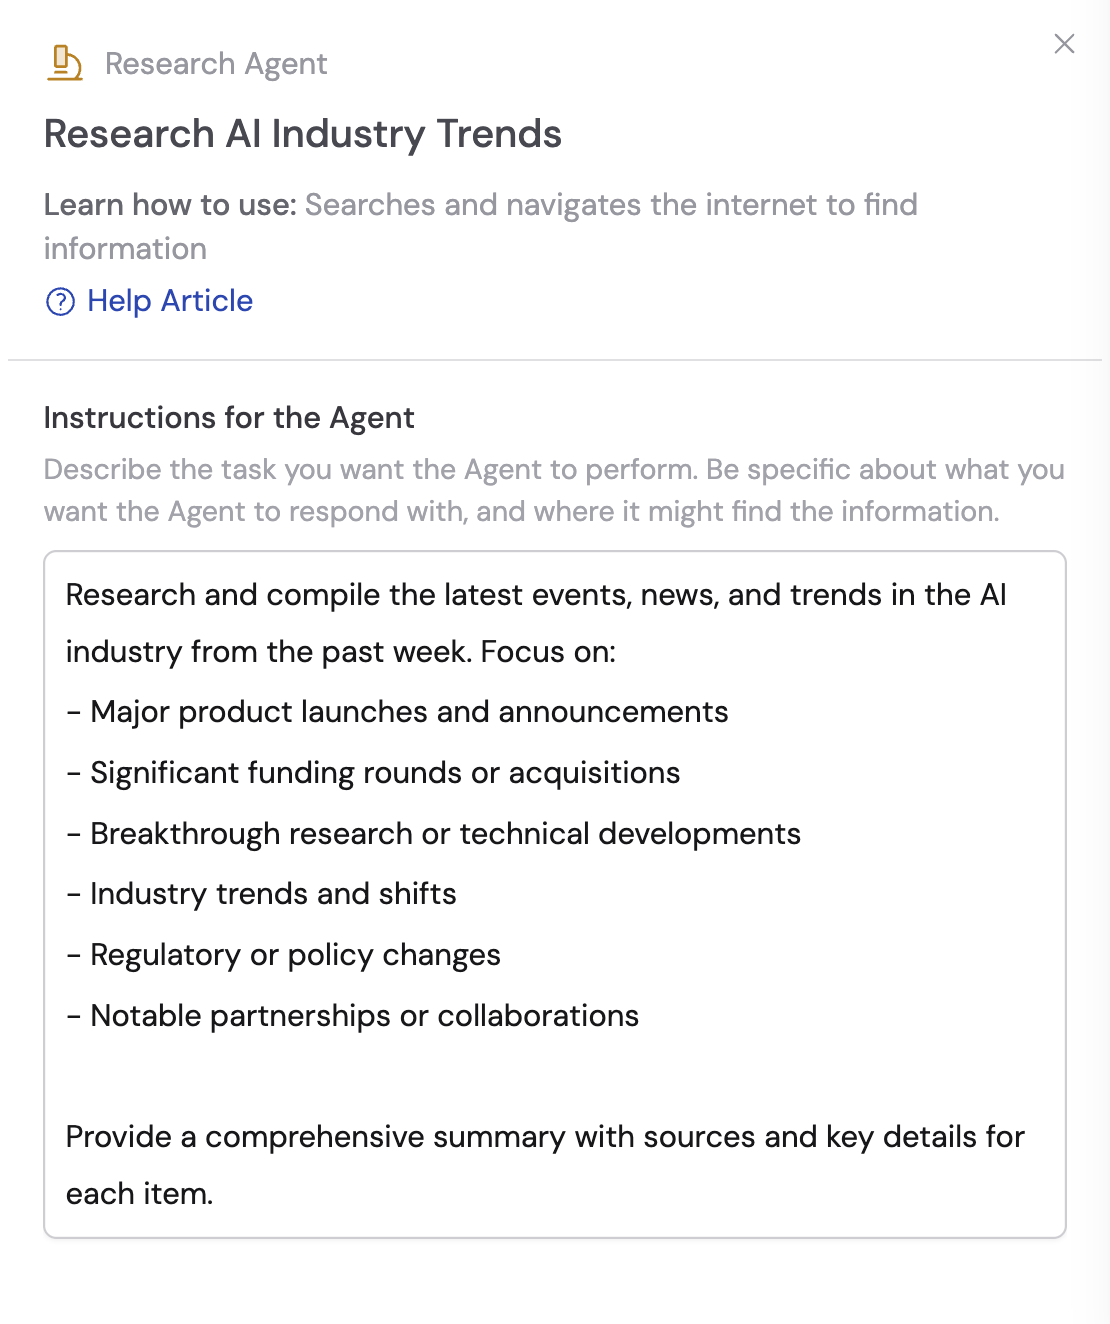
 ### Actions
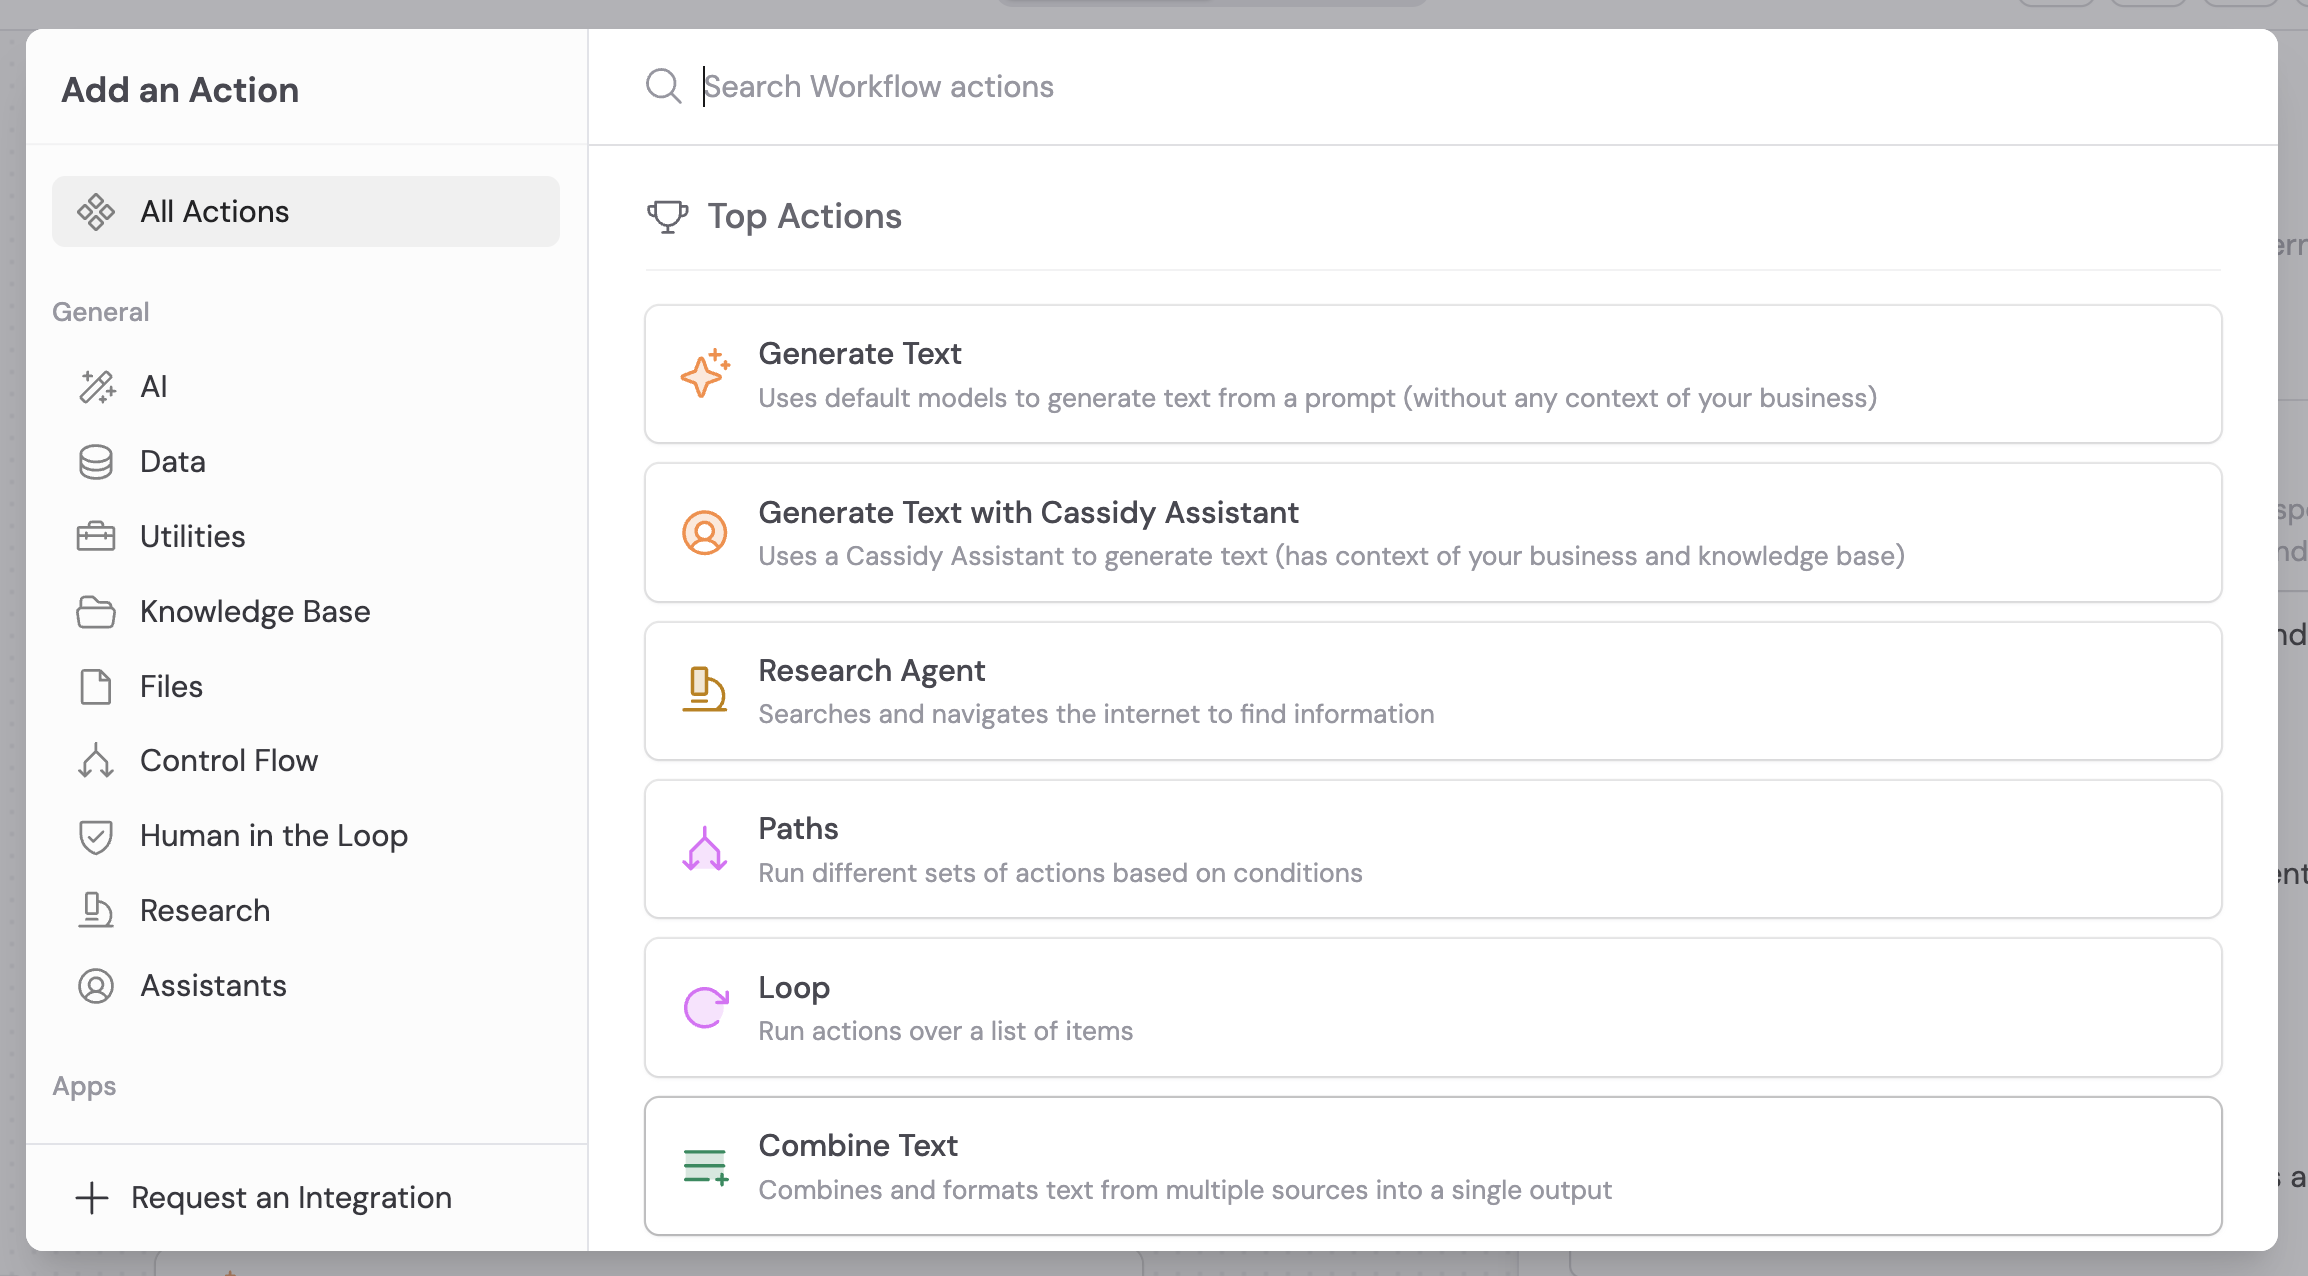
Actions are the steps your Workflow performs after the trigger fires. Click the **+** button between blocks to insert a new action. Browse or search the action library to find what you need — generate text, send an email, update a CRM record, run code, scrape a webpage, and more.
### Actions
Actions are the steps your Workflow performs after the trigger fires. Click the **+** button between blocks to insert a new action. Browse or search the action library to find what you need — generate text, send an email, update a CRM record, run code, scrape a webpage, and more.
 Click an action block to open its settings sidebar. Fill in prompts, select an AI model, map input fields, and adjust any action-specific options.
 To reorder actions, drag them to a new position. To delete an action, click the **...** menu on the block and select **Delete**.
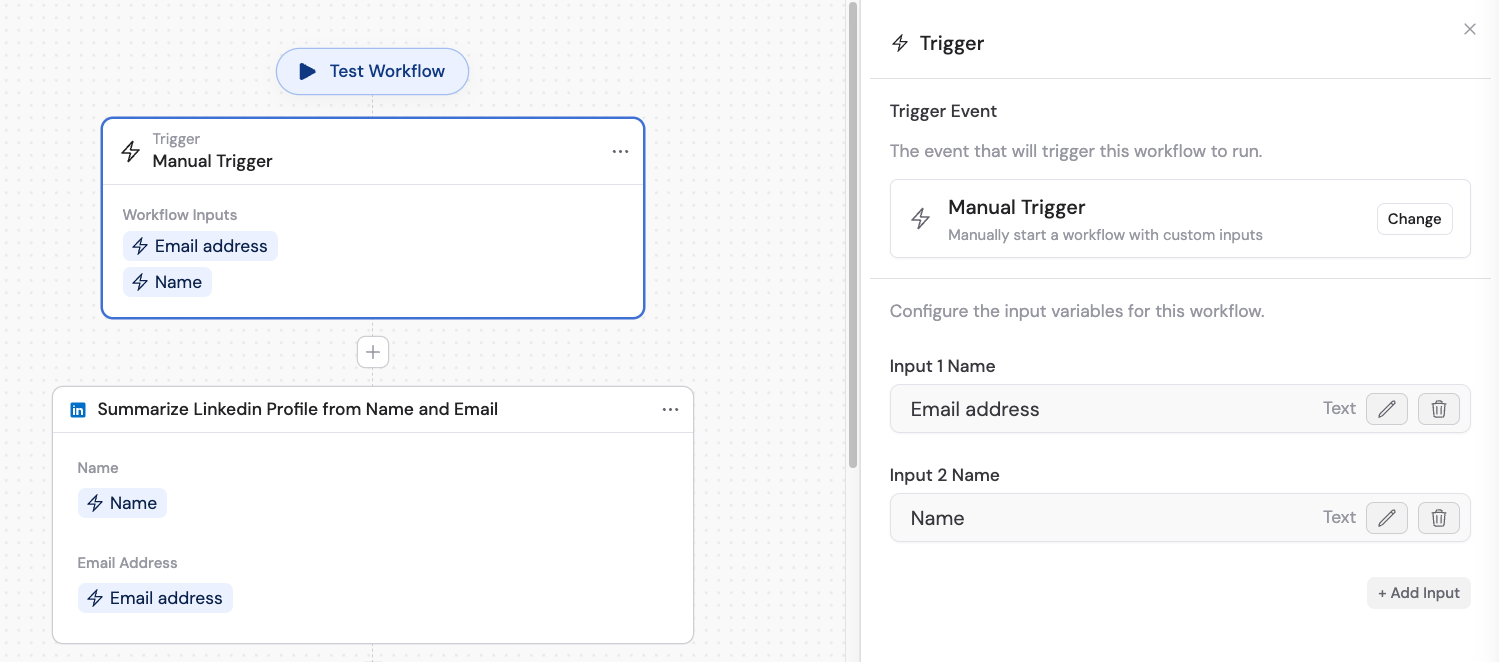
### Variables
Variables let you pass data from the trigger and from previous action outputs into later steps. By default, actions do not have access to the output of earlier steps — you need to explicitly reference variables to connect them.
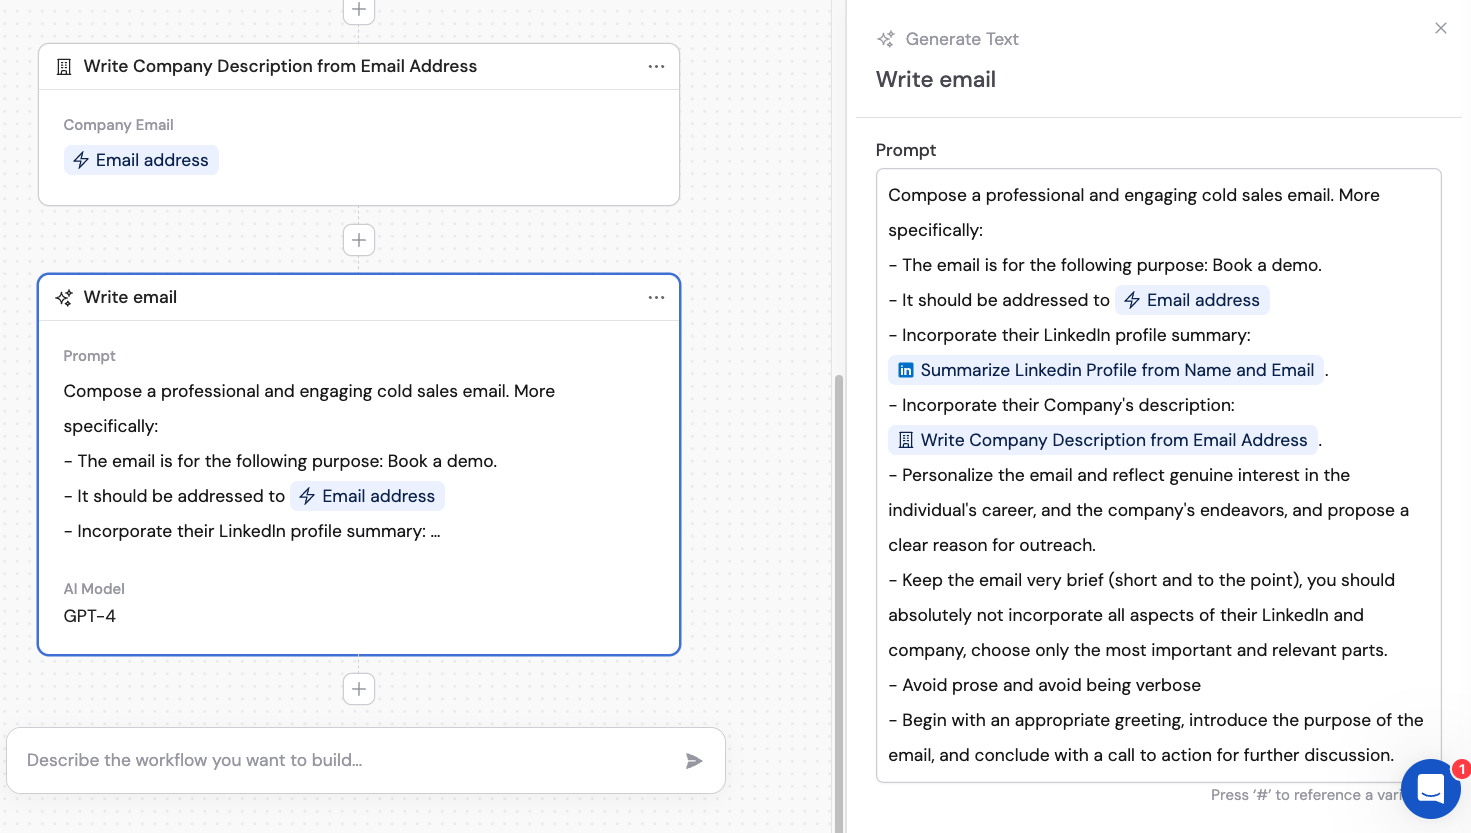
For example, in a LinkedIn-enhanced cold email Workflow, the trigger collects a **Name** and **Email address**. These become variables you reference in later actions like "Summarize LinkedIn Profile" and "Write Company Description."
To reorder actions, drag them to a new position. To delete an action, click the **...** menu on the block and select **Delete**.
### Variables
Variables let you pass data from the trigger and from previous action outputs into later steps. By default, actions do not have access to the output of earlier steps — you need to explicitly reference variables to connect them.
For example, in a LinkedIn-enhanced cold email Workflow, the trigger collects a **Name** and **Email address**. These become variables you reference in later actions like "Summarize LinkedIn Profile" and "Write Company Description."
 To insert a variable, type **#** or click **Insert Variable** while editing an action's prompt or input field. A dropdown appears showing all available variables from the trigger and previous actions.
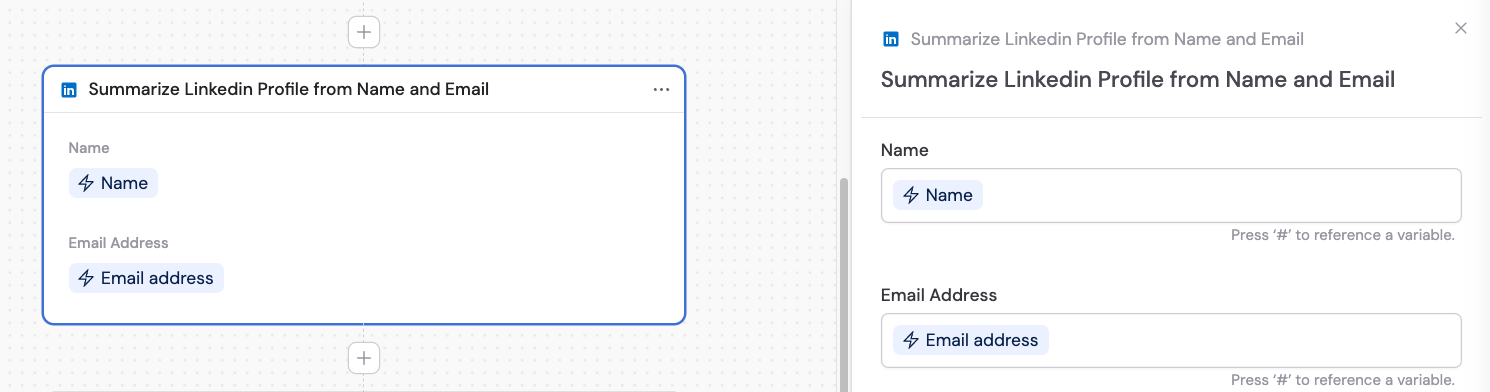 Each action's output becomes a new variable. In the final step, you can combine outputs from multiple earlier steps — for example, referencing both a profile summary and a company description to generate a personalized email.
 Need metadata about the run itself? Use [utility variables](/workflows/advanced/utility-variables) to access the run ID, timestamp, user name, and more.
### Control flow
For branching logic, use [Paths](/reference/actions/paths) to route your Workflow based on conditions — like routing a support question to different [Agents](/agents/overview) depending on the product mentioned. For repeating steps, use [Loops](/reference/actions/loop). For pausing execution, use [Wait/Delay](/reference/actions/wait-delay) or [Request Approval](/reference/actions/request-approval).
## Run view and Interface (Manual-style Workflows)
For Manual-style Workflows, use the **Interface** tab to change what the **Run** tab looks like for people who run the Workflow after it is published—header, description, form fields, run button, and optional highlighted **Outputs**.
Need metadata about the run itself? Use [utility variables](/workflows/advanced/utility-variables) to access the run ID, timestamp, user name, and more.
### Control flow
For branching logic, use [Paths](/reference/actions/paths) to route your Workflow based on conditions — like routing a support question to different [Agents](/agents/overview) depending on the product mentioned. For repeating steps, use [Loops](/reference/actions/loop). For pausing execution, use [Wait/Delay](/reference/actions/wait-delay) or [Request Approval](/reference/actions/request-approval).
## Run view and Interface (Manual-style Workflows)
For Manual-style Workflows, use the **Interface** tab to change what the **Run** tab looks like for people who run the Workflow after it is published—header, description, form fields, run button, and optional highlighted **Outputs**.
 Full walkthrough: [Customize the Workflow run view](/workflows/interface).
## Use the Workflow Copilot
The Workflow Copilot is an AI-powered building partner that helps you configure Workflows using plain language. Instead of editing each setting manually, describe what you want and the Copilot generates or updates the Workflow for you — including triggers, actions, prompts, and variable mappings.
You can use the Copilot at any point: when creating a new Workflow from scratch, when starting from a template, or when refining an existing Workflow.
Do not manually edit the Workflow while the Copilot is working — your changes will be overwritten.
### Access the Copilot
* **When creating a new Workflow**: The Copilot opens automatically if you choose **Custom Workflow**.
* **When editing an existing Workflow**: Click the wand icon in the top toolbar of the Workflow editor.
Full walkthrough: [Customize the Workflow run view](/workflows/interface).
## Use the Workflow Copilot
The Workflow Copilot is an AI-powered building partner that helps you configure Workflows using plain language. Instead of editing each setting manually, describe what you want and the Copilot generates or updates the Workflow for you — including triggers, actions, prompts, and variable mappings.
You can use the Copilot at any point: when creating a new Workflow from scratch, when starting from a template, or when refining an existing Workflow.
Do not manually edit the Workflow while the Copilot is working — your changes will be overwritten.
### Access the Copilot
* **When creating a new Workflow**: The Copilot opens automatically if you choose **Custom Workflow**.
* **When editing an existing Workflow**: Click the wand icon in the top toolbar of the Workflow editor.
 ### How the Copilot works
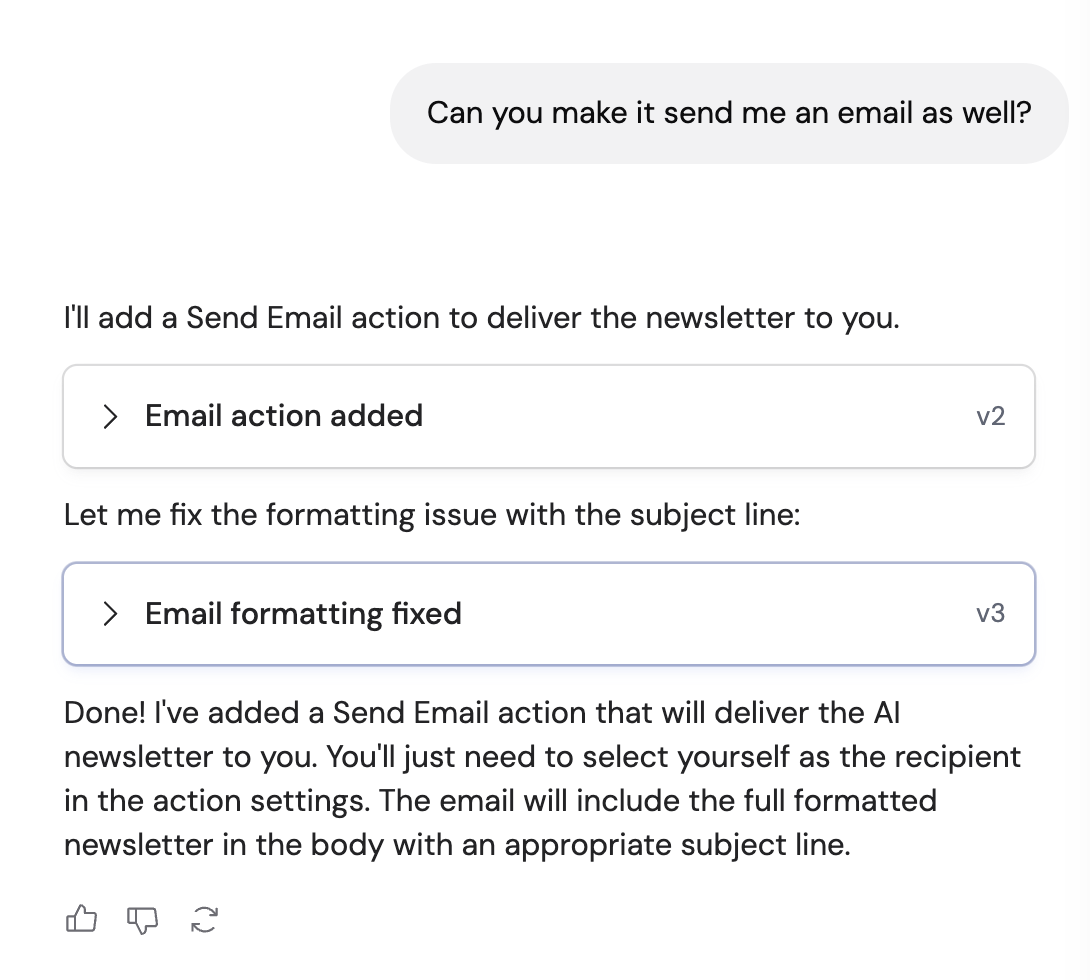
Tell the Copilot what you want to automate in plain language. For example: *"When a new Zendesk ticket arrives, summarize it using our product knowledge base and draft a reply."* The Copilot plans its approach and begins building.
### How the Copilot works
Tell the Copilot what you want to automate in plain language. For example: *"When a new Zendesk ticket arrives, summarize it using our product knowledge base and draft a reply."* The Copilot plans its approach and begins building.
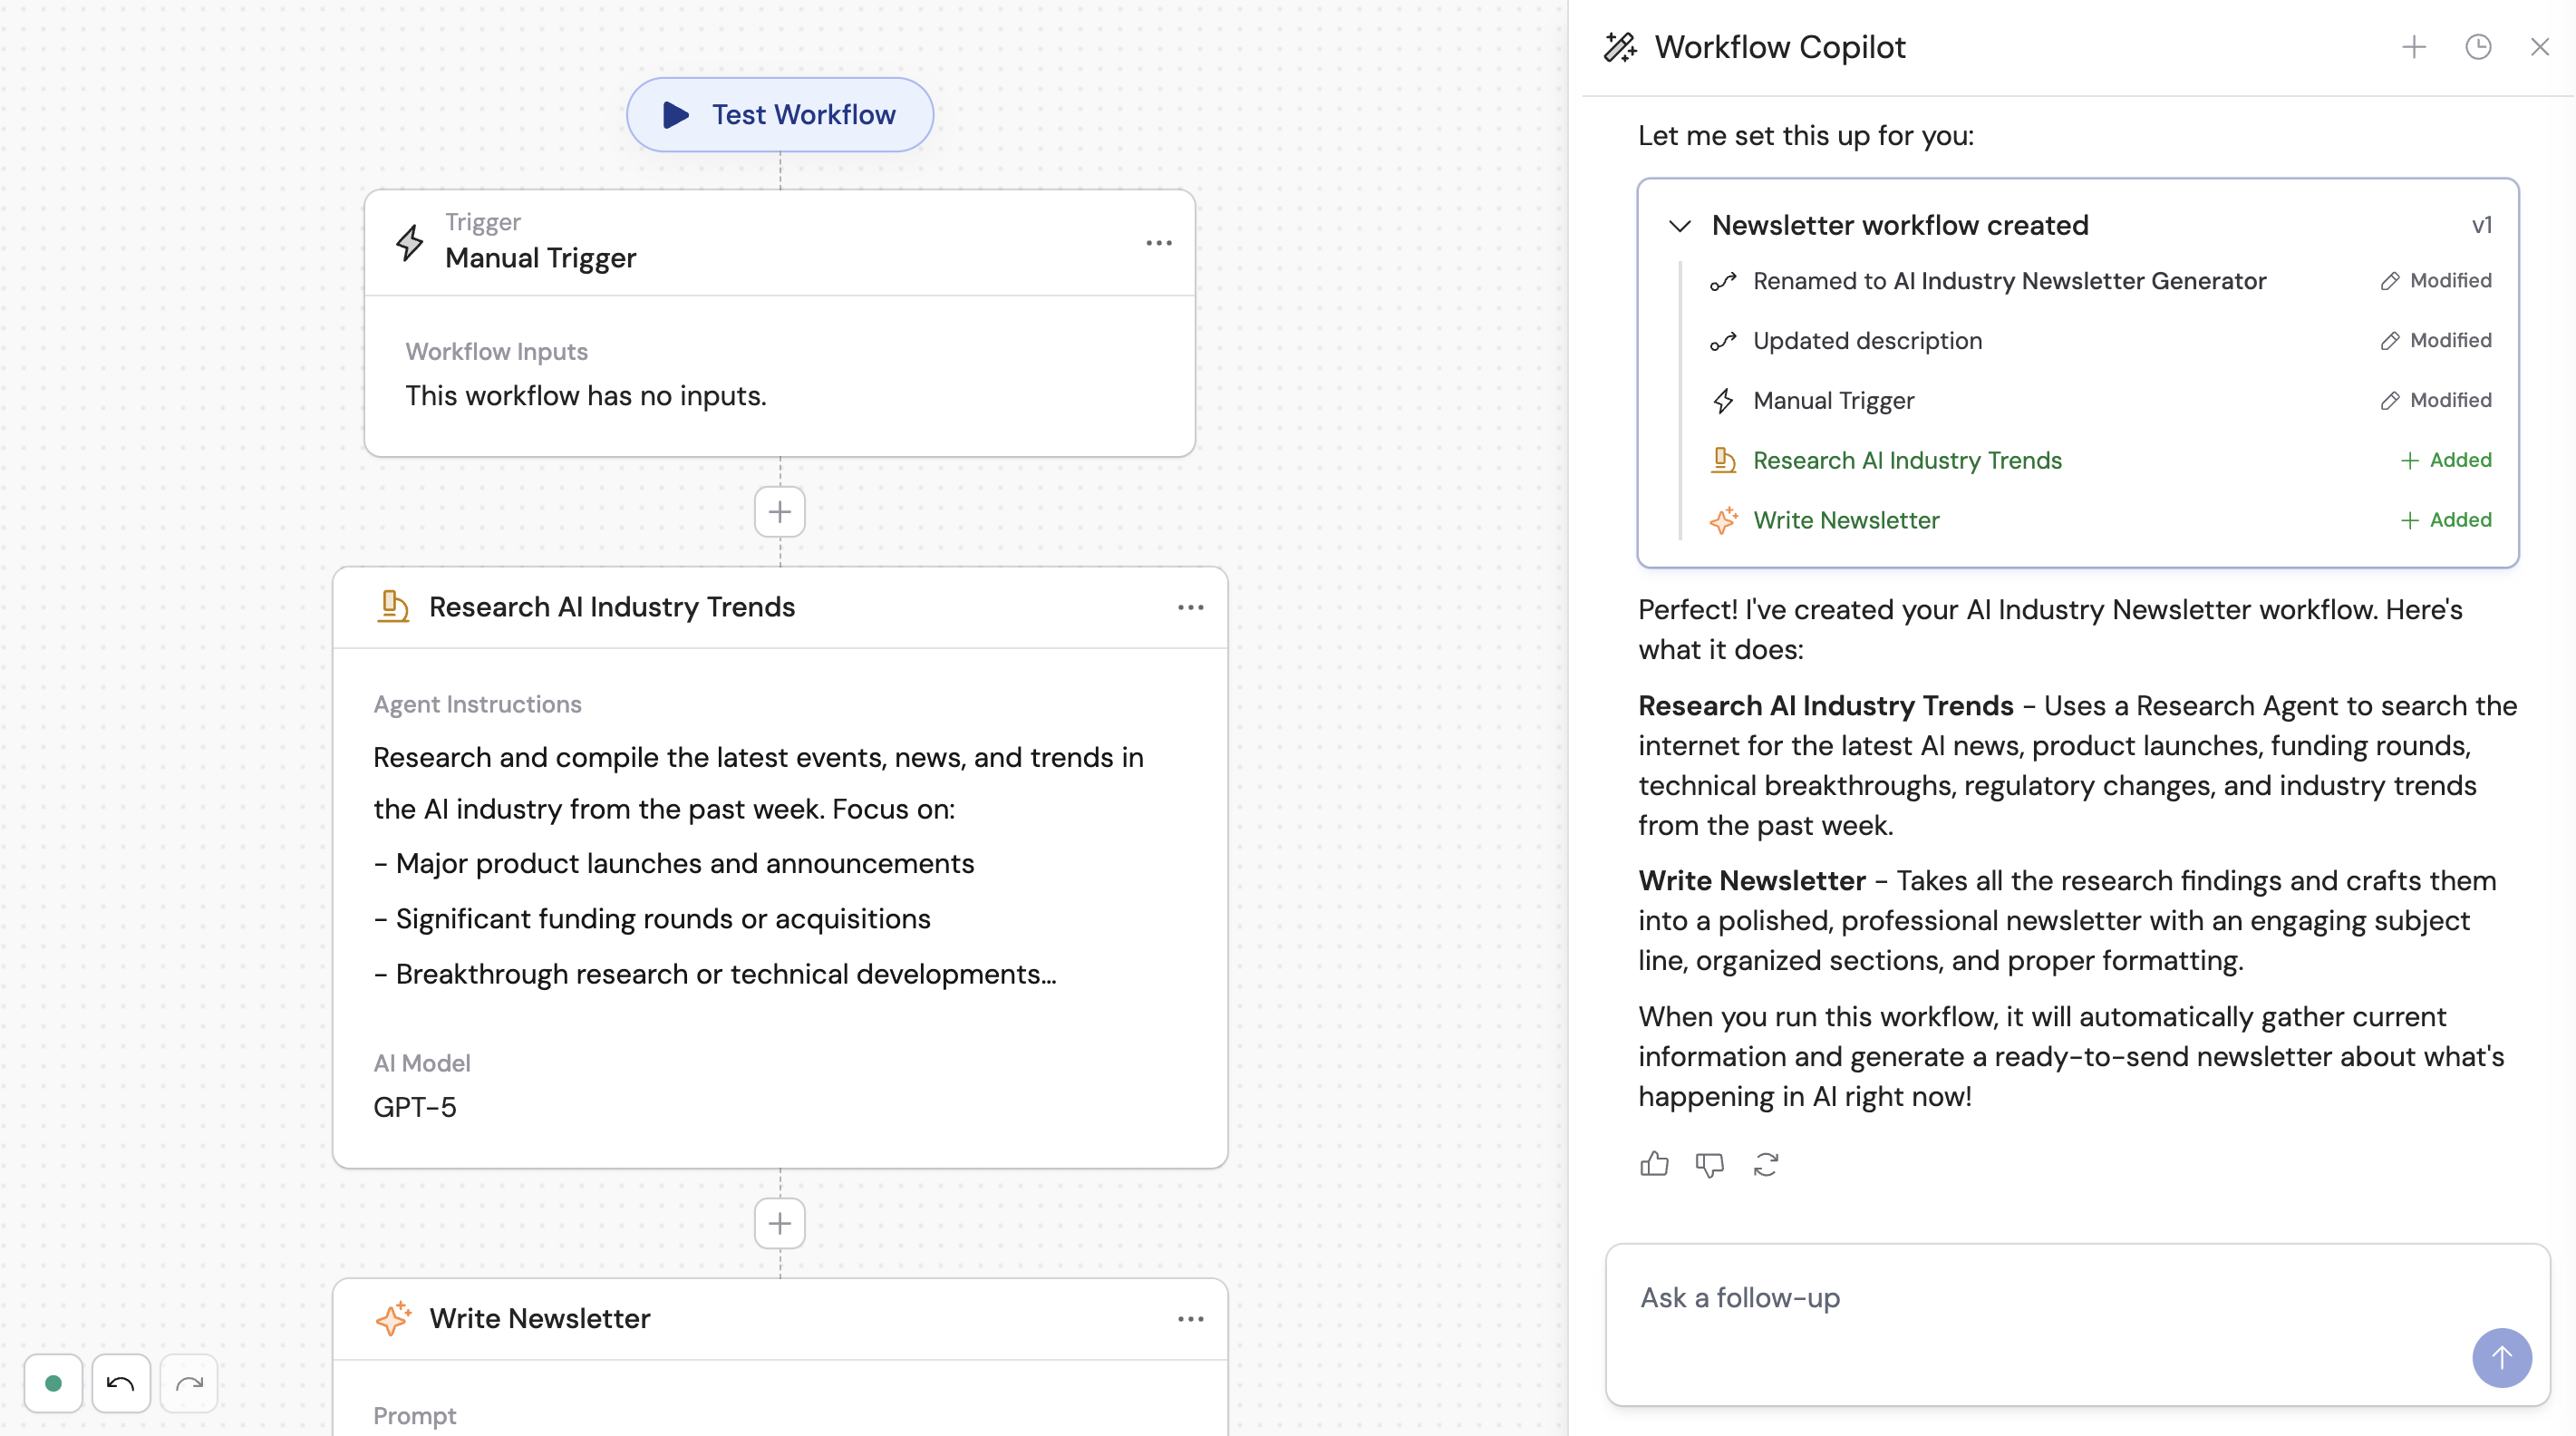
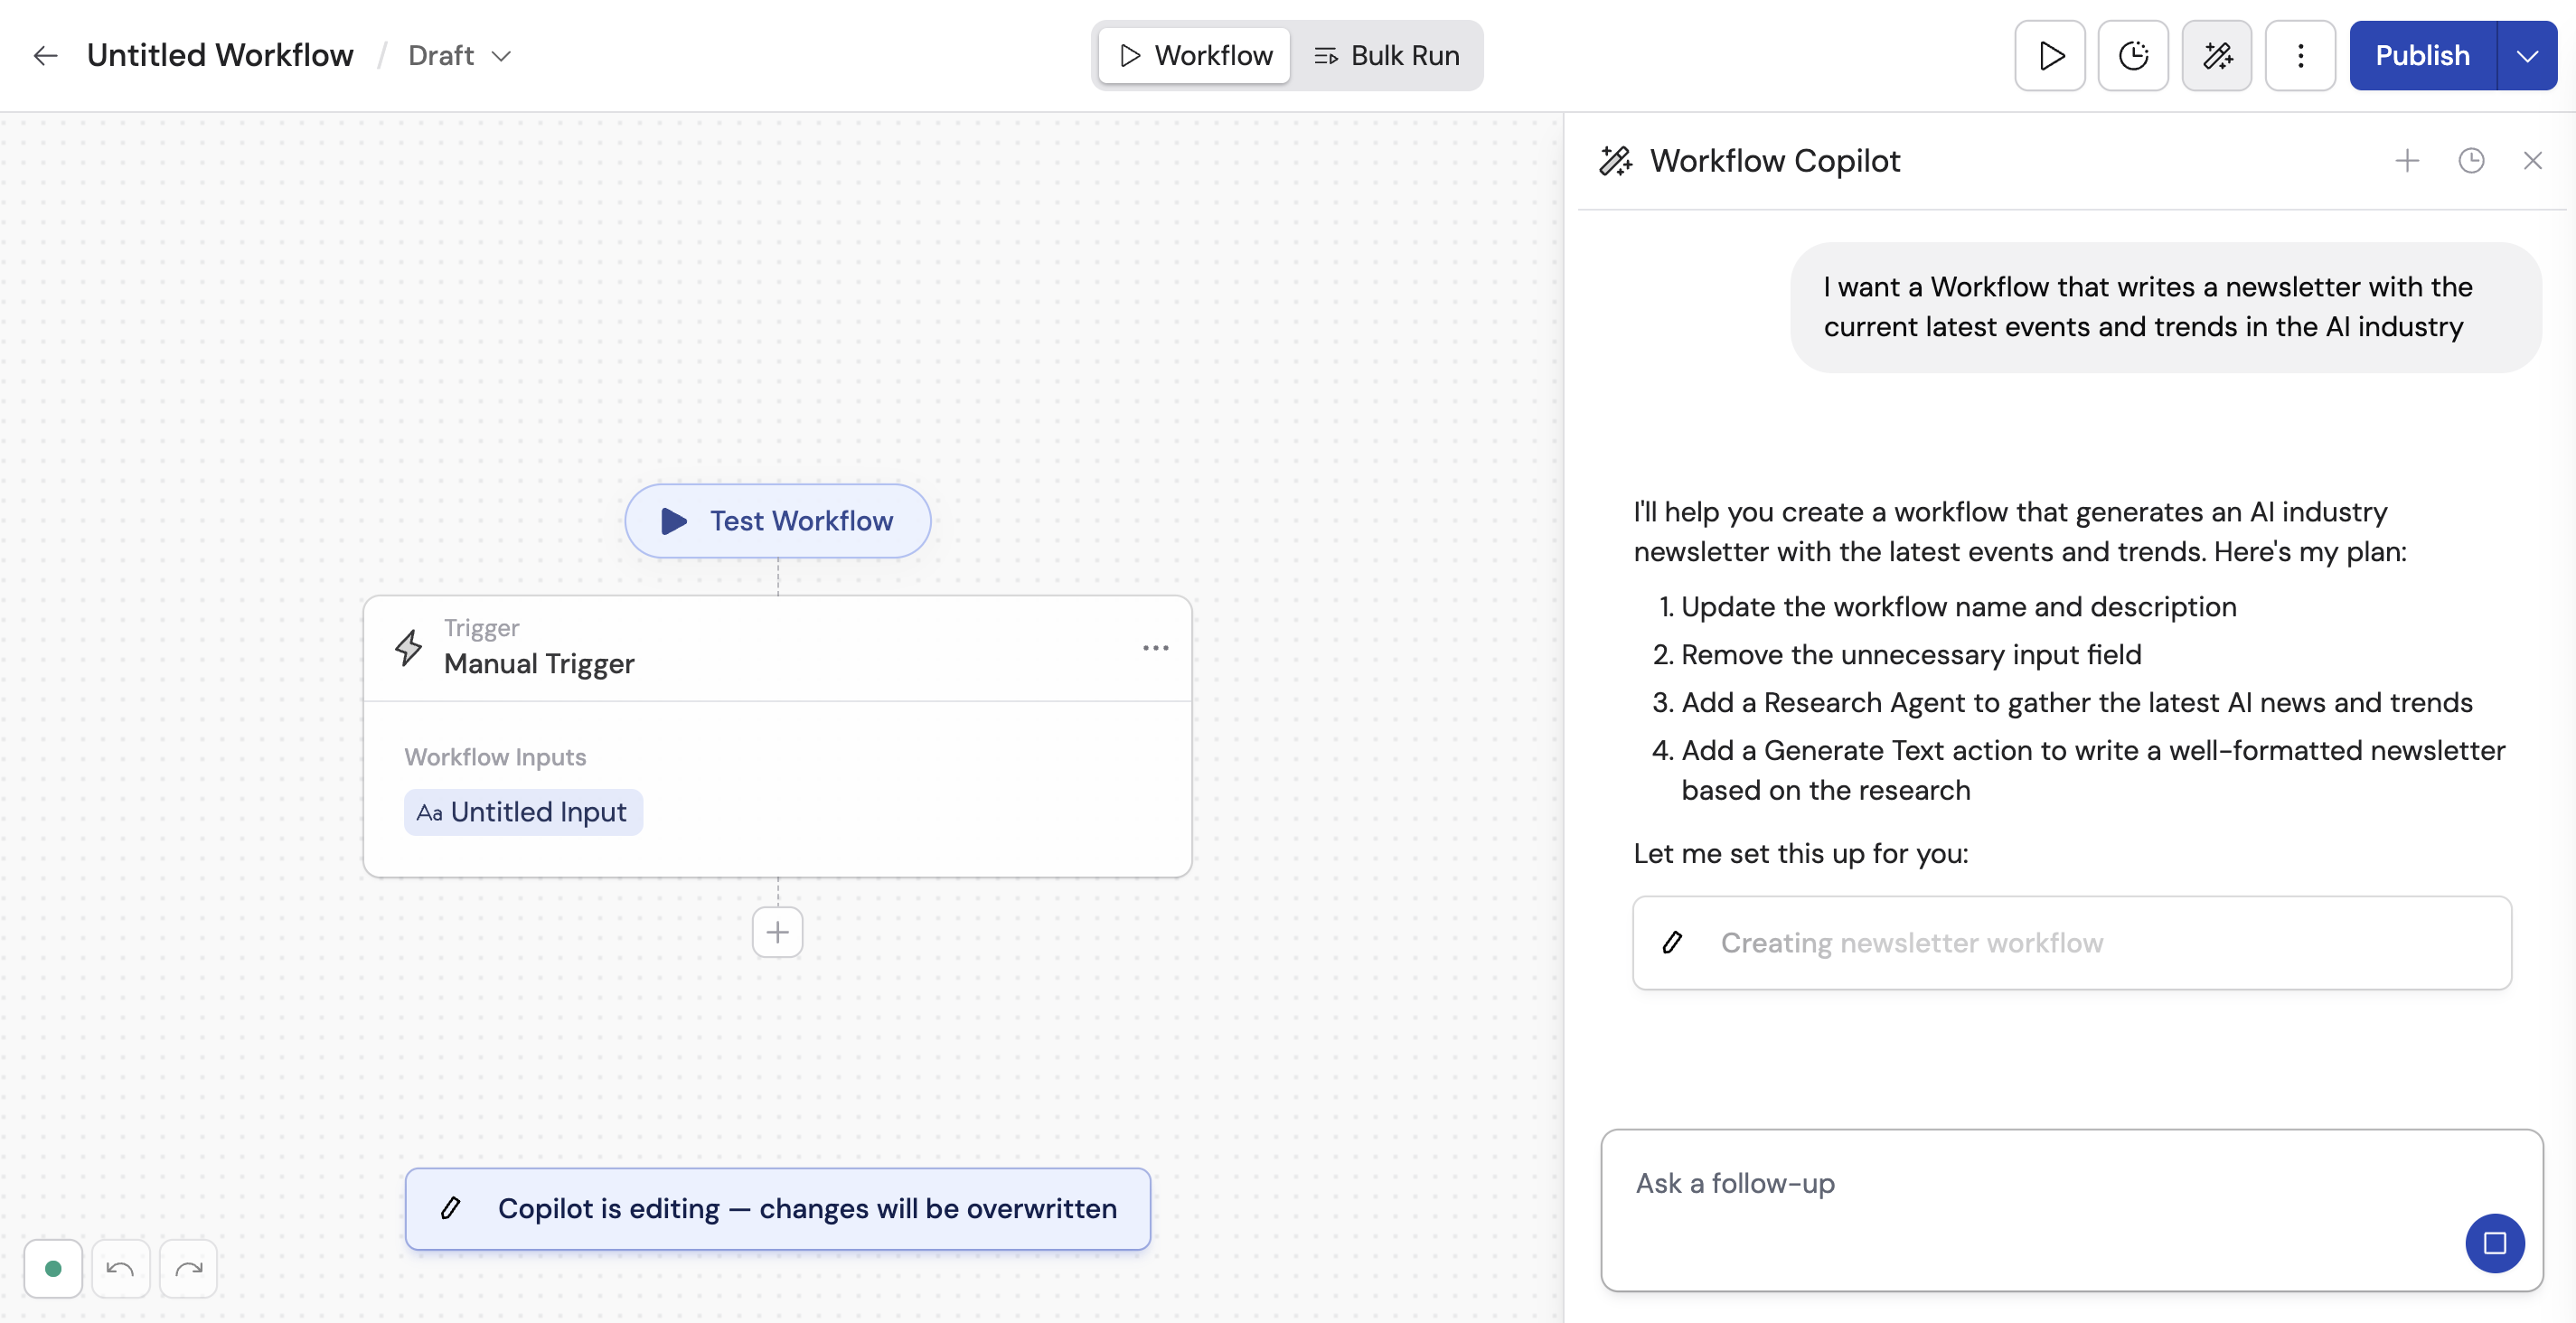 The Copilot generates a complete Workflow. You can see the steps that were changed or added, along with a message from the Copilot explaining what it did.
 Send follow-up messages to refine further. You can ask the Copilot to add steps, modify existing steps, swap models, adjust prompts, or connect different integrations.
 Once you are satisfied, [test the Workflow](/workflows/running-and-testing) to verify it produces the output you expect.
### Copilot controls
| Control | What it does |
| ---------------------- | ----------------------------------------------------------- |
| **Regenerate** | Try a different approach for any Copilot message |
| **Edit message** | Modify your prompt and resubmit |
| **Restore checkpoint** | Revert the Workflow to the version before a specific change |
| **New chat** | Start a fresh Copilot conversation |
| **Chat history** | Browse and return to earlier Copilot conversations |
### Using the Copilot with testing
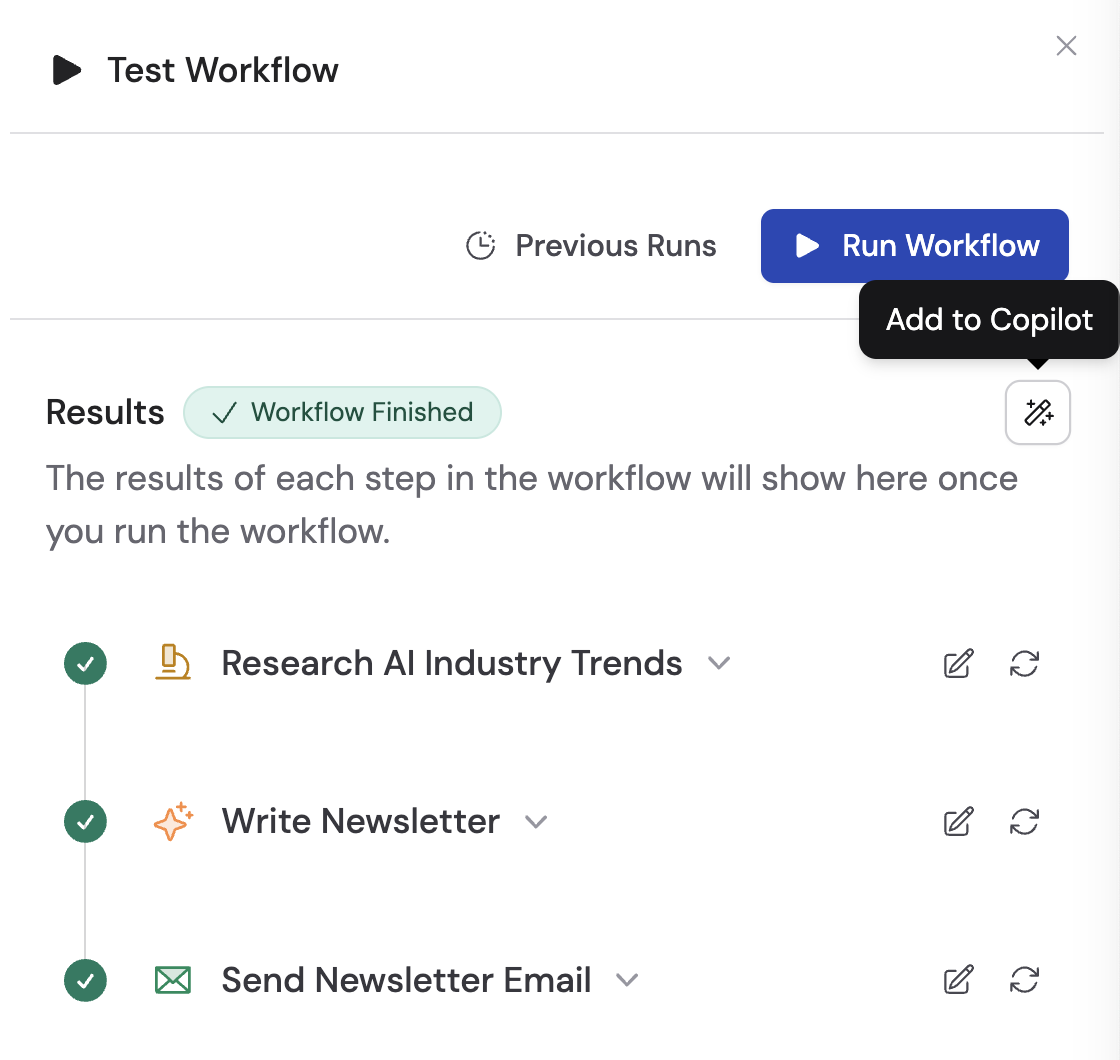
When [testing your Workflow](/workflows/running-and-testing), you can send test results directly to the Copilot for analysis:
* **Add to Copilot** — Click this icon on any test run to attach the outputs to the Copilot chat. Ask the Copilot to improve results or make tweaks based on actual performance data.
* **Fix in Copilot** — If a step produces an error during testing, click this icon to bring the error into the Copilot's context so it can debug and resolve the issue.
Once you are satisfied, [test the Workflow](/workflows/running-and-testing) to verify it produces the output you expect.
### Copilot controls
| Control | What it does |
| ---------------------- | ----------------------------------------------------------- |
| **Regenerate** | Try a different approach for any Copilot message |
| **Edit message** | Modify your prompt and resubmit |
| **Restore checkpoint** | Revert the Workflow to the version before a specific change |
| **New chat** | Start a fresh Copilot conversation |
| **Chat history** | Browse and return to earlier Copilot conversations |
### Using the Copilot with testing
When [testing your Workflow](/workflows/running-and-testing), you can send test results directly to the Copilot for analysis:
* **Add to Copilot** — Click this icon on any test run to attach the outputs to the Copilot chat. Ask the Copilot to improve results or make tweaks based on actual performance data.
* **Fix in Copilot** — If a step produces an error during testing, click this icon to bring the error into the Copilot's context so it can debug and resolve the issue.
 ## Next steps
Style the Run tab, Manual inputs, and highlighted outputs from the Interface tab.
Execute your Workflow and use the testing interface to debug each step.
Import a CSV or use Smart Import to run your Workflow across a full dataset.
Manage permissions, publish versions, organize into folders, and deploy externally.
Define specific output fields for consistent, machine-readable results.
## Next steps
Style the Run tab, Manual inputs, and highlighted outputs from the Interface tab.
Execute your Workflow and use the testing interface to debug each step.
Import a CSV or use Smart Import to run your Workflow across a full dataset.
Manage permissions, publish versions, organize into folders, and deploy externally.
Define specific output fields for consistent, machine-readable results.