> ## Documentation Index
> Fetch the complete documentation index at: https://docs.cassidyai.com/llms.txt
> Use this file to discover all available pages before exploring further.
# Share and deploy Workflows
> Organize Workflows into folders, manage permissions, and deploy externally via webhooks.
Cassidy gives you flexible options for controlling who can access your [Workflows](/workflows/overview), how they are organized, and where they run. This guide covers folder management, permissions, external deployment, and failure notifications.
## Organize Workflows with folders
Folders help your team find Workflows quickly and control access at a group level.
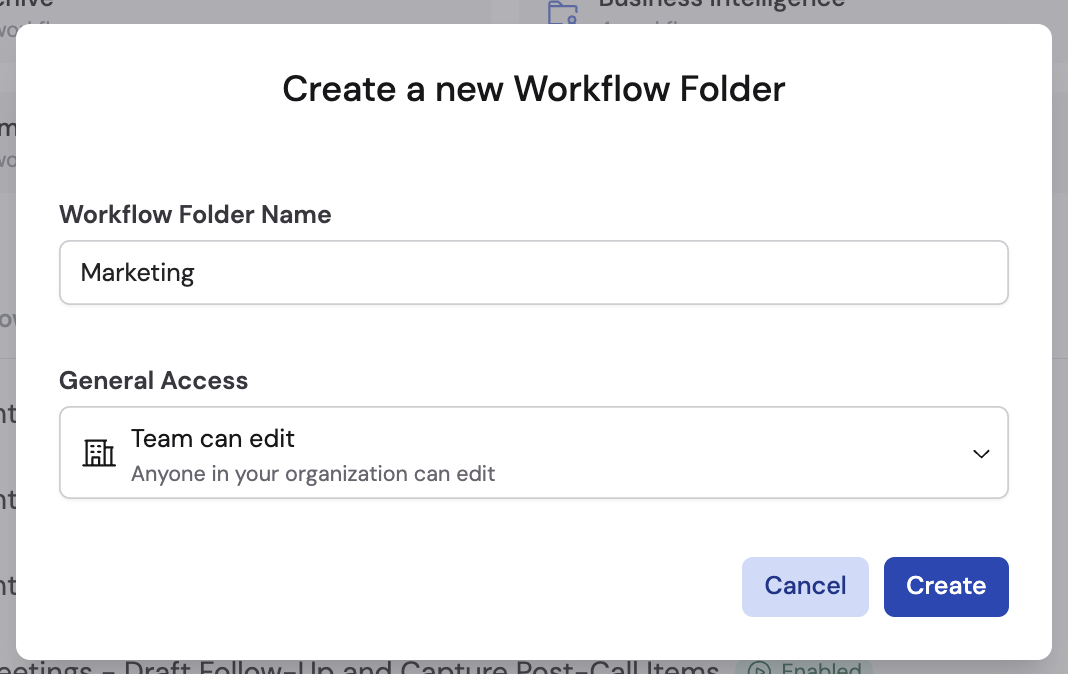
On the **Workflows** page, click **Create a Folder**. Enter a name and choose an access level:
* **Team can edit** -- anyone in your organization can view and edit Workflows in this folder.
* **Team can view** -- anyone can view, but only you and explicitly added people can edit.
* **Restricted** -- only specific people and groups you choose can access the folder.
 Drag and drop Workflows from the main list into a folder. You can also move Workflows to the **Private** section to make them visible only to you.
Click the **...** menu on a folder and select **Share**. Change the access type or add/remove specific people and groups. For each person or group, set **Can edit** or **Can view** granular permissions.
Drag and drop Workflows from the main list into a folder. You can also move Workflows to the **Private** section to make them visible only to you.
Click the **...** menu on a folder and select **Share**. Change the access type or add/remove specific people and groups. For each person or group, set **Can edit** or **Can view** granular permissions.
 ## Copy links from the Run view
On the **Run** tab, click the link icon in the header and choose an option:
## Copy links from the Run view
On the **Run** tab, click the link icon in the header and choose an option:
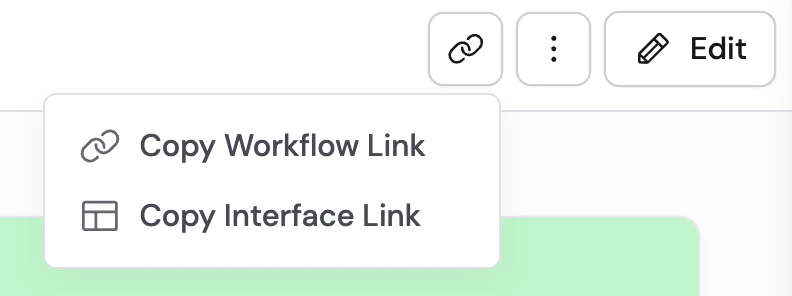 * **Copy Workflow Link** — Opens this Workflow inside Cassidy (recipients need access).
* **Copy Interface Link** — Opens a focused page to run the Workflow. Layout and labels follow your [Interface](/workflows/interface) settings.
Folder and Workflow permissions still apply.
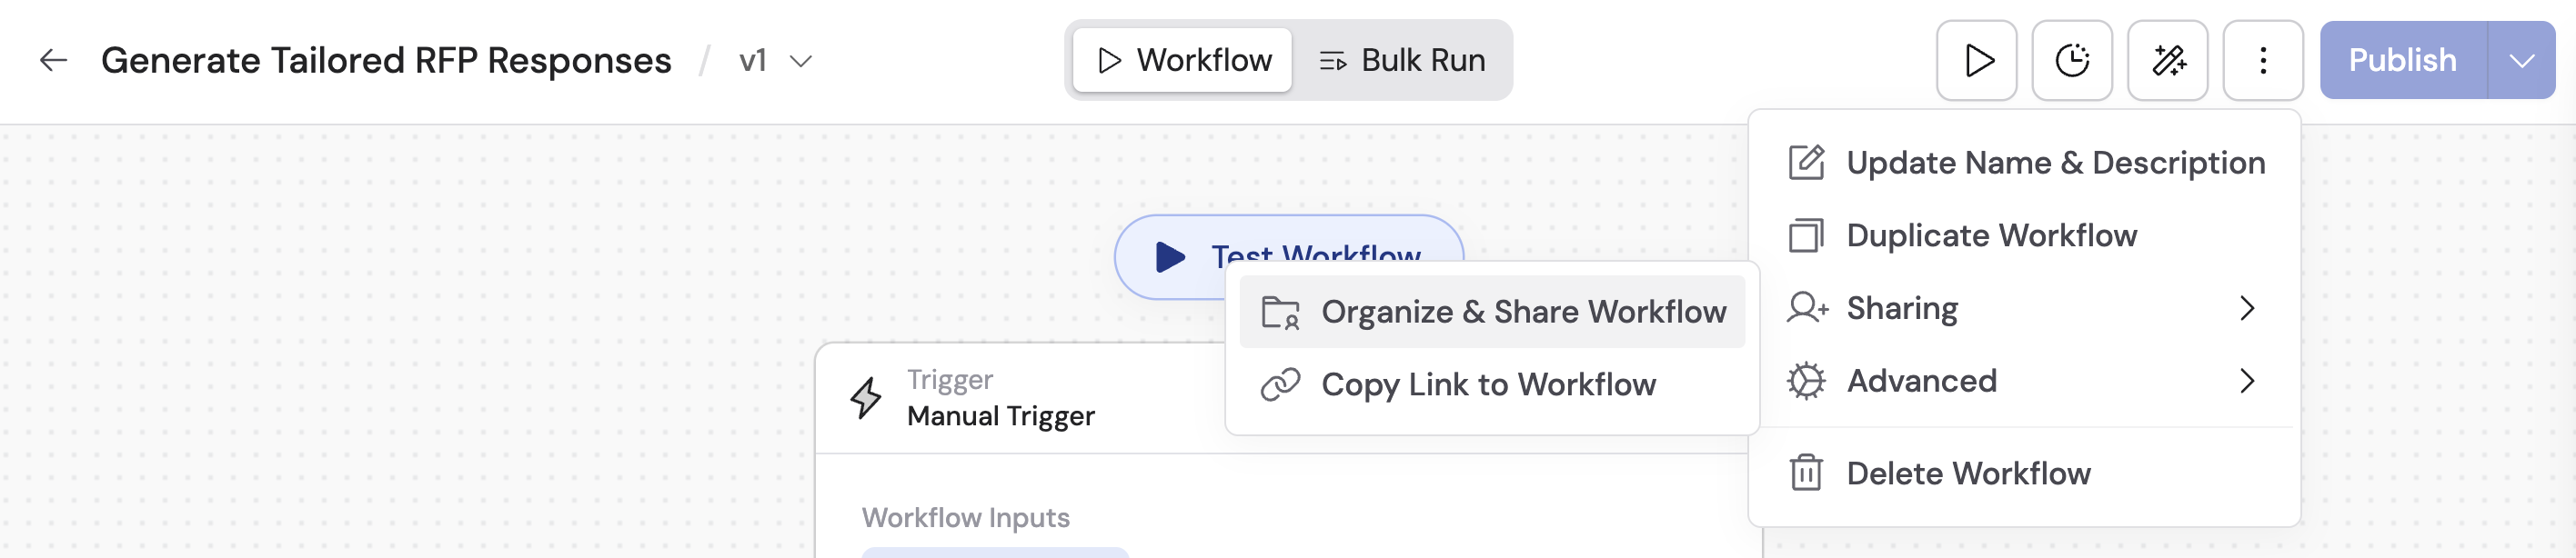
## Manage permissions from the editor
You can also update a Workflow's location and permissions while editing it.
In the Workflow editor, click the **...** menu and select **Organize & Share Workflow** under **Sharing**.
* **Copy Workflow Link** — Opens this Workflow inside Cassidy (recipients need access).
* **Copy Interface Link** — Opens a focused page to run the Workflow. Layout and labels follow your [Interface](/workflows/interface) settings.
Folder and Workflow permissions still apply.
## Manage permissions from the editor
You can also update a Workflow's location and permissions while editing it.
In the Workflow editor, click the **...** menu and select **Organize & Share Workflow** under **Sharing**.
 A modal appears showing your Team and Private sections and any folders within them. Select where to save the Workflow, or create a new folder directly from this modal.
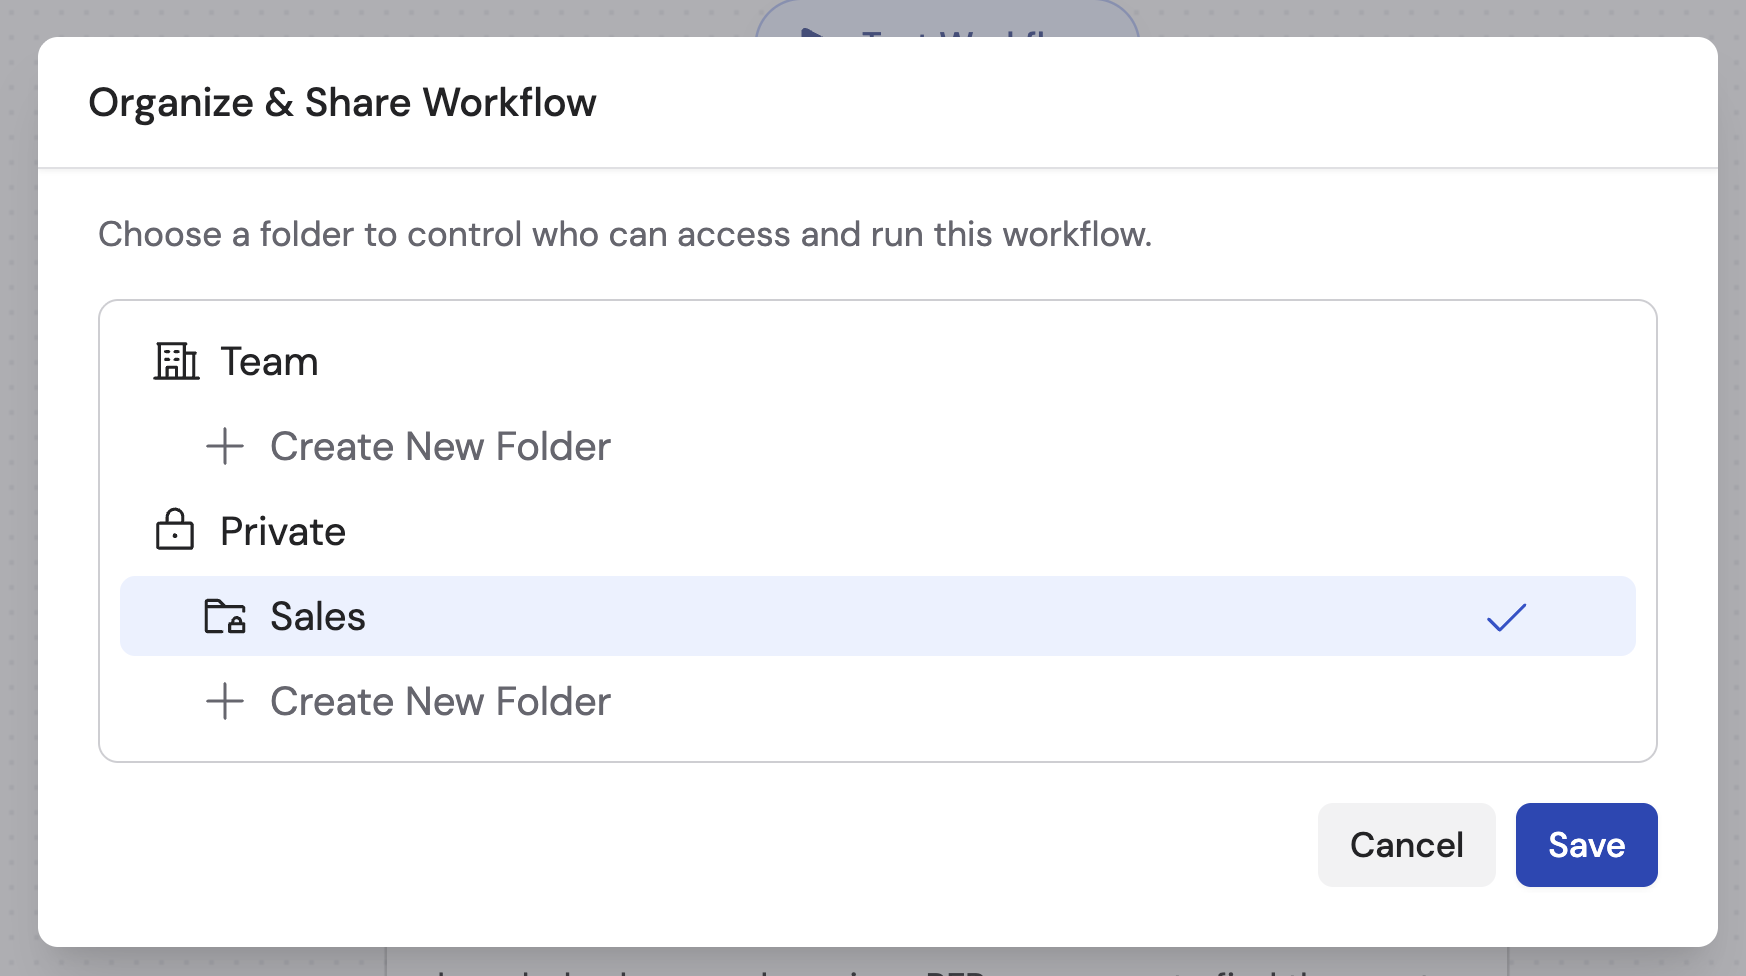 Click **Save** to apply the changes.
## Deploy externally
You can run Cassidy Workflows from outside the platform by using webhook triggers and returning results to your external systems.
When [building your Workflow](/workflows/building#configure-the-trigger), select **Webhook** as the trigger type. Copy the unique webhook URL that Cassidy generates.
Set up your website, app, or automation tool to send a POST request to the webhook URL when the relevant event occurs (e.g., a form submission or a record update).
You have two options for sending results back:
* **Return results from webhook** -- toggle this option in the Webhook trigger settings. The Workflow's output is automatically returned as the HTTP response to the incoming request.
* **Send API Request action** -- add this action at the end of your Workflow to POST results to a specific endpoint in your system. This gives you full control over the URL, method, headers, and body.
You can also trigger Workflows from [Slack](/integrations/slack/overview), [Zapier](/integrations/zapier/overview), [inbound email](/reference/triggers/email), or on a schedule -- providing flexibility in how you integrate Cassidy with your existing stack.
## Set up failure notifications
Stay informed when Workflows encounter errors so you can address issues quickly.
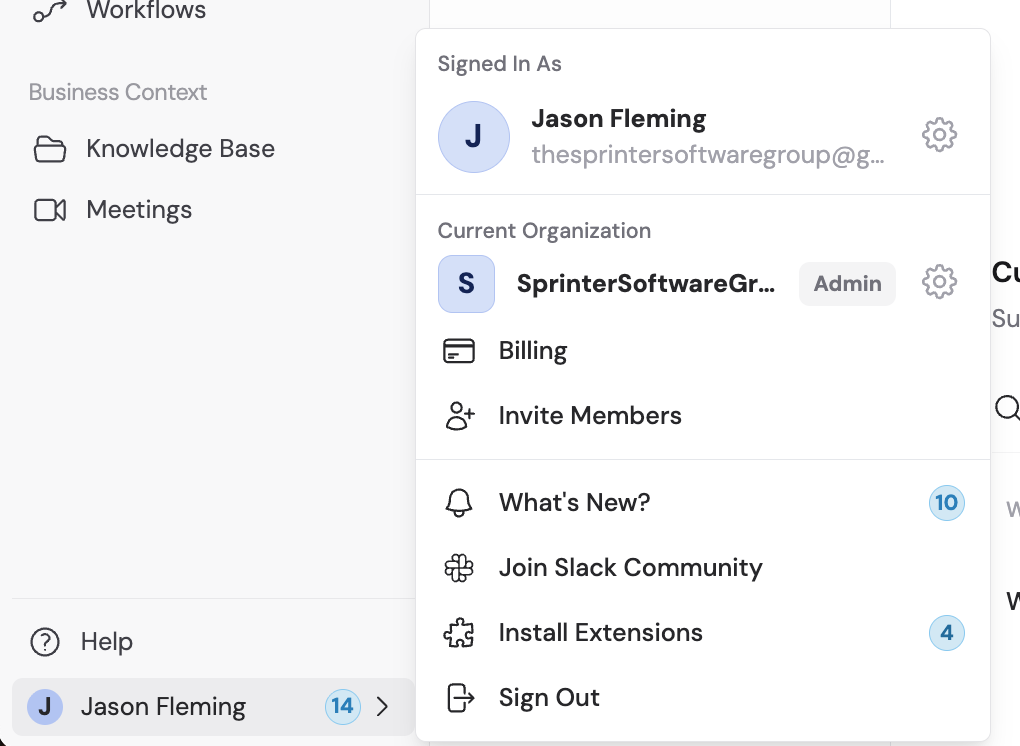
Click your name in the bottom-left sidebar, then click the settings icon next to your name.
Click **Save** to apply the changes.
## Deploy externally
You can run Cassidy Workflows from outside the platform by using webhook triggers and returning results to your external systems.
When [building your Workflow](/workflows/building#configure-the-trigger), select **Webhook** as the trigger type. Copy the unique webhook URL that Cassidy generates.
Set up your website, app, or automation tool to send a POST request to the webhook URL when the relevant event occurs (e.g., a form submission or a record update).
You have two options for sending results back:
* **Return results from webhook** -- toggle this option in the Webhook trigger settings. The Workflow's output is automatically returned as the HTTP response to the incoming request.
* **Send API Request action** -- add this action at the end of your Workflow to POST results to a specific endpoint in your system. This gives you full control over the URL, method, headers, and body.
You can also trigger Workflows from [Slack](/integrations/slack/overview), [Zapier](/integrations/zapier/overview), [inbound email](/reference/triggers/email), or on a schedule -- providing flexibility in how you integrate Cassidy with your existing stack.
## Set up failure notifications
Stay informed when Workflows encounter errors so you can address issues quickly.
Click your name in the bottom-left sidebar, then click the settings icon next to your name.
 In Account Settings, click **Workflow Notifications**.
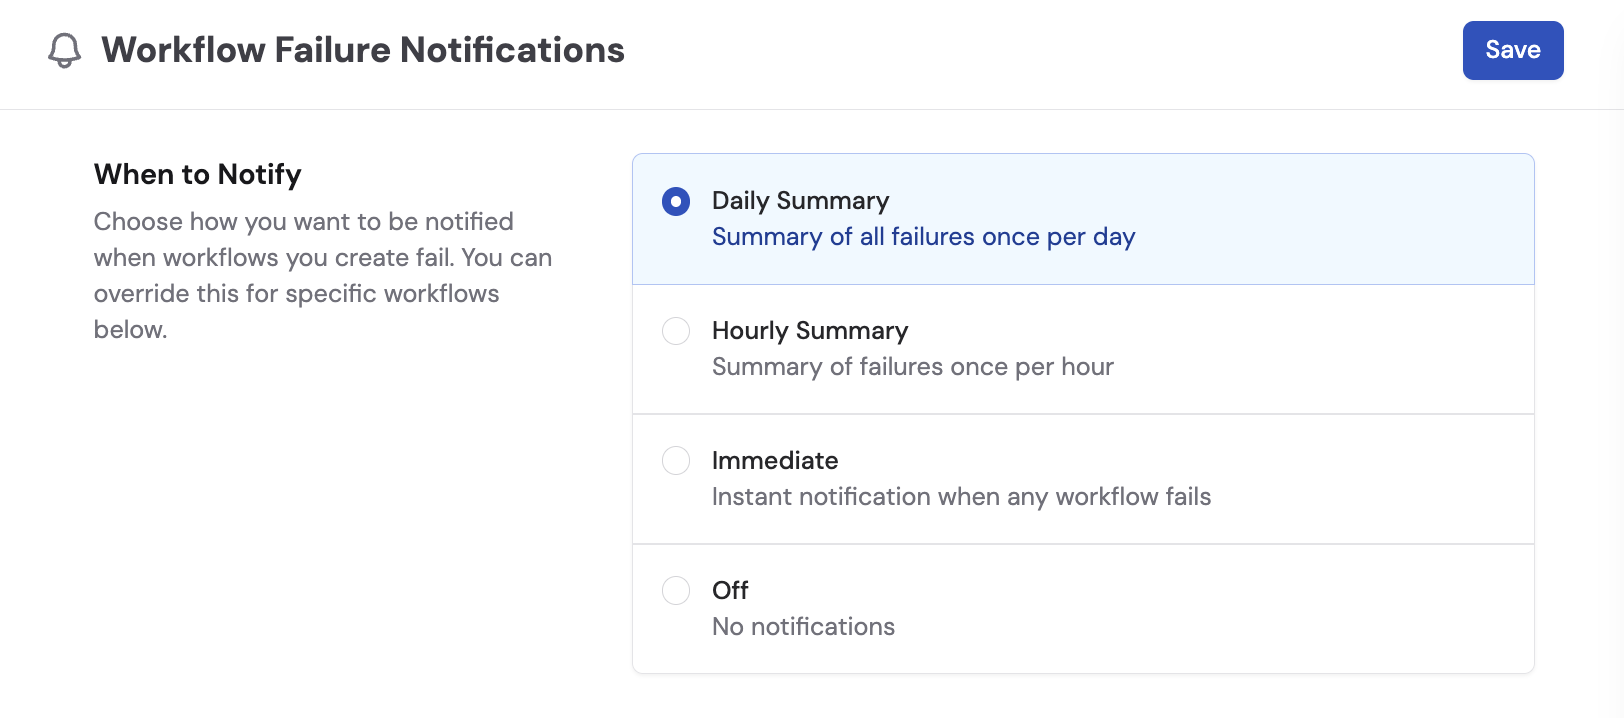 Choose how you want to be notified about failures for Workflows you create:
| Frequency | Description |
| ------------------ | -------------------------------------- |
| **Daily Summary** | One digest of all failures per day |
| **Hourly Summary** | One digest per hour |
| **Immediate** | Instant notification for every failure |
| **Off** | No notifications |
Click **Save** to apply.
To receive alerts for Workflows you did not create, click **+ Add Subscription**.
Choose how you want to be notified about failures for Workflows you create:
| Frequency | Description |
| ------------------ | -------------------------------------- |
| **Daily Summary** | One digest of all failures per day |
| **Hourly Summary** | One digest per hour |
| **Immediate** | Instant notification for every failure |
| **Off** | No notifications |
Click **Save** to apply.
To receive alerts for Workflows you did not create, click **+ Add Subscription**.
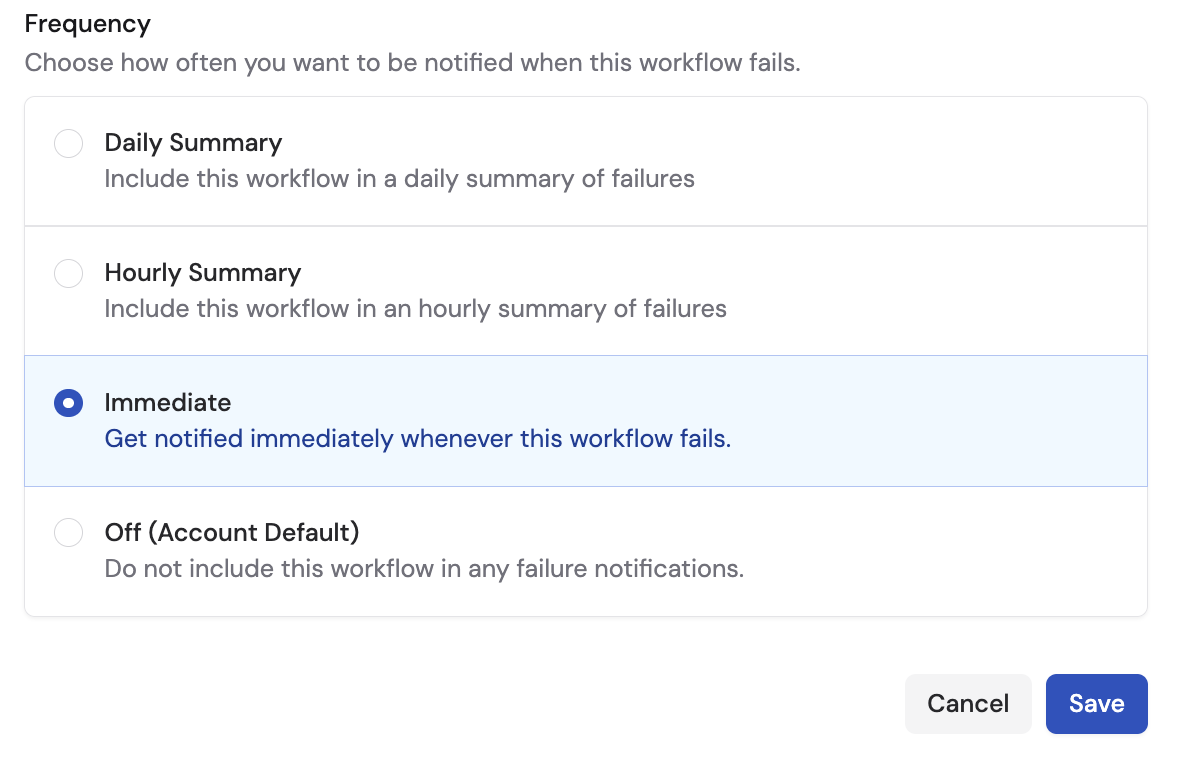 Click the **No workflow selected** dropdown and choose the Workflow you want to be notified about. Select a notification frequency and click **Save**.
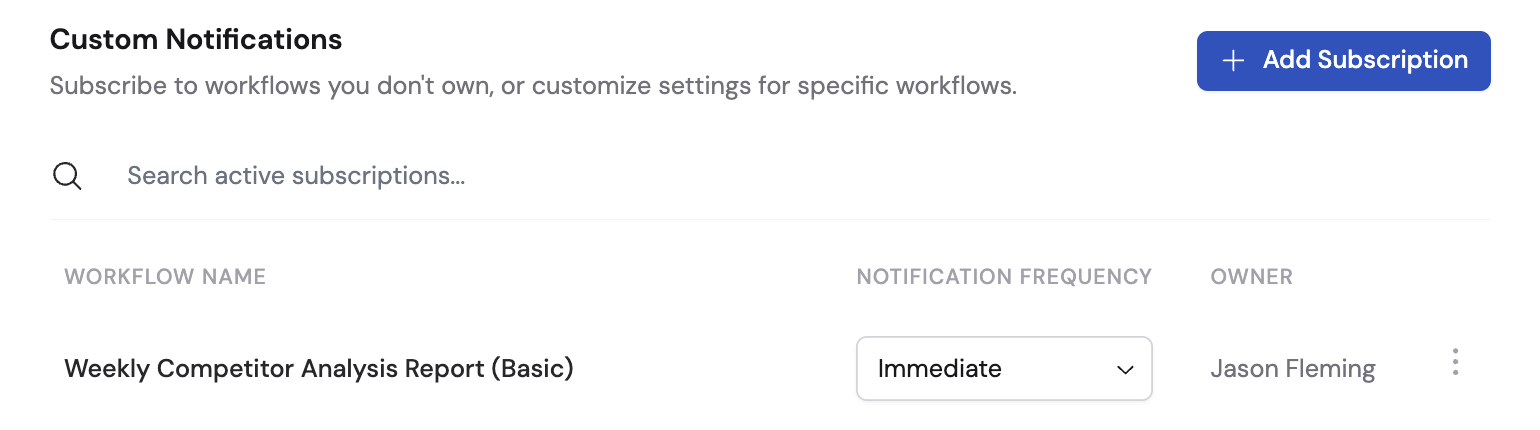
 From the subscriptions list, you can search your active subscriptions, update the notification frequency, or remove subscriptions you no longer need.
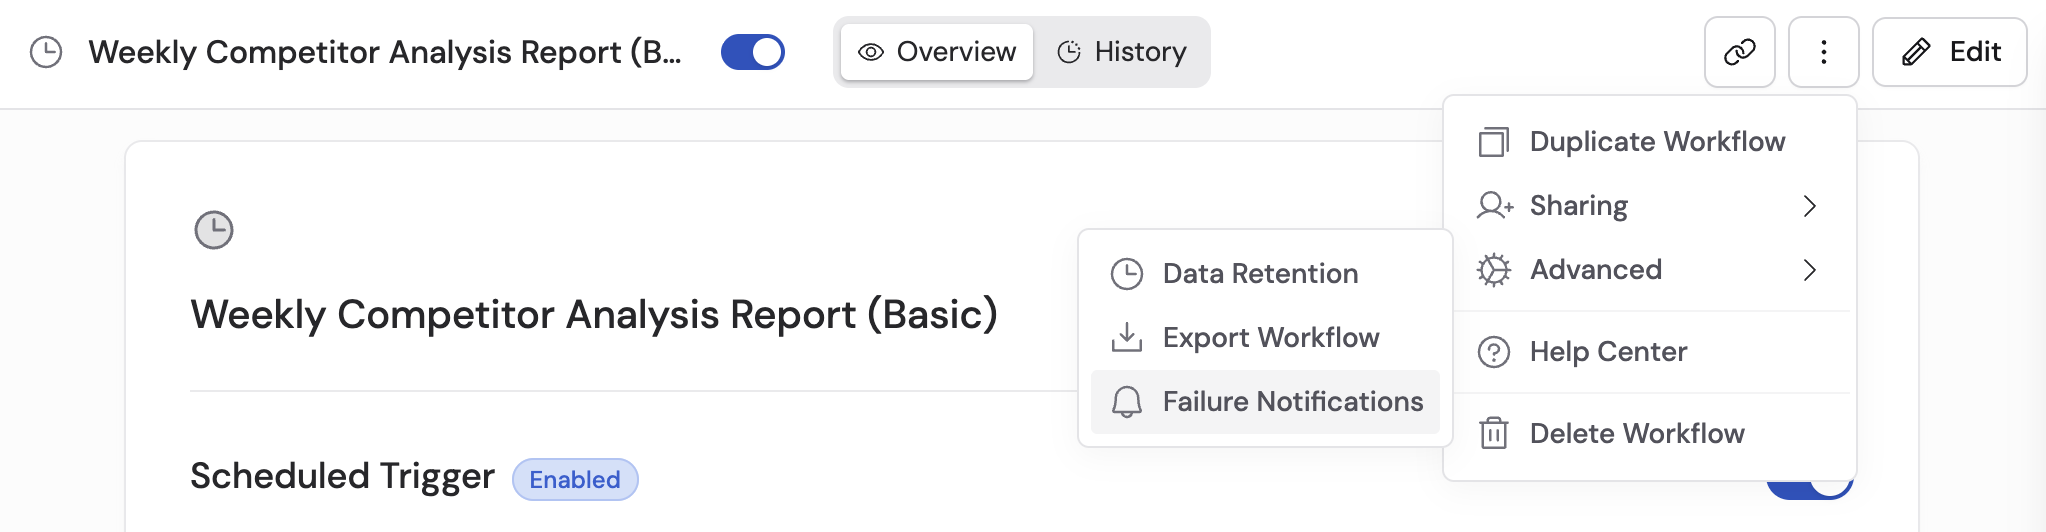
 You can also subscribe to failure notifications directly from within any Workflow by clicking the **...** menu and selecting **Failure Notifications**.
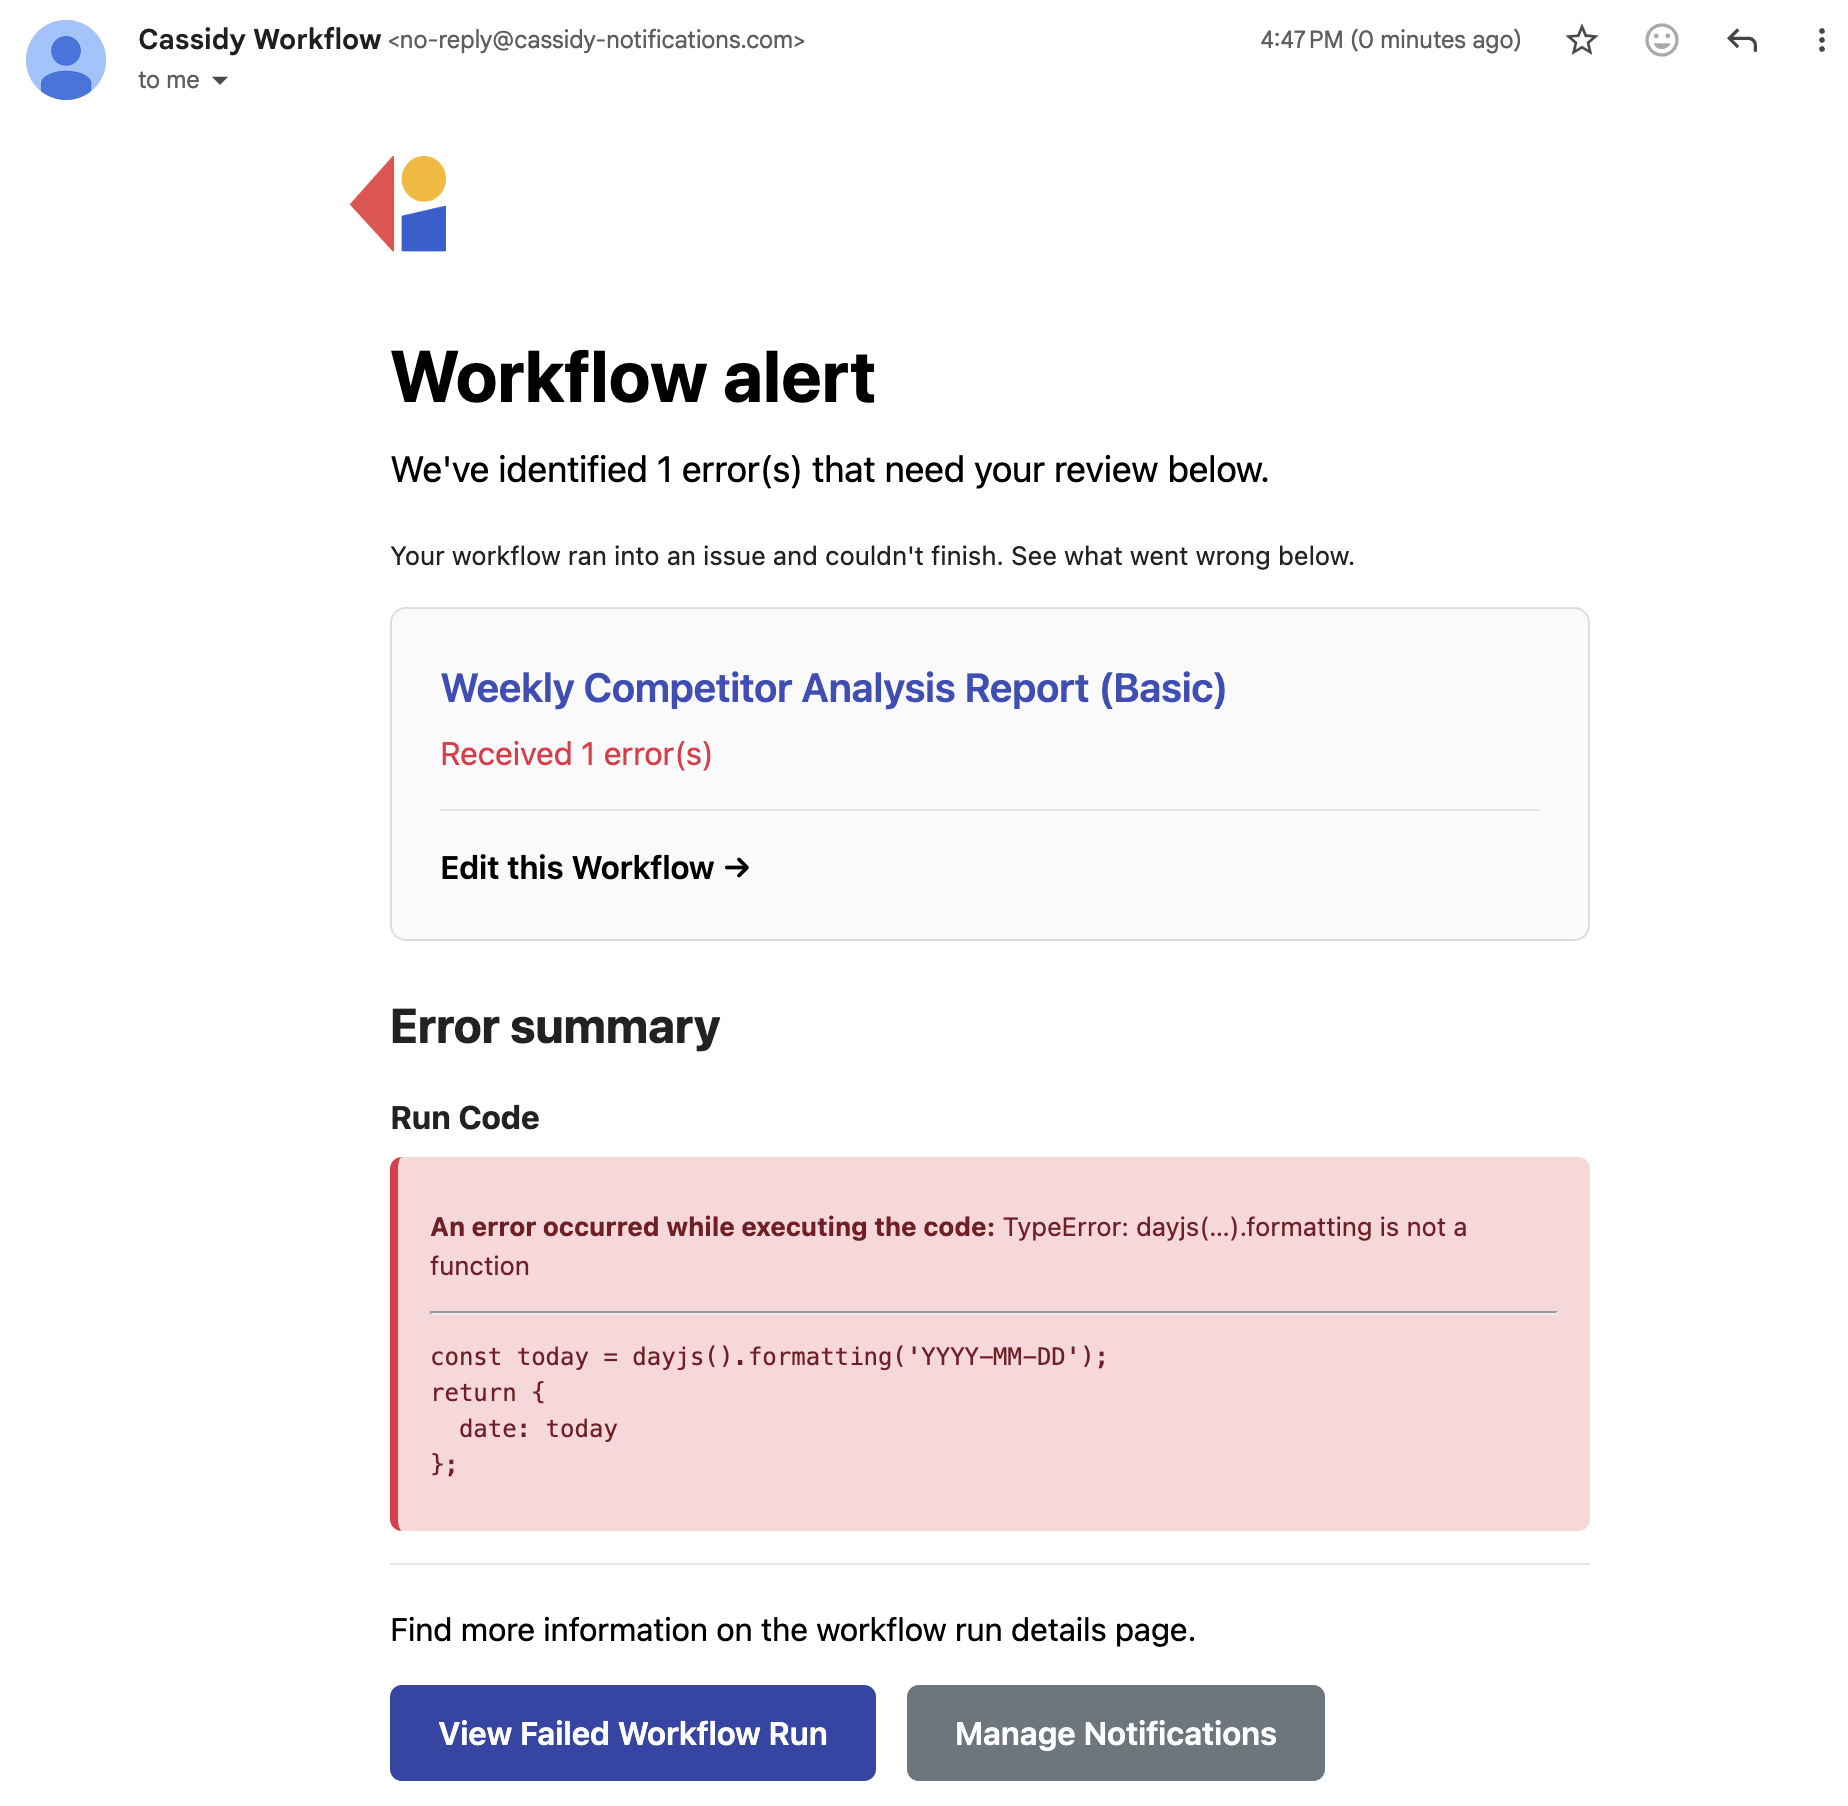
 When a Workflow fails, you receive a **Workflow alert** containing the error details, the affected Workflow name, and an error summary. The notification includes links to **Edit this Workflow** (to fix the issue) and **View Failed Workflow Run** (to inspect the specific run).
 ## Next steps
Control how long Workflow run history is stored.
Securely store API keys and passwords for use in Workflow actions.
Set up teams and roles to streamline Workflow permissions.
Go back to creating and configuring Workflows.
## Next steps
Control how long Workflow run history is stored.
Securely store API keys and passwords for use in Workflow actions.
Set up teams and roles to streamline Workflow permissions.
Go back to creating and configuring Workflows.